Posted in: Exploring Ohio, School, Sightseeing

Mercantile Library

When I was searching for unique things to do, this came up on my list. I used to work in downtown Cincinnati for years and did not know the Mercantile Library was there!

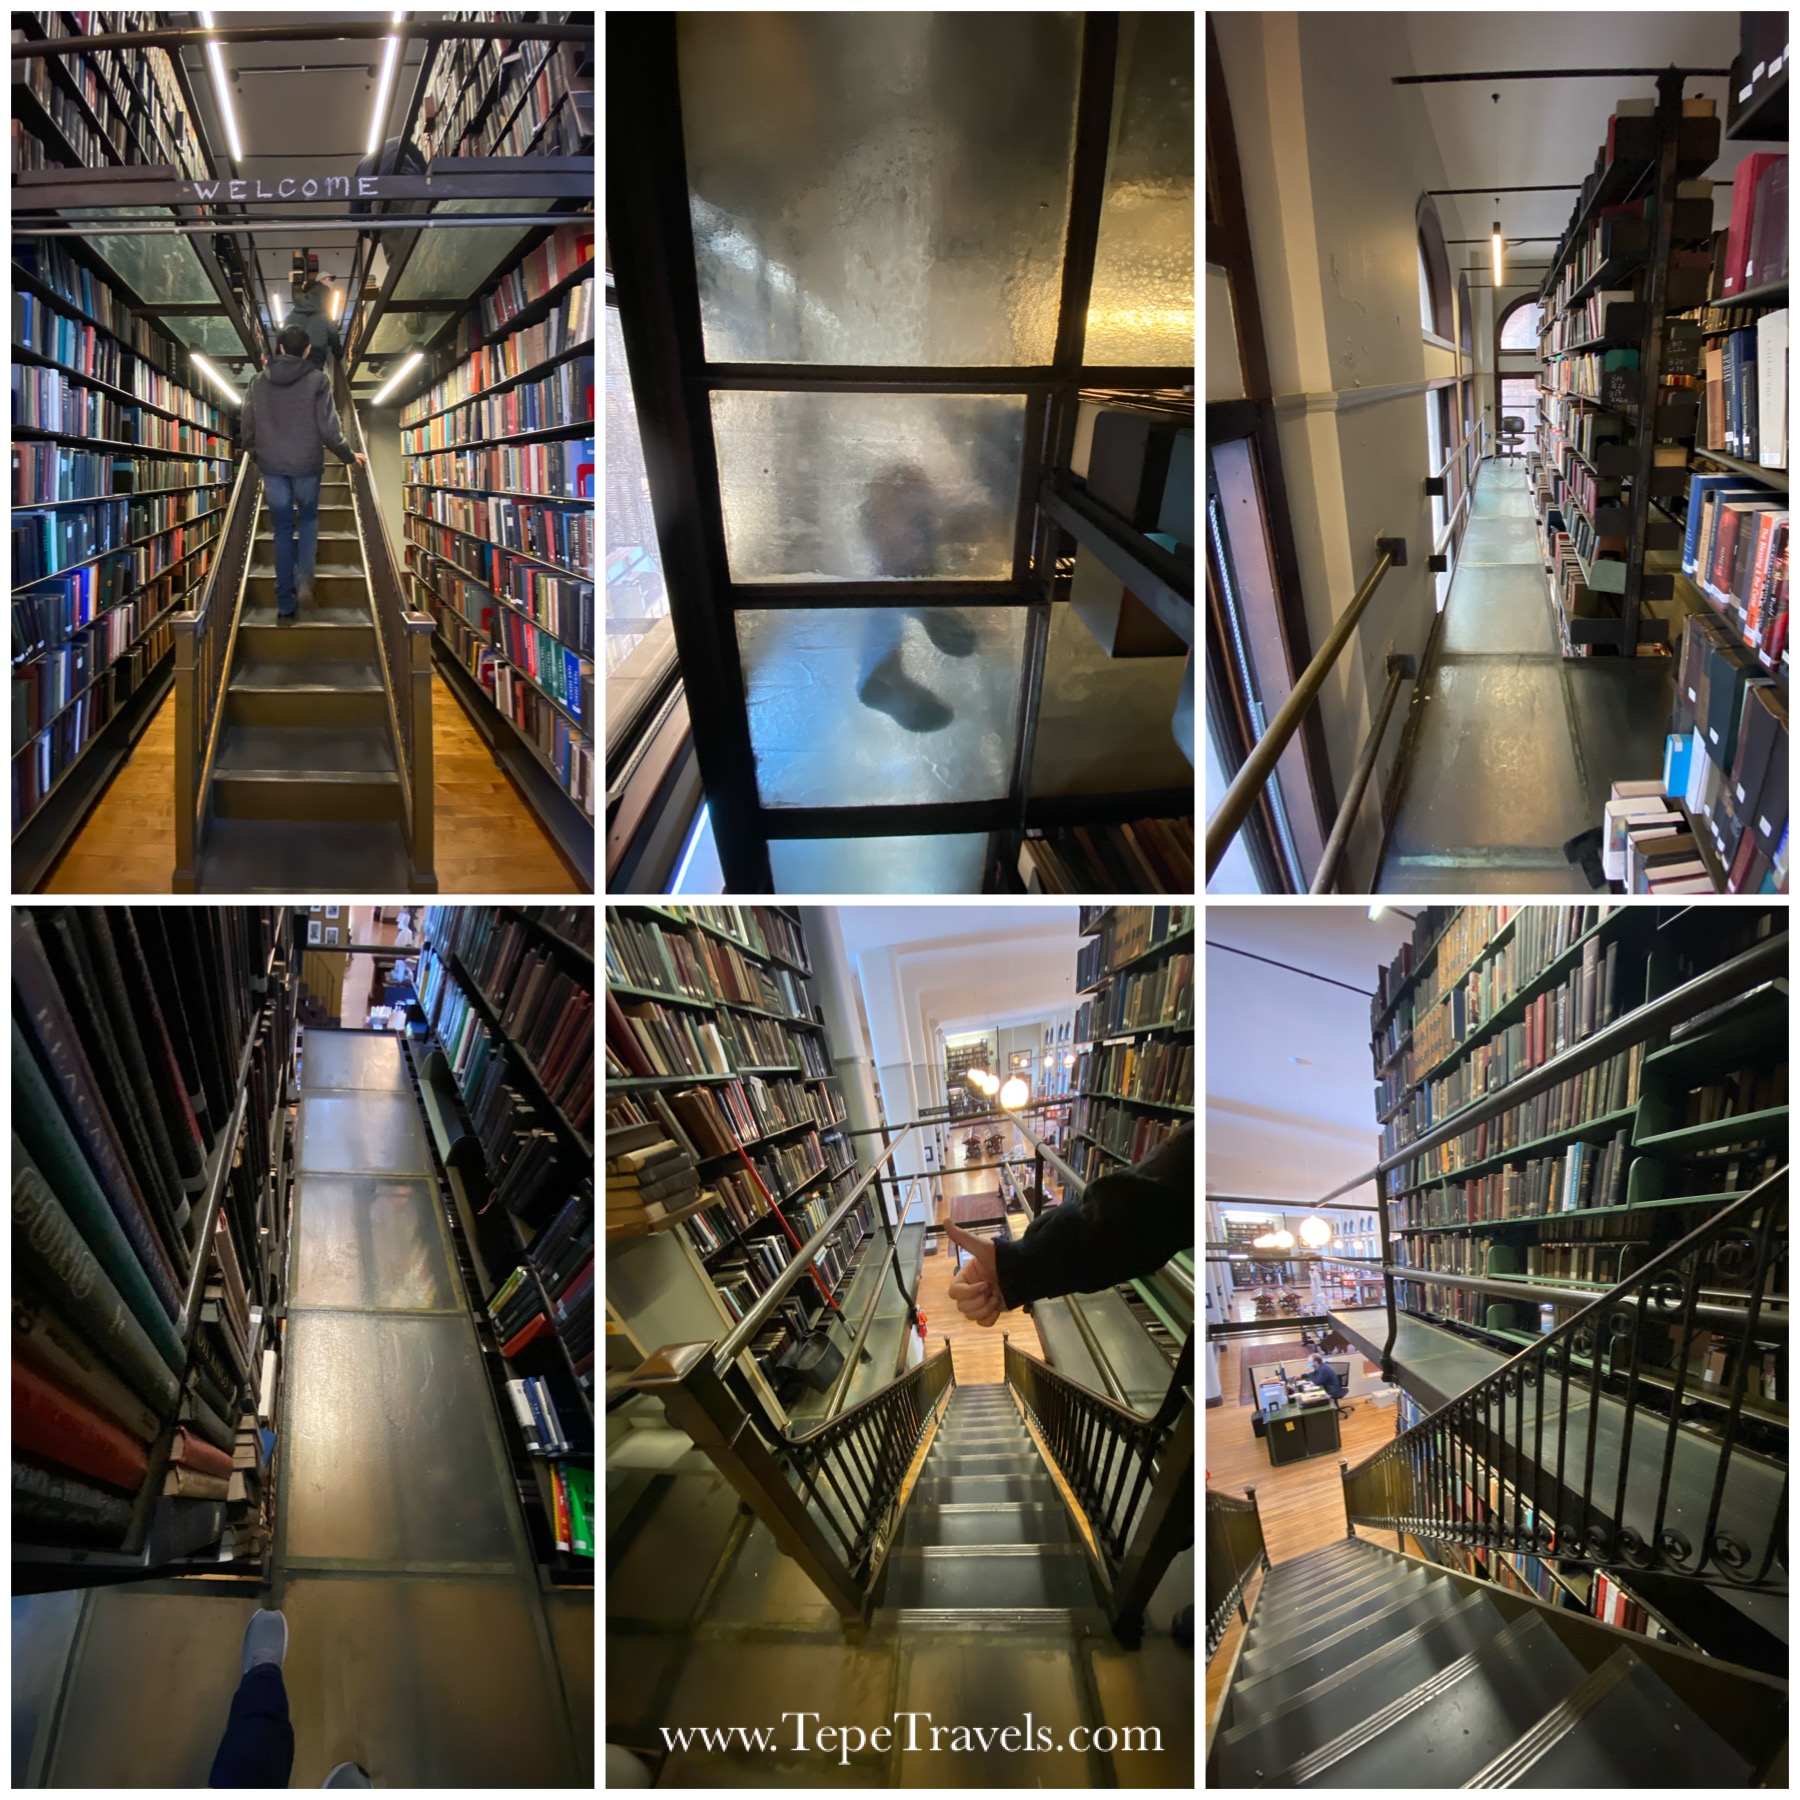
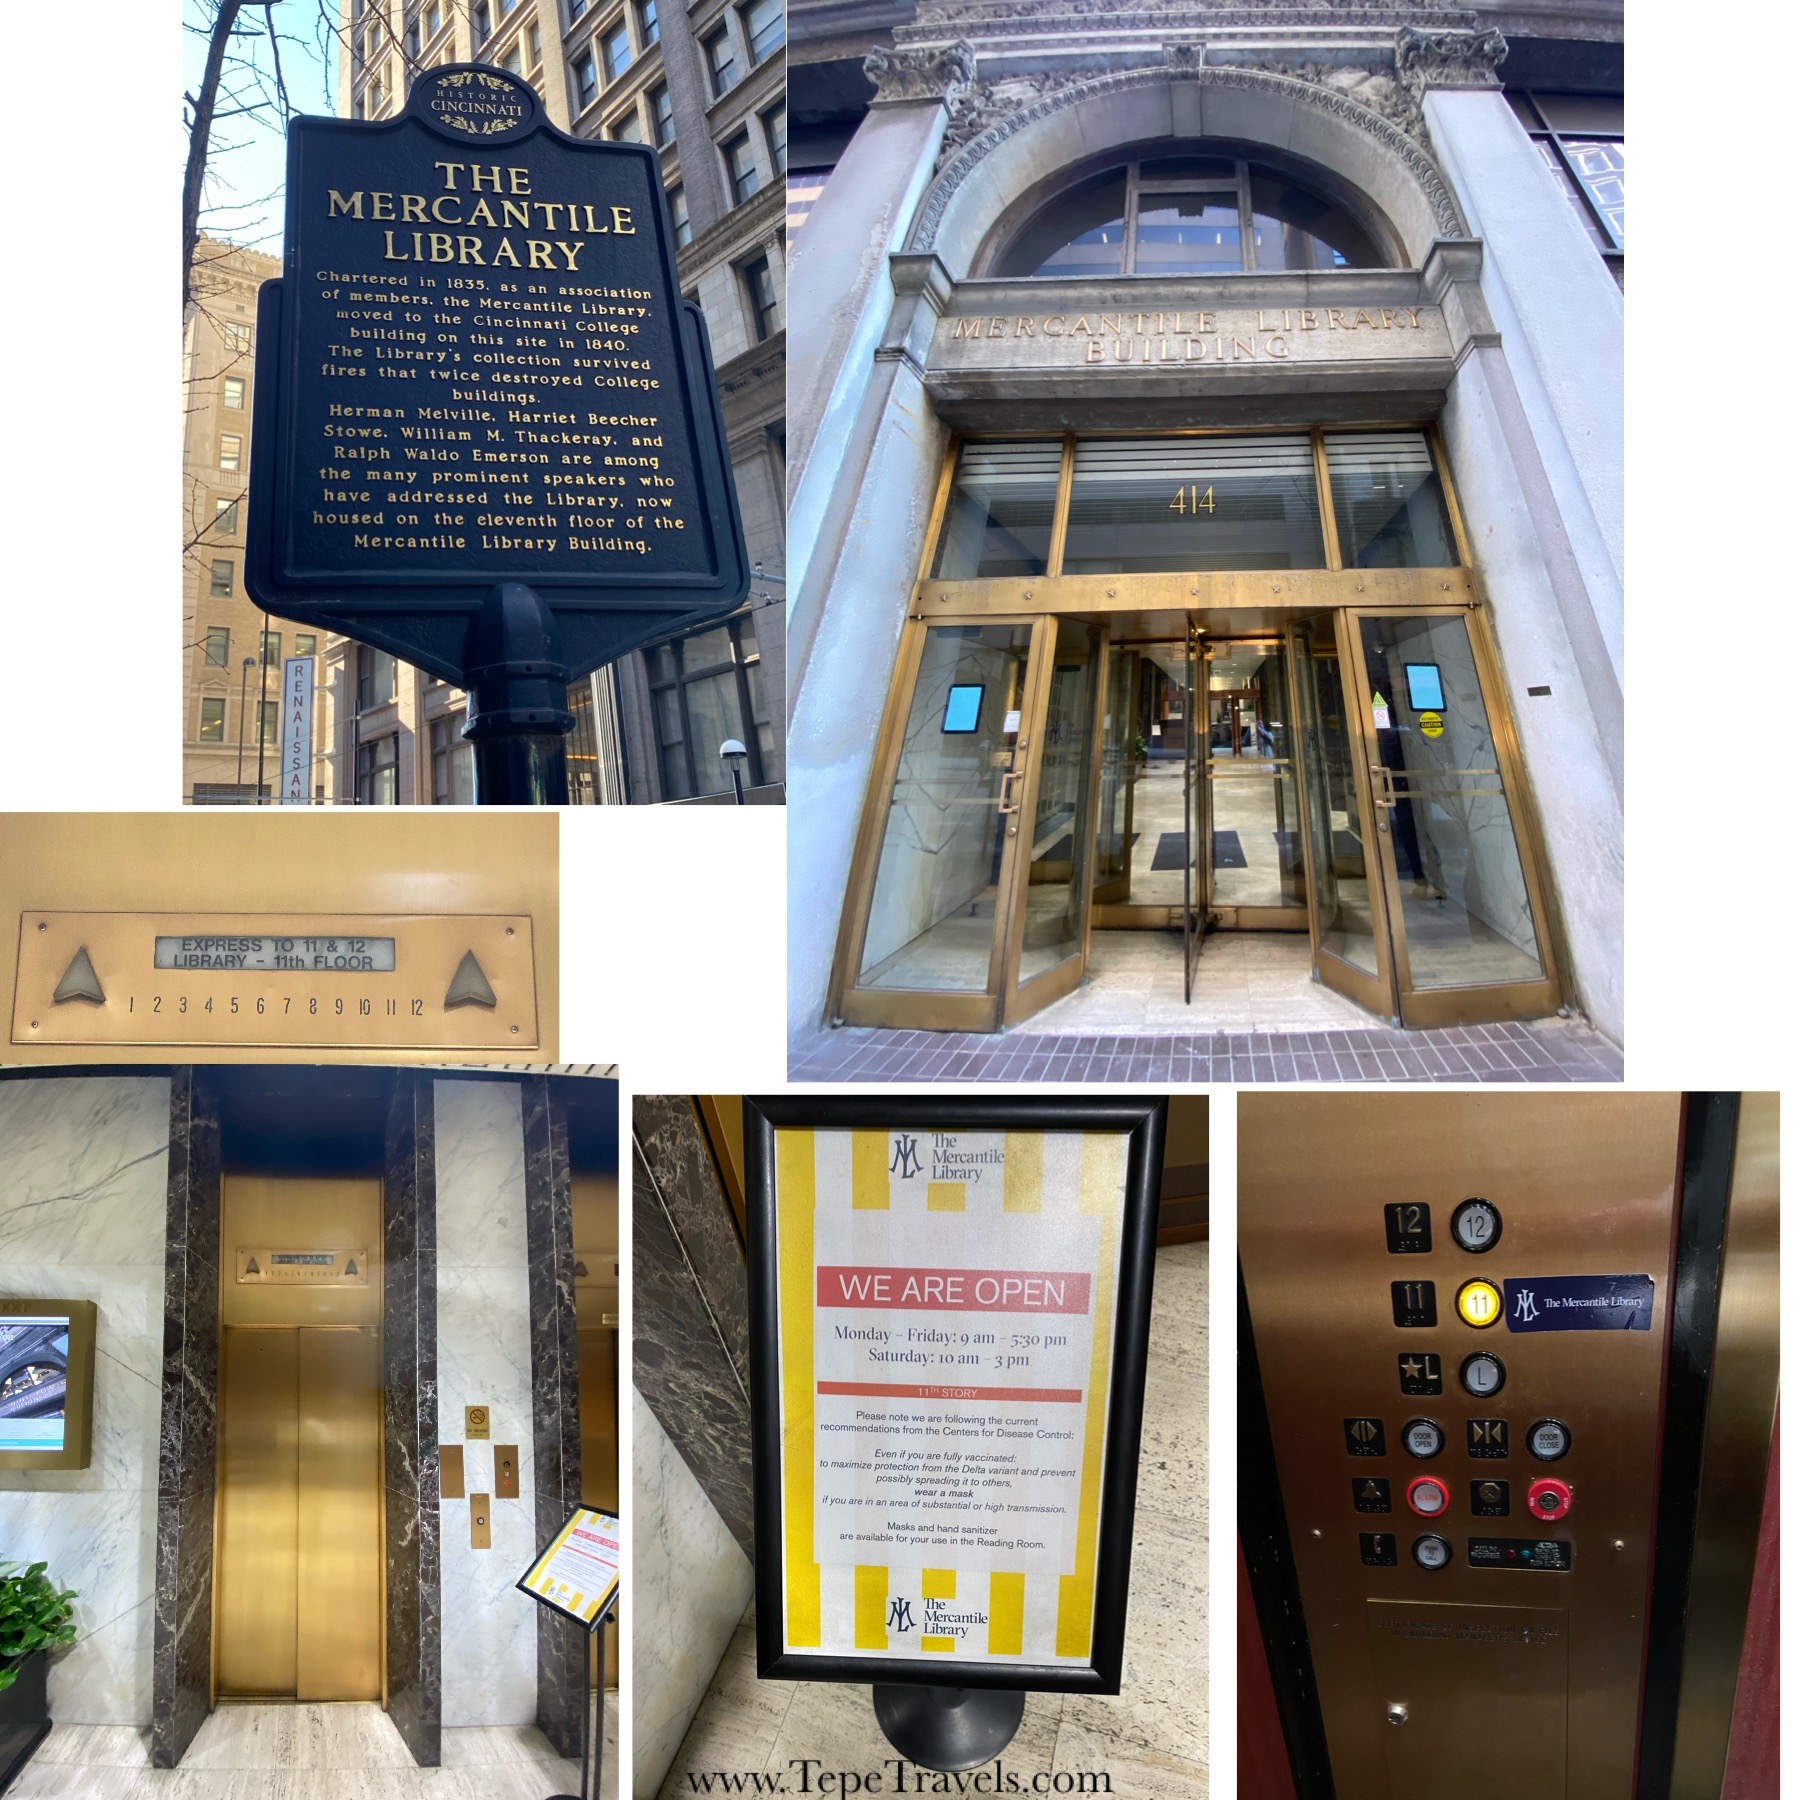
This Library is in an older building from the 1800s and is located on the 11th floor. (Don’t worry, there is an elevator going up to the Library.). There is paid parking available on the street or in nearby parking garages.

Click to Enlarge

This not a public library. That’s right, I said NOT a public library. It is a membership/subscription library. Annual dues are $65 (For an individual. There are several different membership options available.) This library began in 1835, created by a group of local merchants. They shared their books and funded the library with their own money. They eventually rented space in the Cincinnati College building. After a fire in 1845, the group pulled together to raise $10,000 to help rebuild the building, and in return the Library was given a 10,000 year lease.

I love older buildings; there is almost always something interesting about them. The library had a tiled floor entry, neat architectural details, and a spiral staircase. (I am a sucker for spiral staircases.) The second story on the right hand side had glass walkways! The building still had the old style US Mail Chute in the walls.

The Library doors open to a nice area with seating and select books displayed. To the right is the service desk, a bathroom, the spiral staircase leading to a meeting room, and a flight of stairs leading to a second story of books. To the left is additional seating, books behind glass door cases, and another flight of stairs leading to a second story of books. Some of these books were old, some were new. There were books I never heard of. There were also books I don’t think the public library would have (i.e. a section on the occult).

It was so quiet! There were only a few other people there, but they all were quiet while they read or worked on their laptops. I would not say that it is a younger child friendly library. There were no children’s books that we could see. However, on the plus side, it is a place where you could go to relax and read or get some work done. There were windows everywhere letting in light and views of downtown.

If you are in the downtown Cincinnati, Ohio area, check out this library treasure. It was a neat space and is a great piece of history. I never really thought about the history of libraries before. They were all funded by local taxes to become public libraries.

DETAILS:

  • WHERE: 414 Walnut St., Cincinnati Ohio 45202
  • COSTS: Free to Visit. Memberships begin at $30 for students. Individual memberships are $65, Household Membership $110. There are other membership packages as well.
  • HOURS: MONDAY-FRIDAY 9:00AM to 5:30PM, SATURDAY 10:00AM to 3:00PM
  • PARKING: On street (paid) or parking garage (paid)
  • BATHROOM: Yes (1)
  • TIME RECOMMENDED: 1+hours
  • COVID RESTRICTIONS: Masks required as of January 2022
  • *Details correct at the time of posting, but please double check before you go.

Posted in: Exploring Ohio, Holidays, Museums & Tours, School, Sightseeing

Visiting the National Underground Railroad Freedom Center

Happy Martin Luther King Jr. Day.

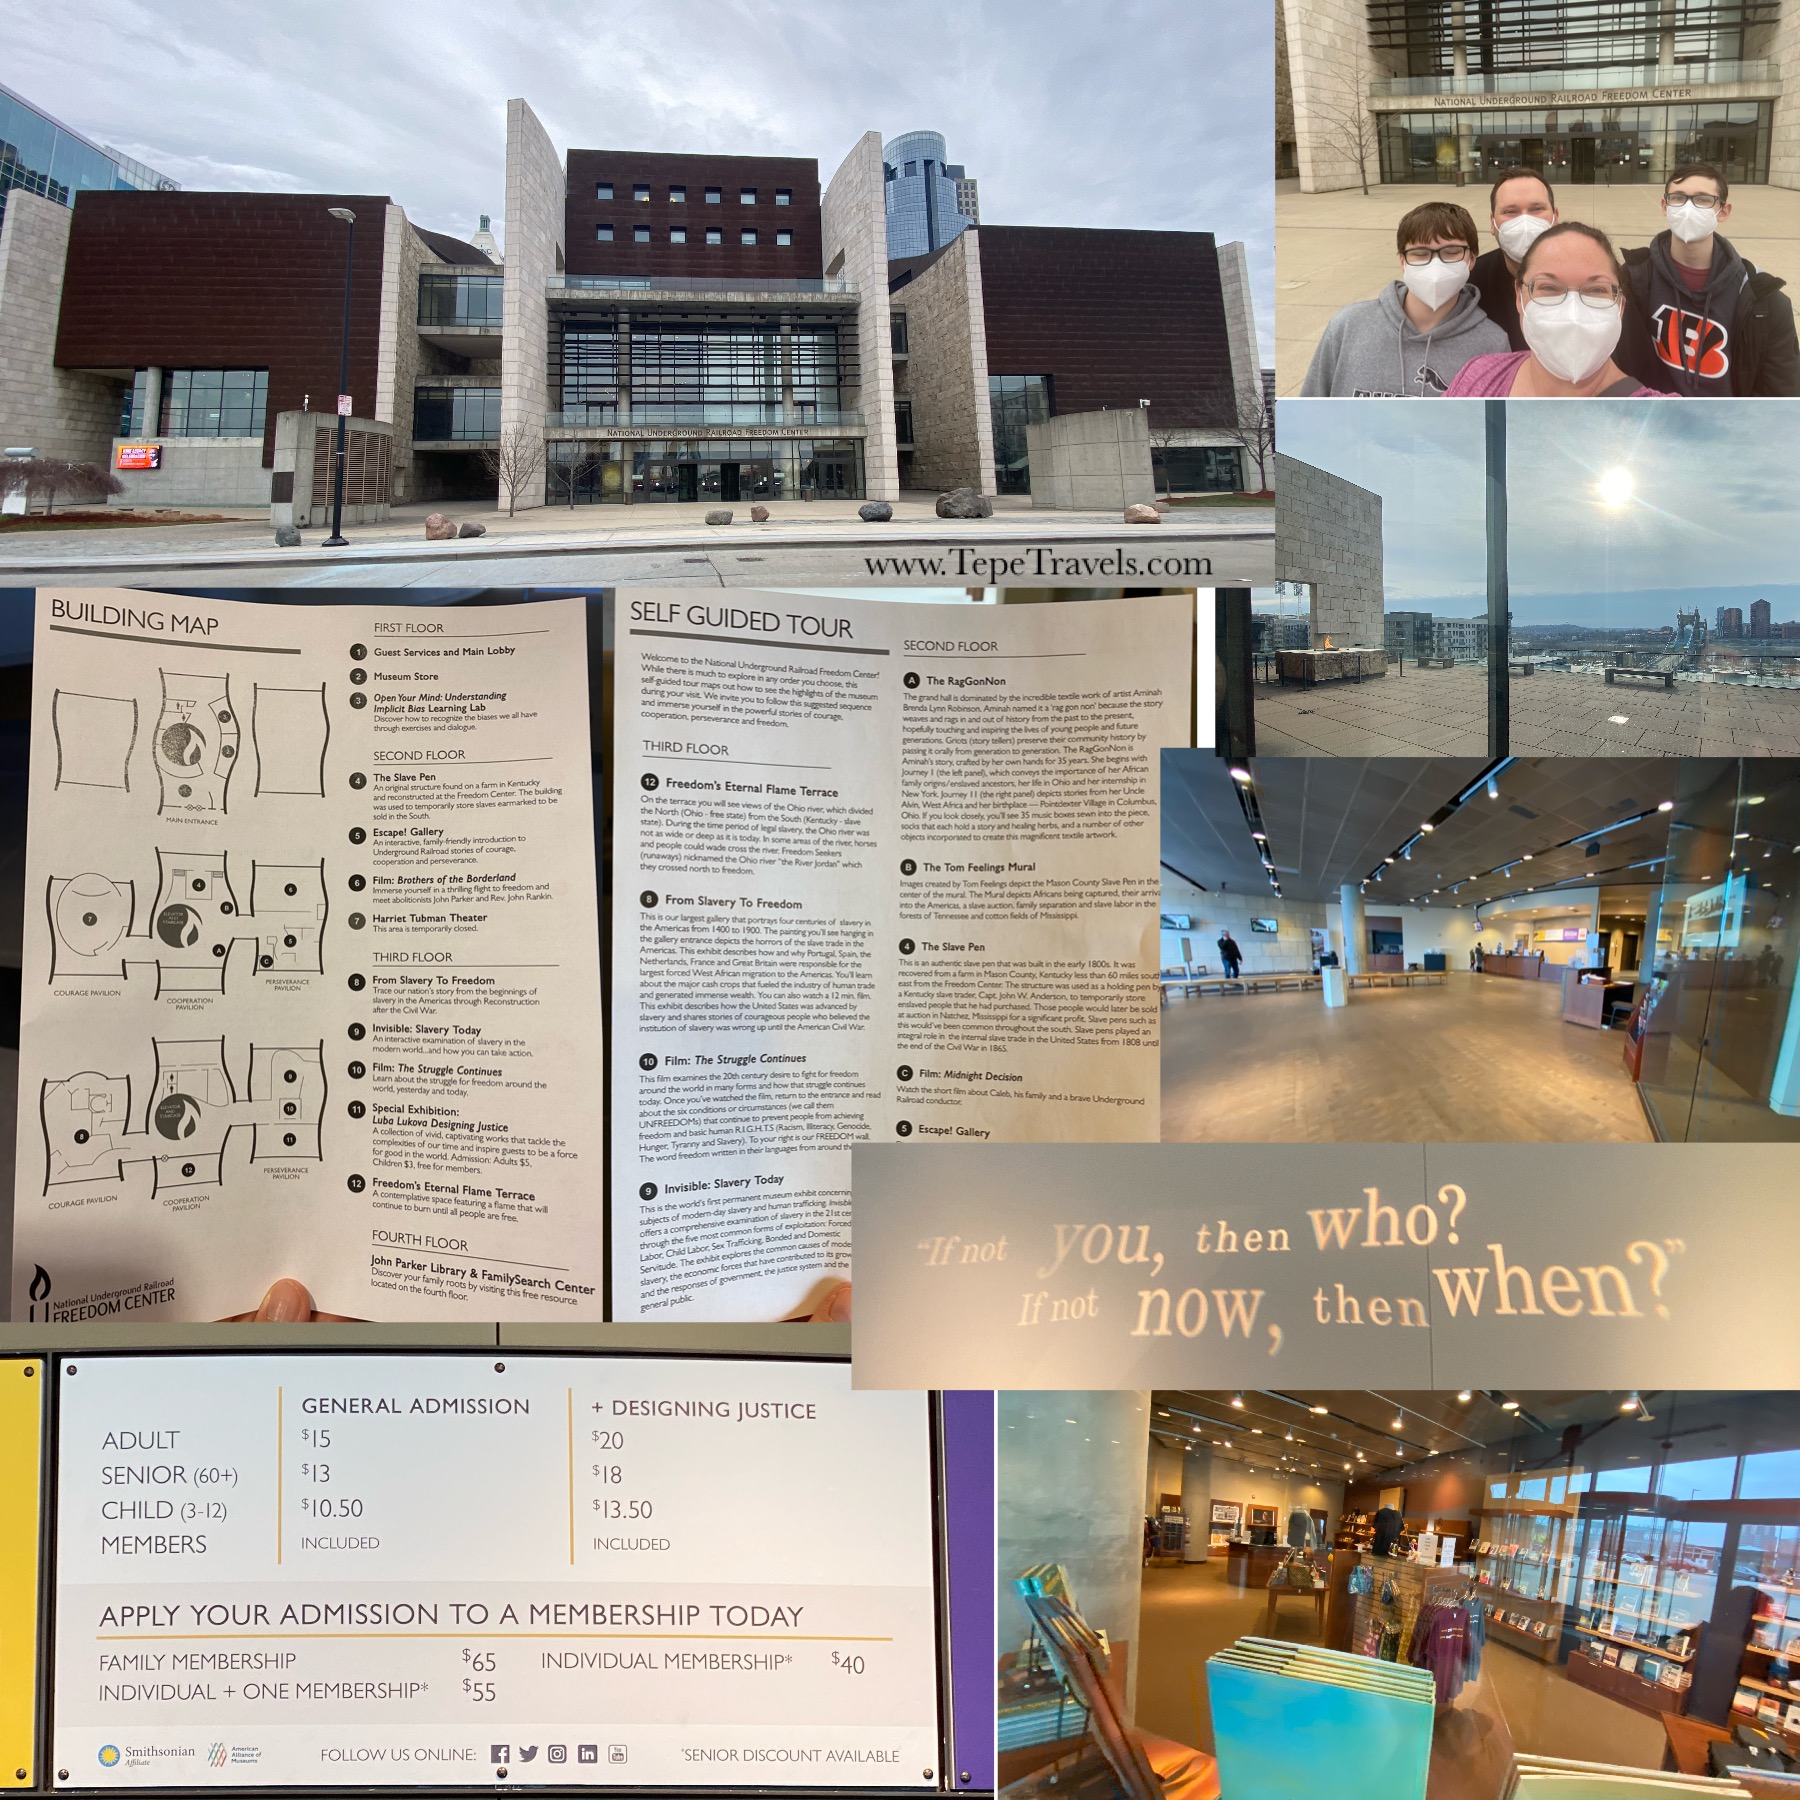
We went to the National Underground Railroad Freedom Center yesterday.

They have free admission on 1/17/22 for MLK Day, but we were worried it would be too crowded, so we went the Sunday before.

Click to Enlarge

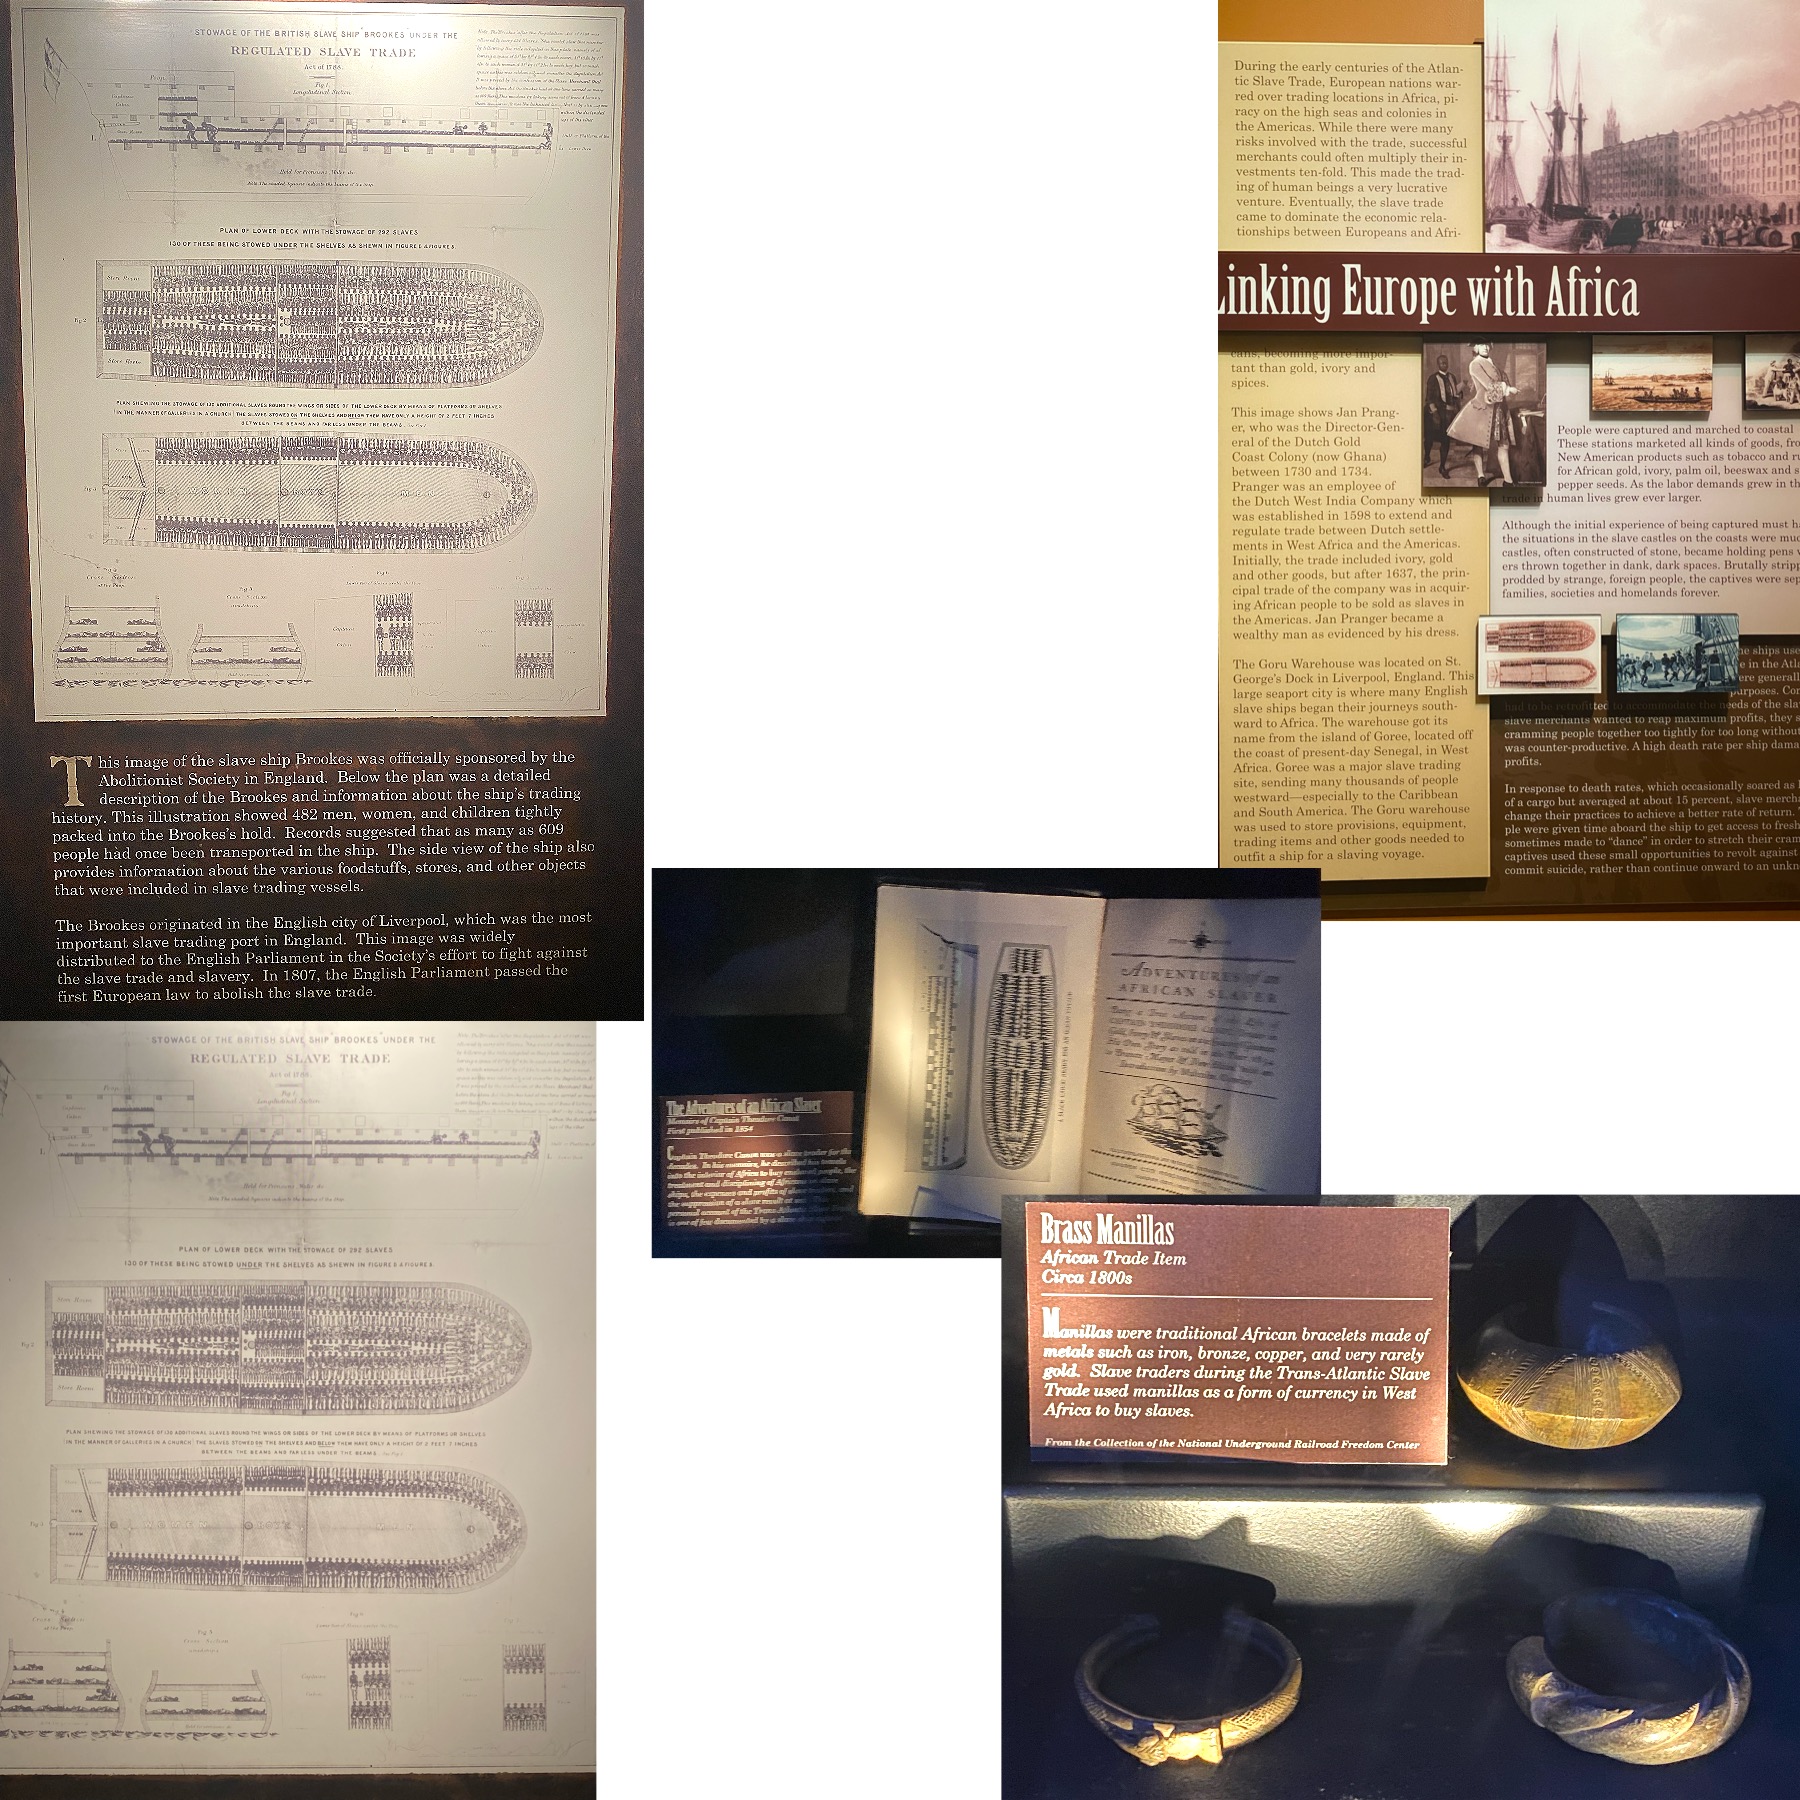
“Those that fail to learn from history are doomed to repeat it.”, Winston Churchill wrote. Everyone has a bias, even the history books and museums; we wanted to expand the kids’ views and to expose them to all different views of history so that they could learn, research, think for themselves, and listen to all points of view. Each museum has been a different experience, so we weren’t quite sure what to expect of the Freedom Center.

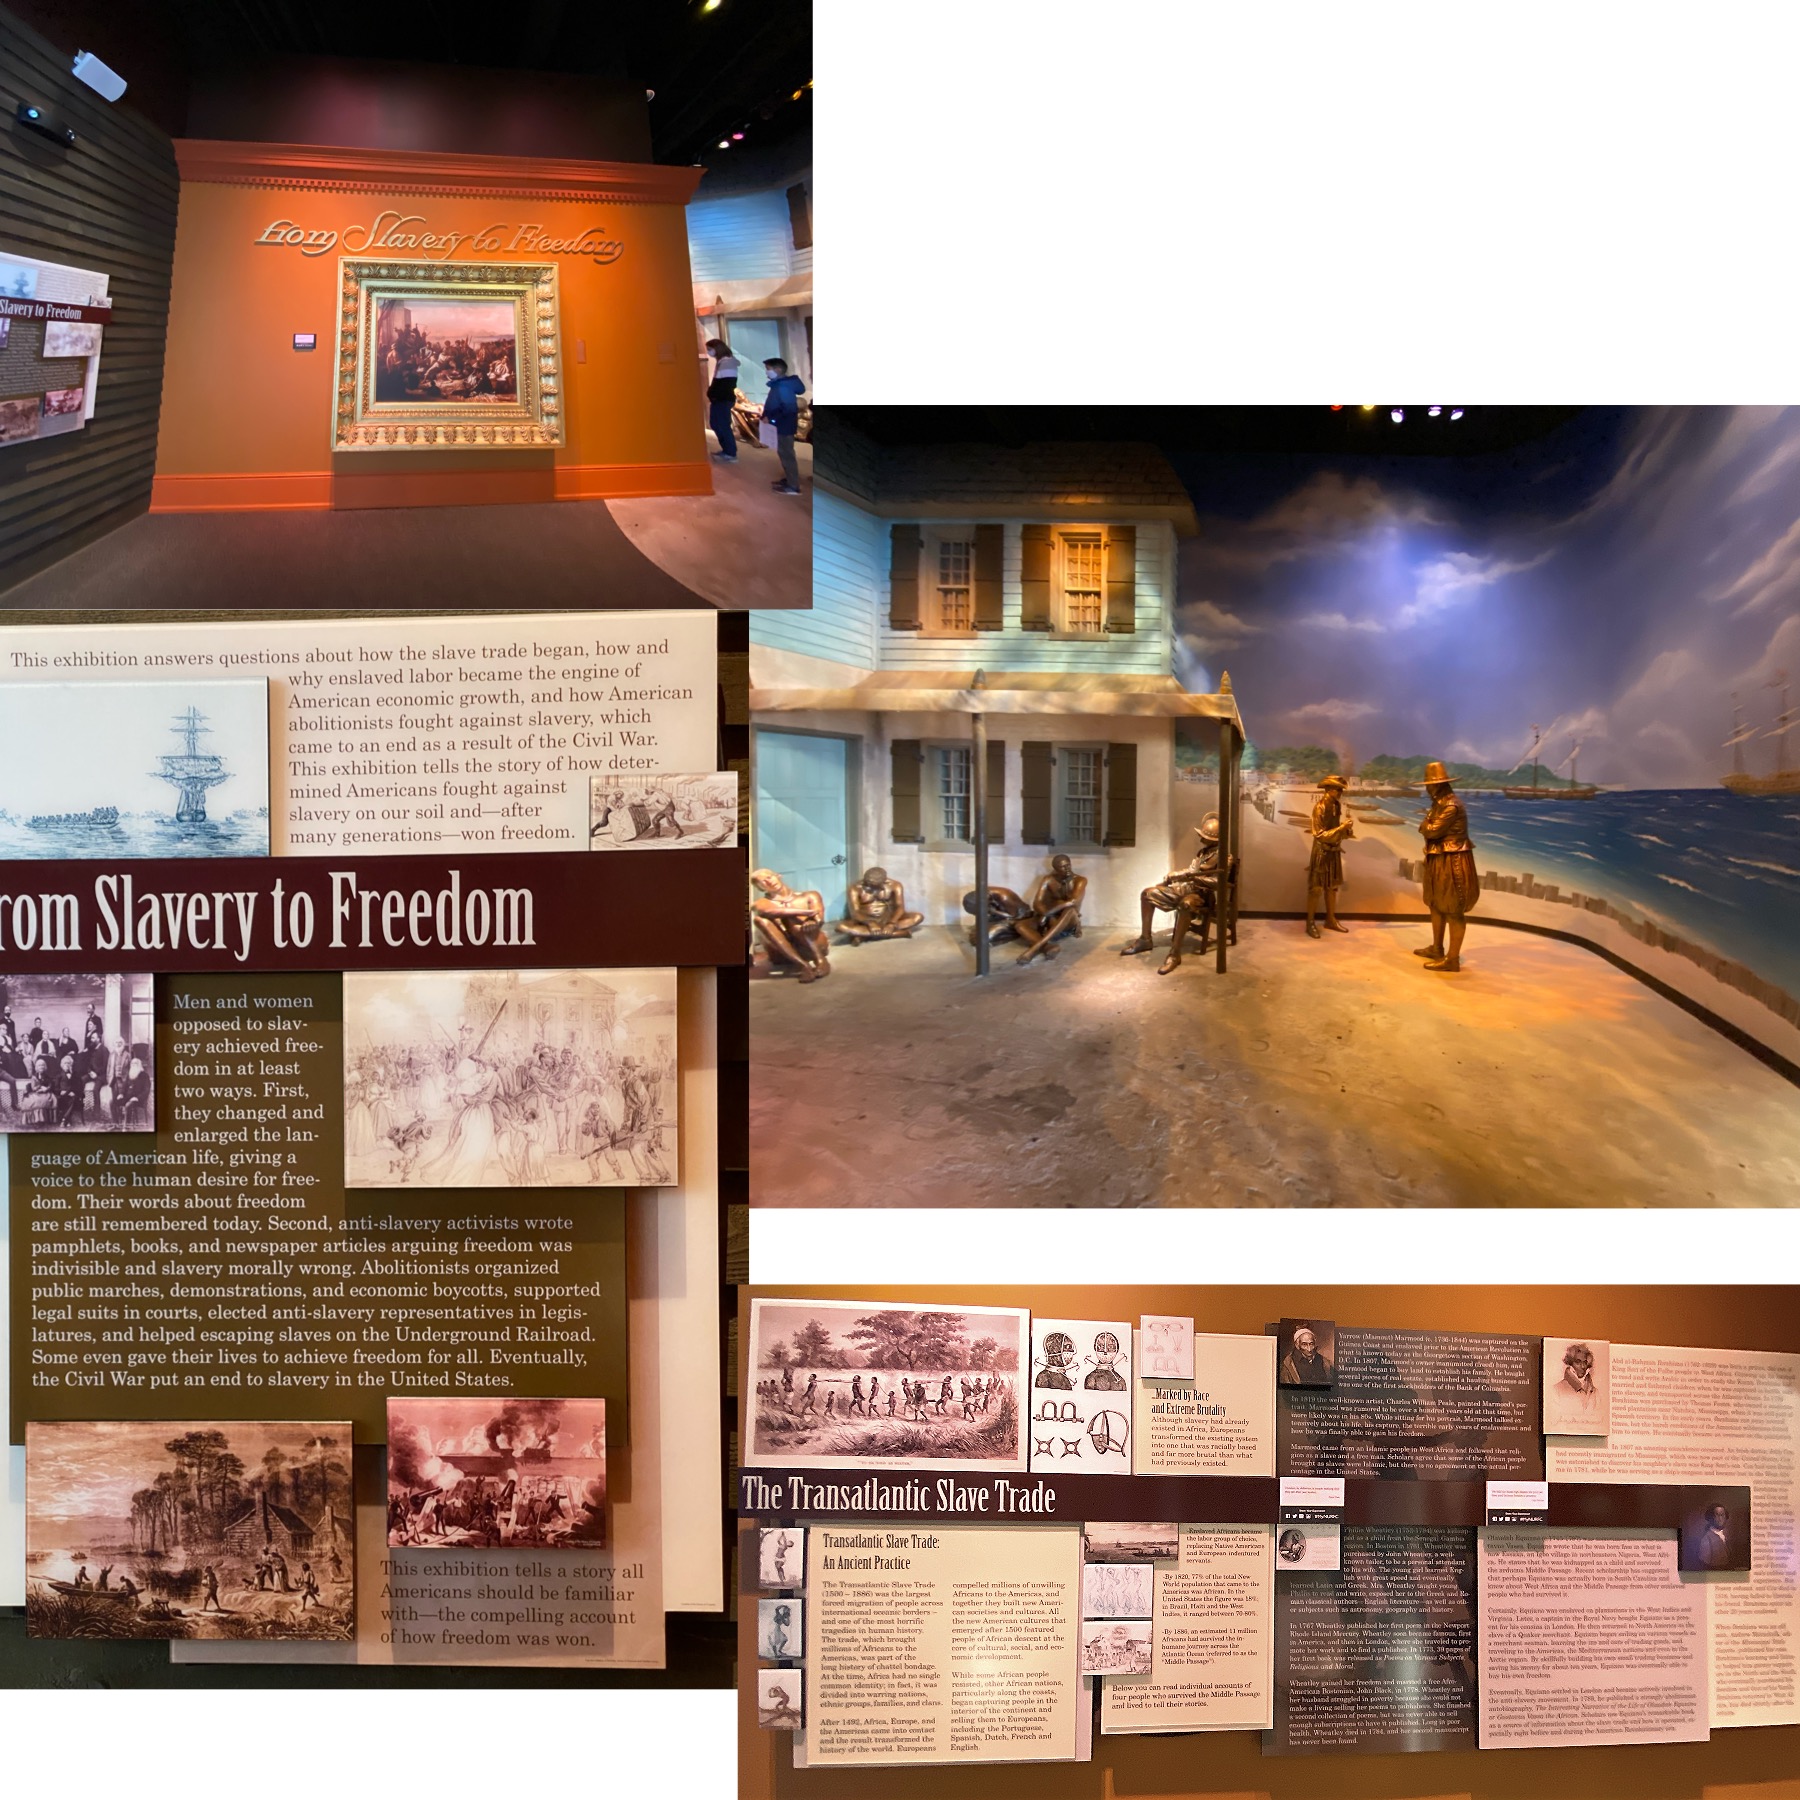
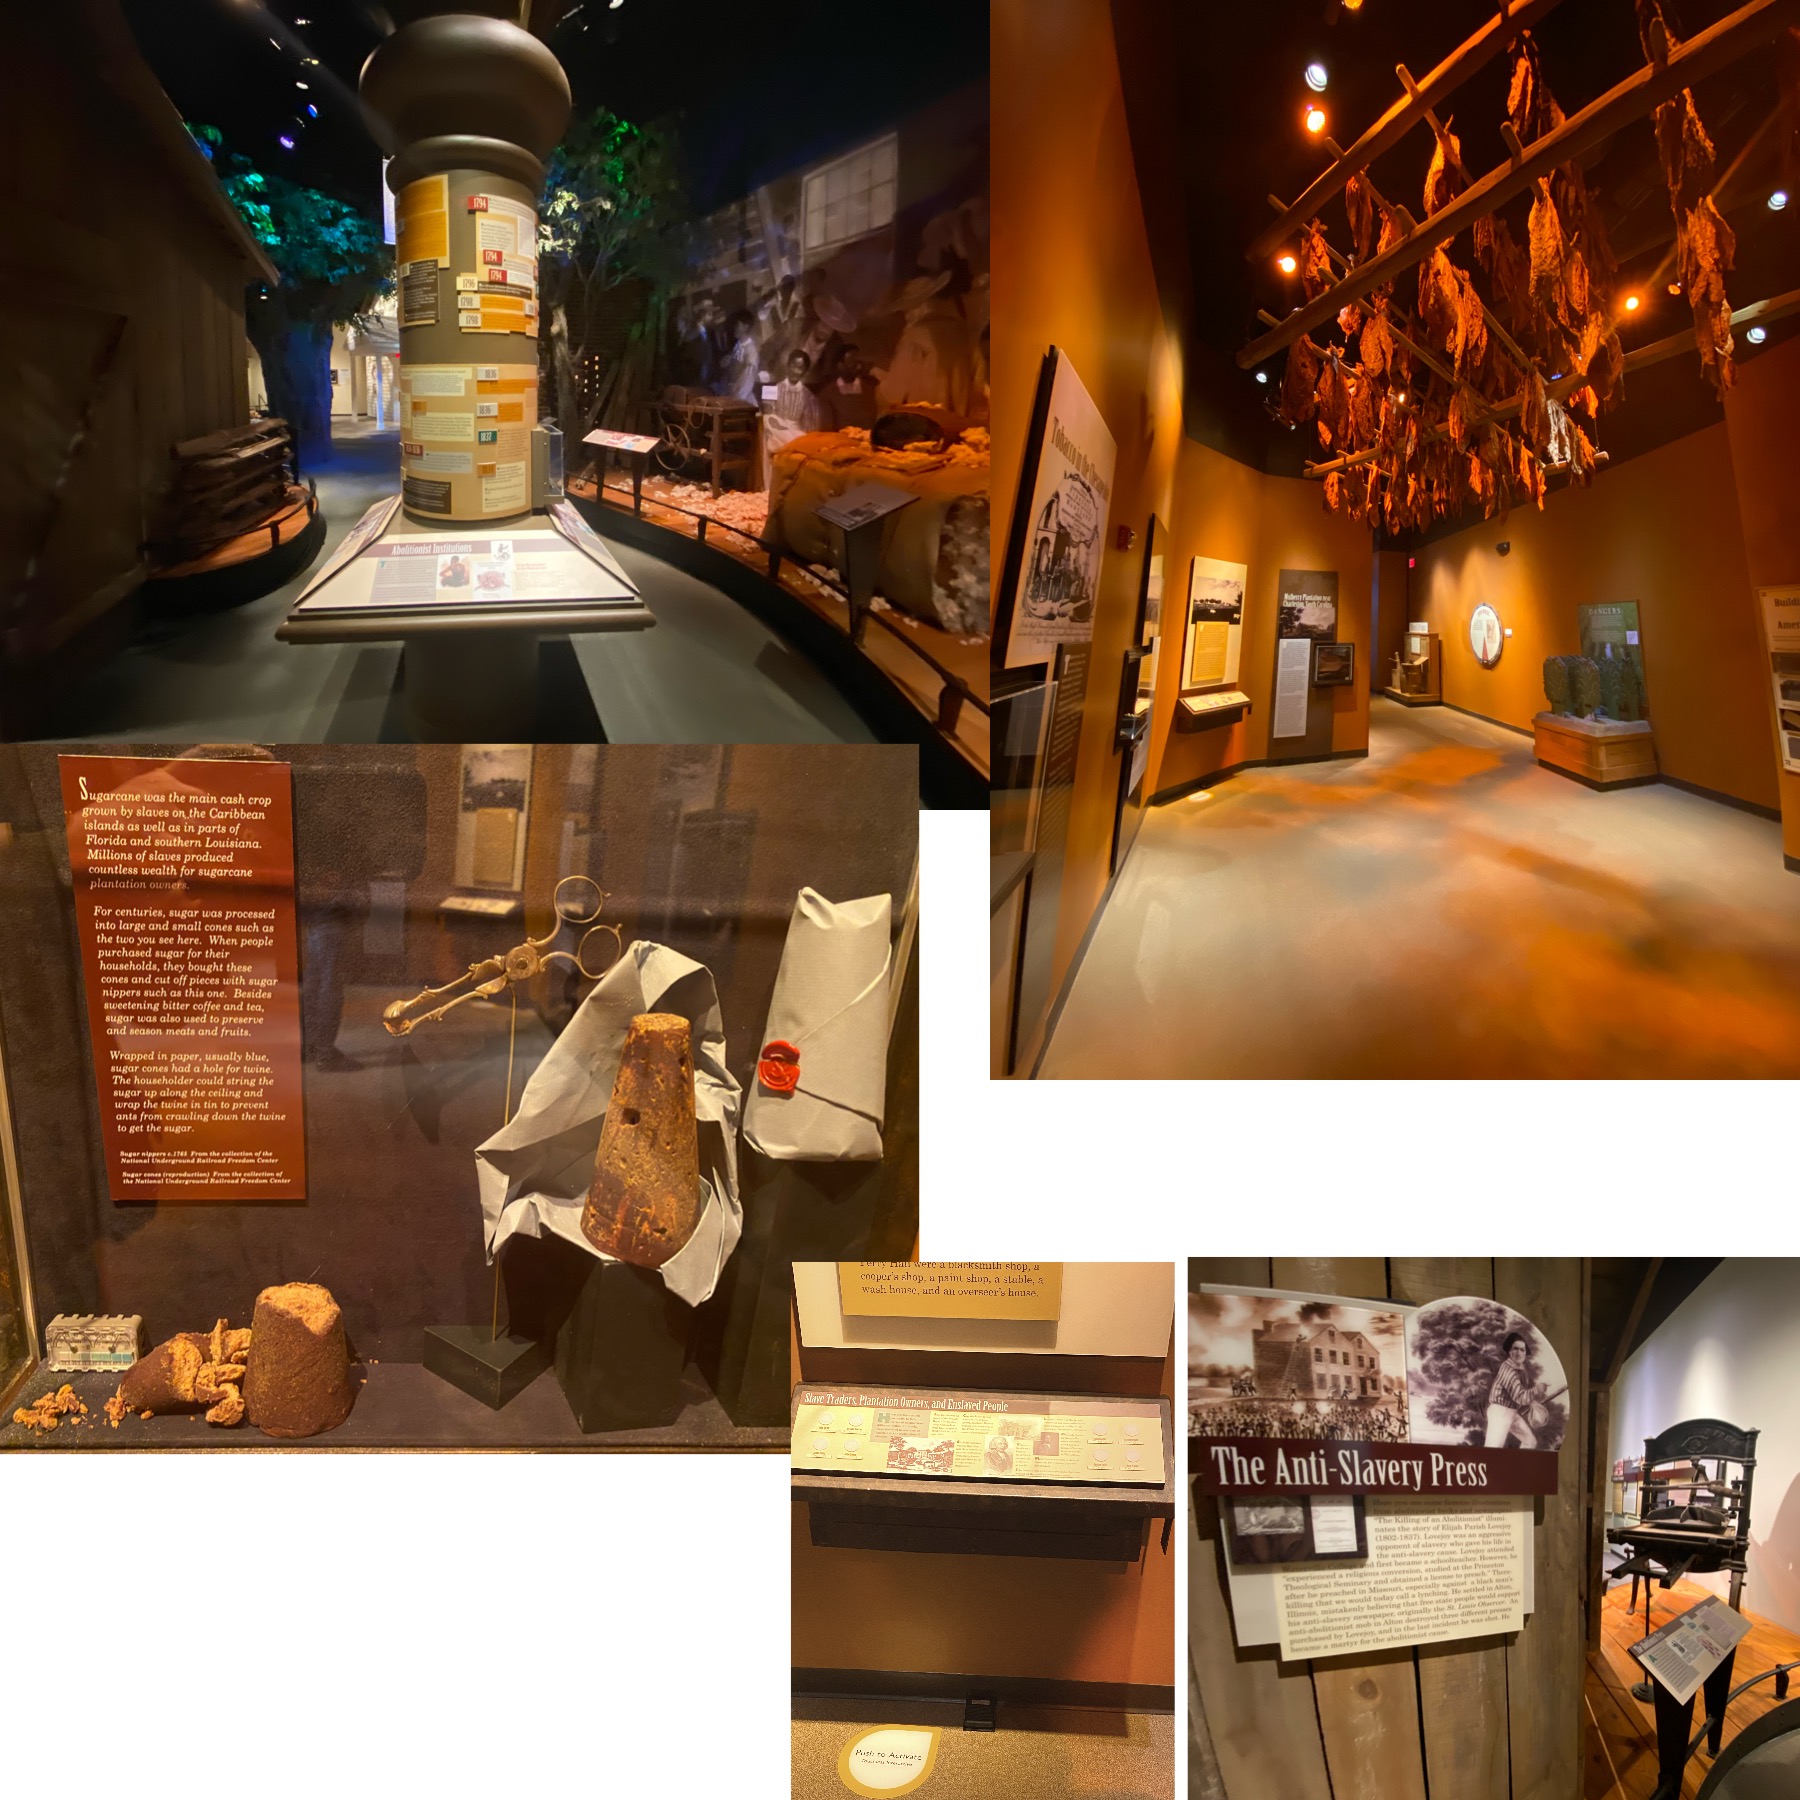
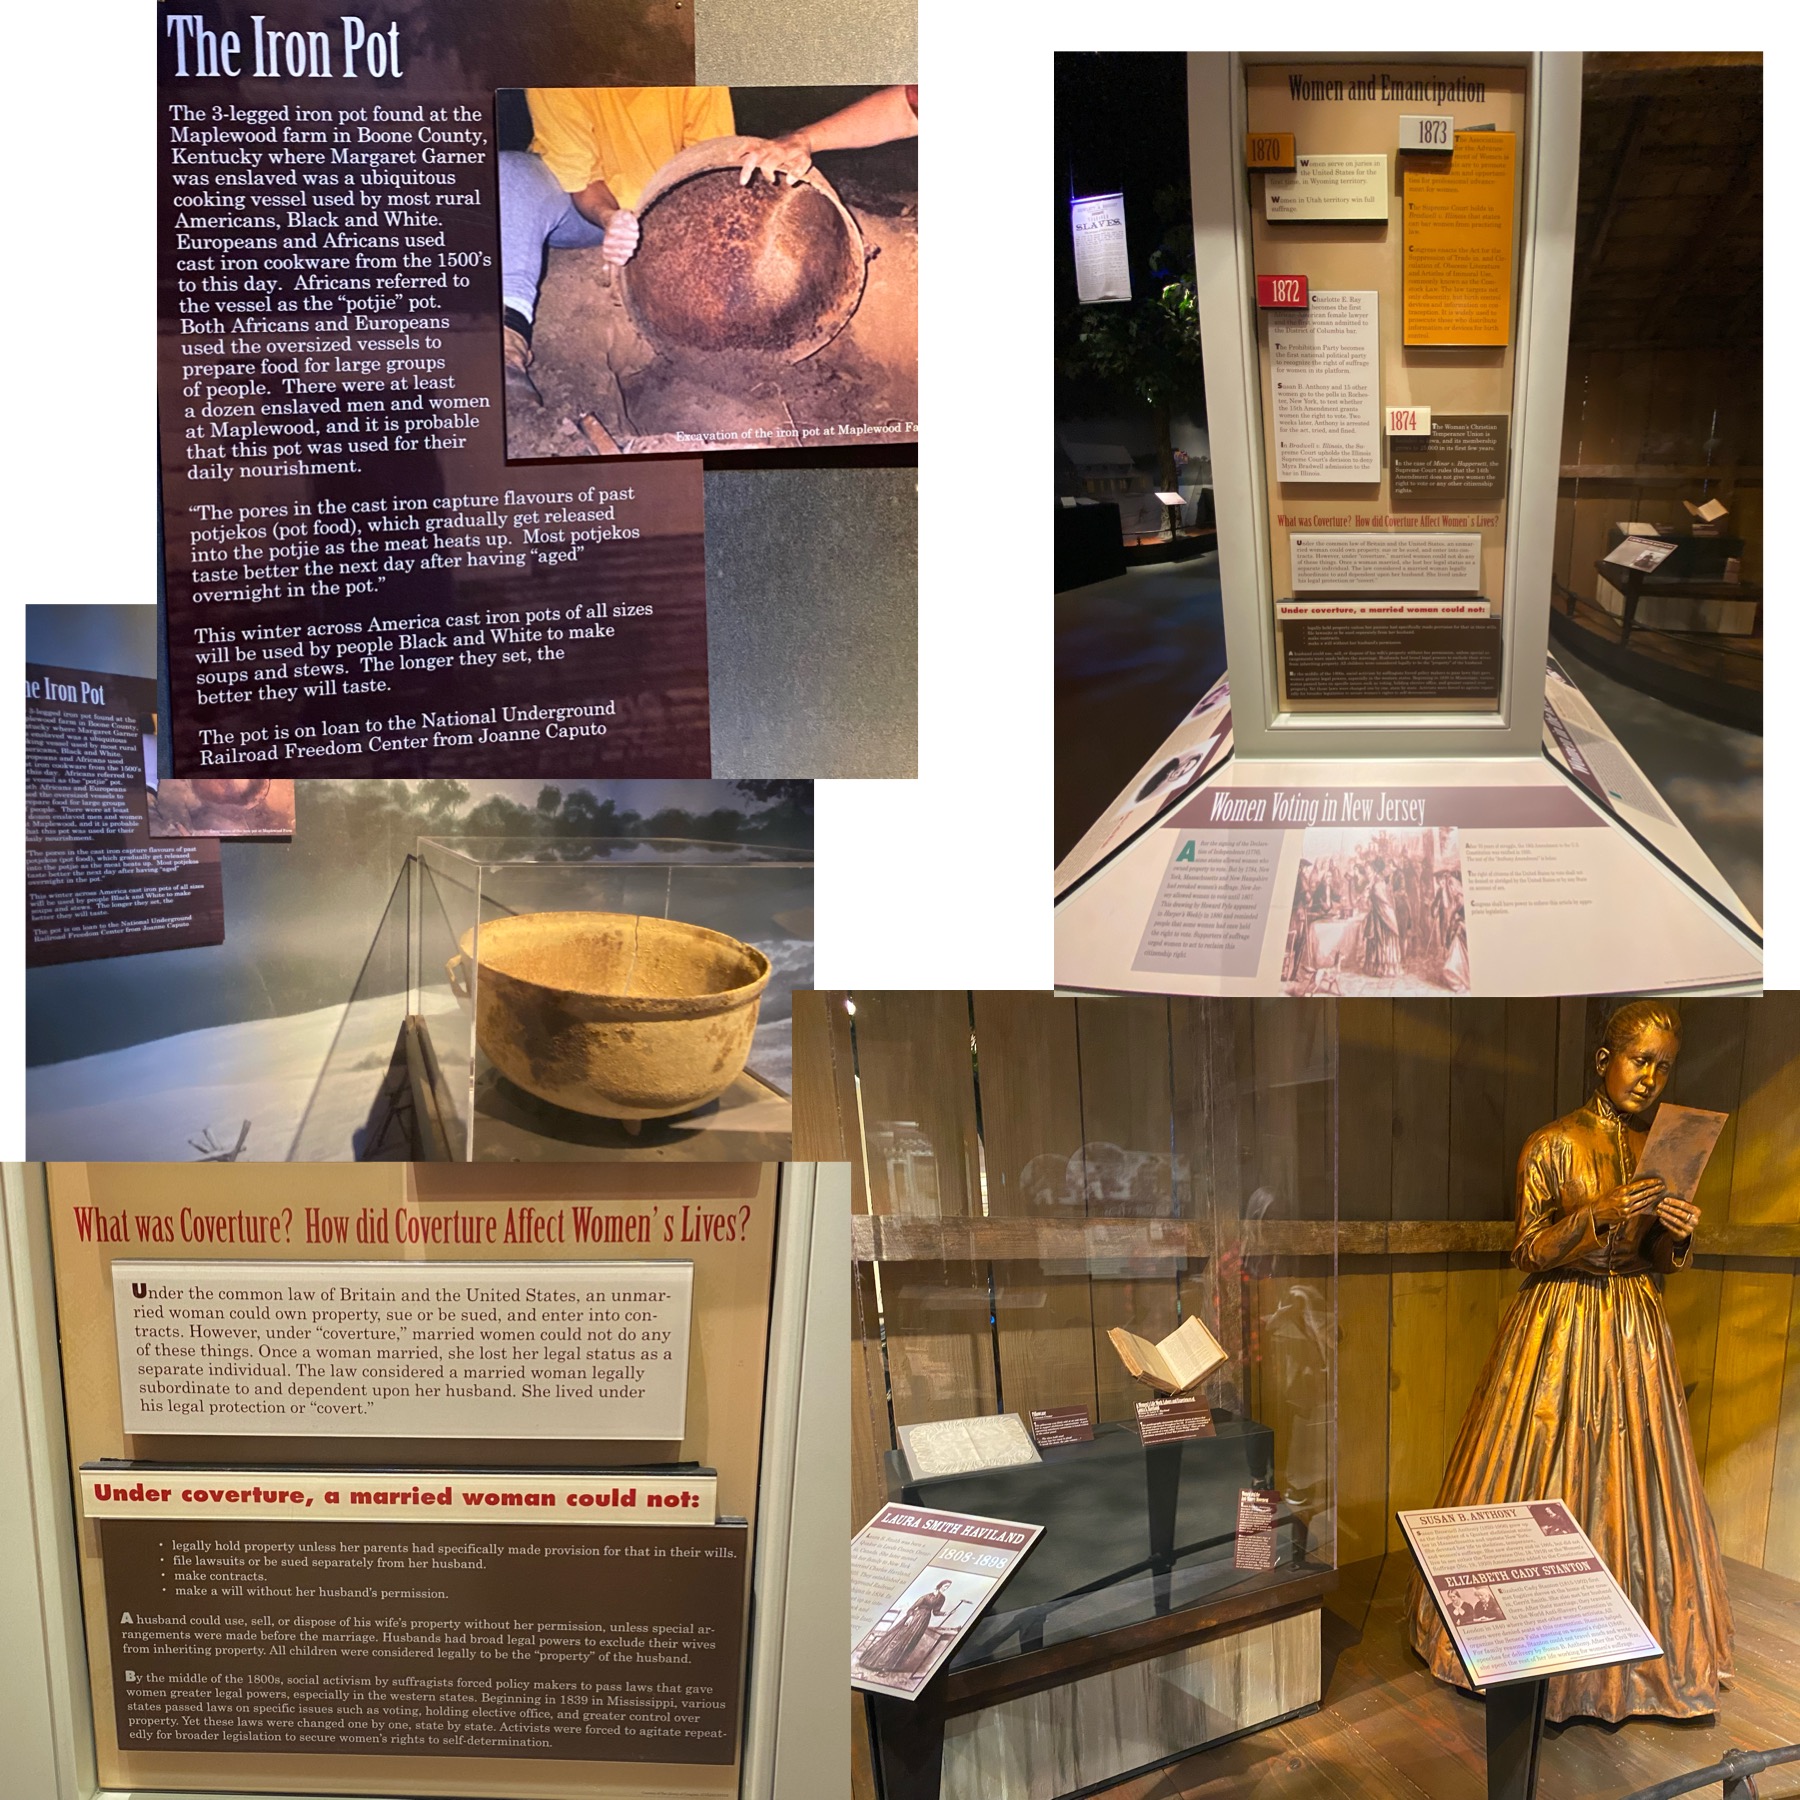
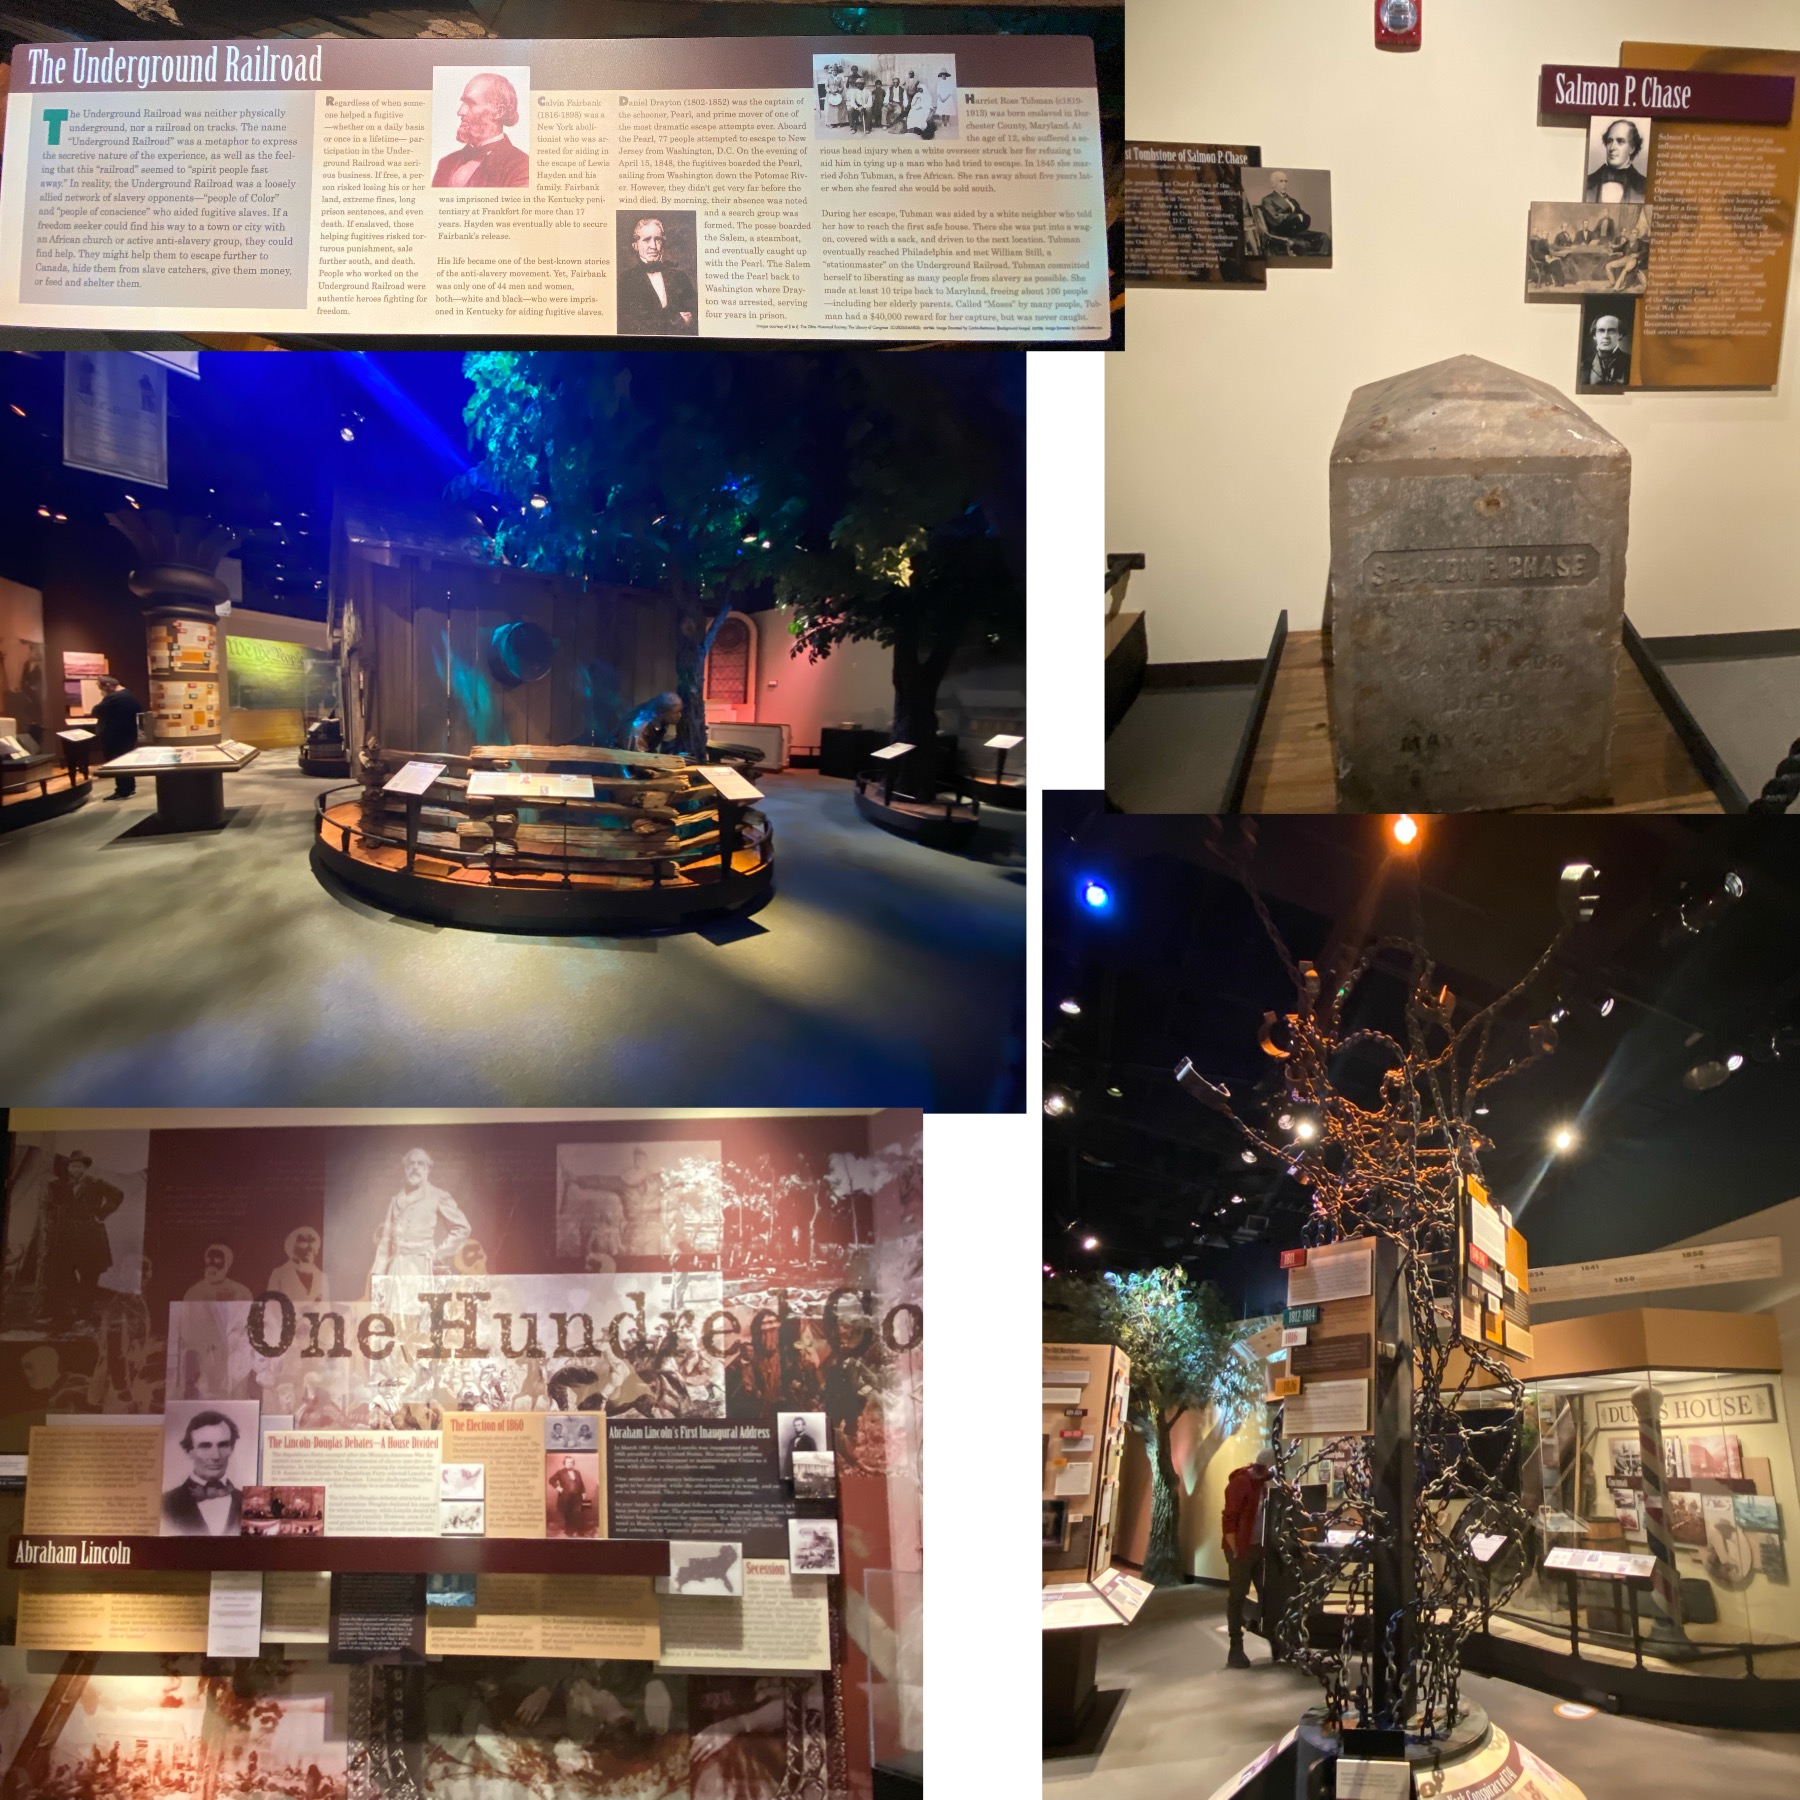
I will say we were pleasantly surprised. I thought the spacing throughout the Center was very nice and that there was nice mix of props (statues, cotton bales, buildings, maps, a few artifacts). There was a lot of factual information, along with some personal anecdotes.

The third floor is where most of the exhibits are and where they recommend you start your visit. The Center did a pretty good job with decorations around the exhibits and movie screens to set the scene. There is an outdoor terrace that has a great view of the Ohio River and Suspension Bridge. It also has Freedom’s Eternal Flame (a gas fueled flame). The Terrace was closed while we were there; of course, it was about 28 degrees outside.

Click to Enlarge
Click to Enlarge
Click to Enlarge

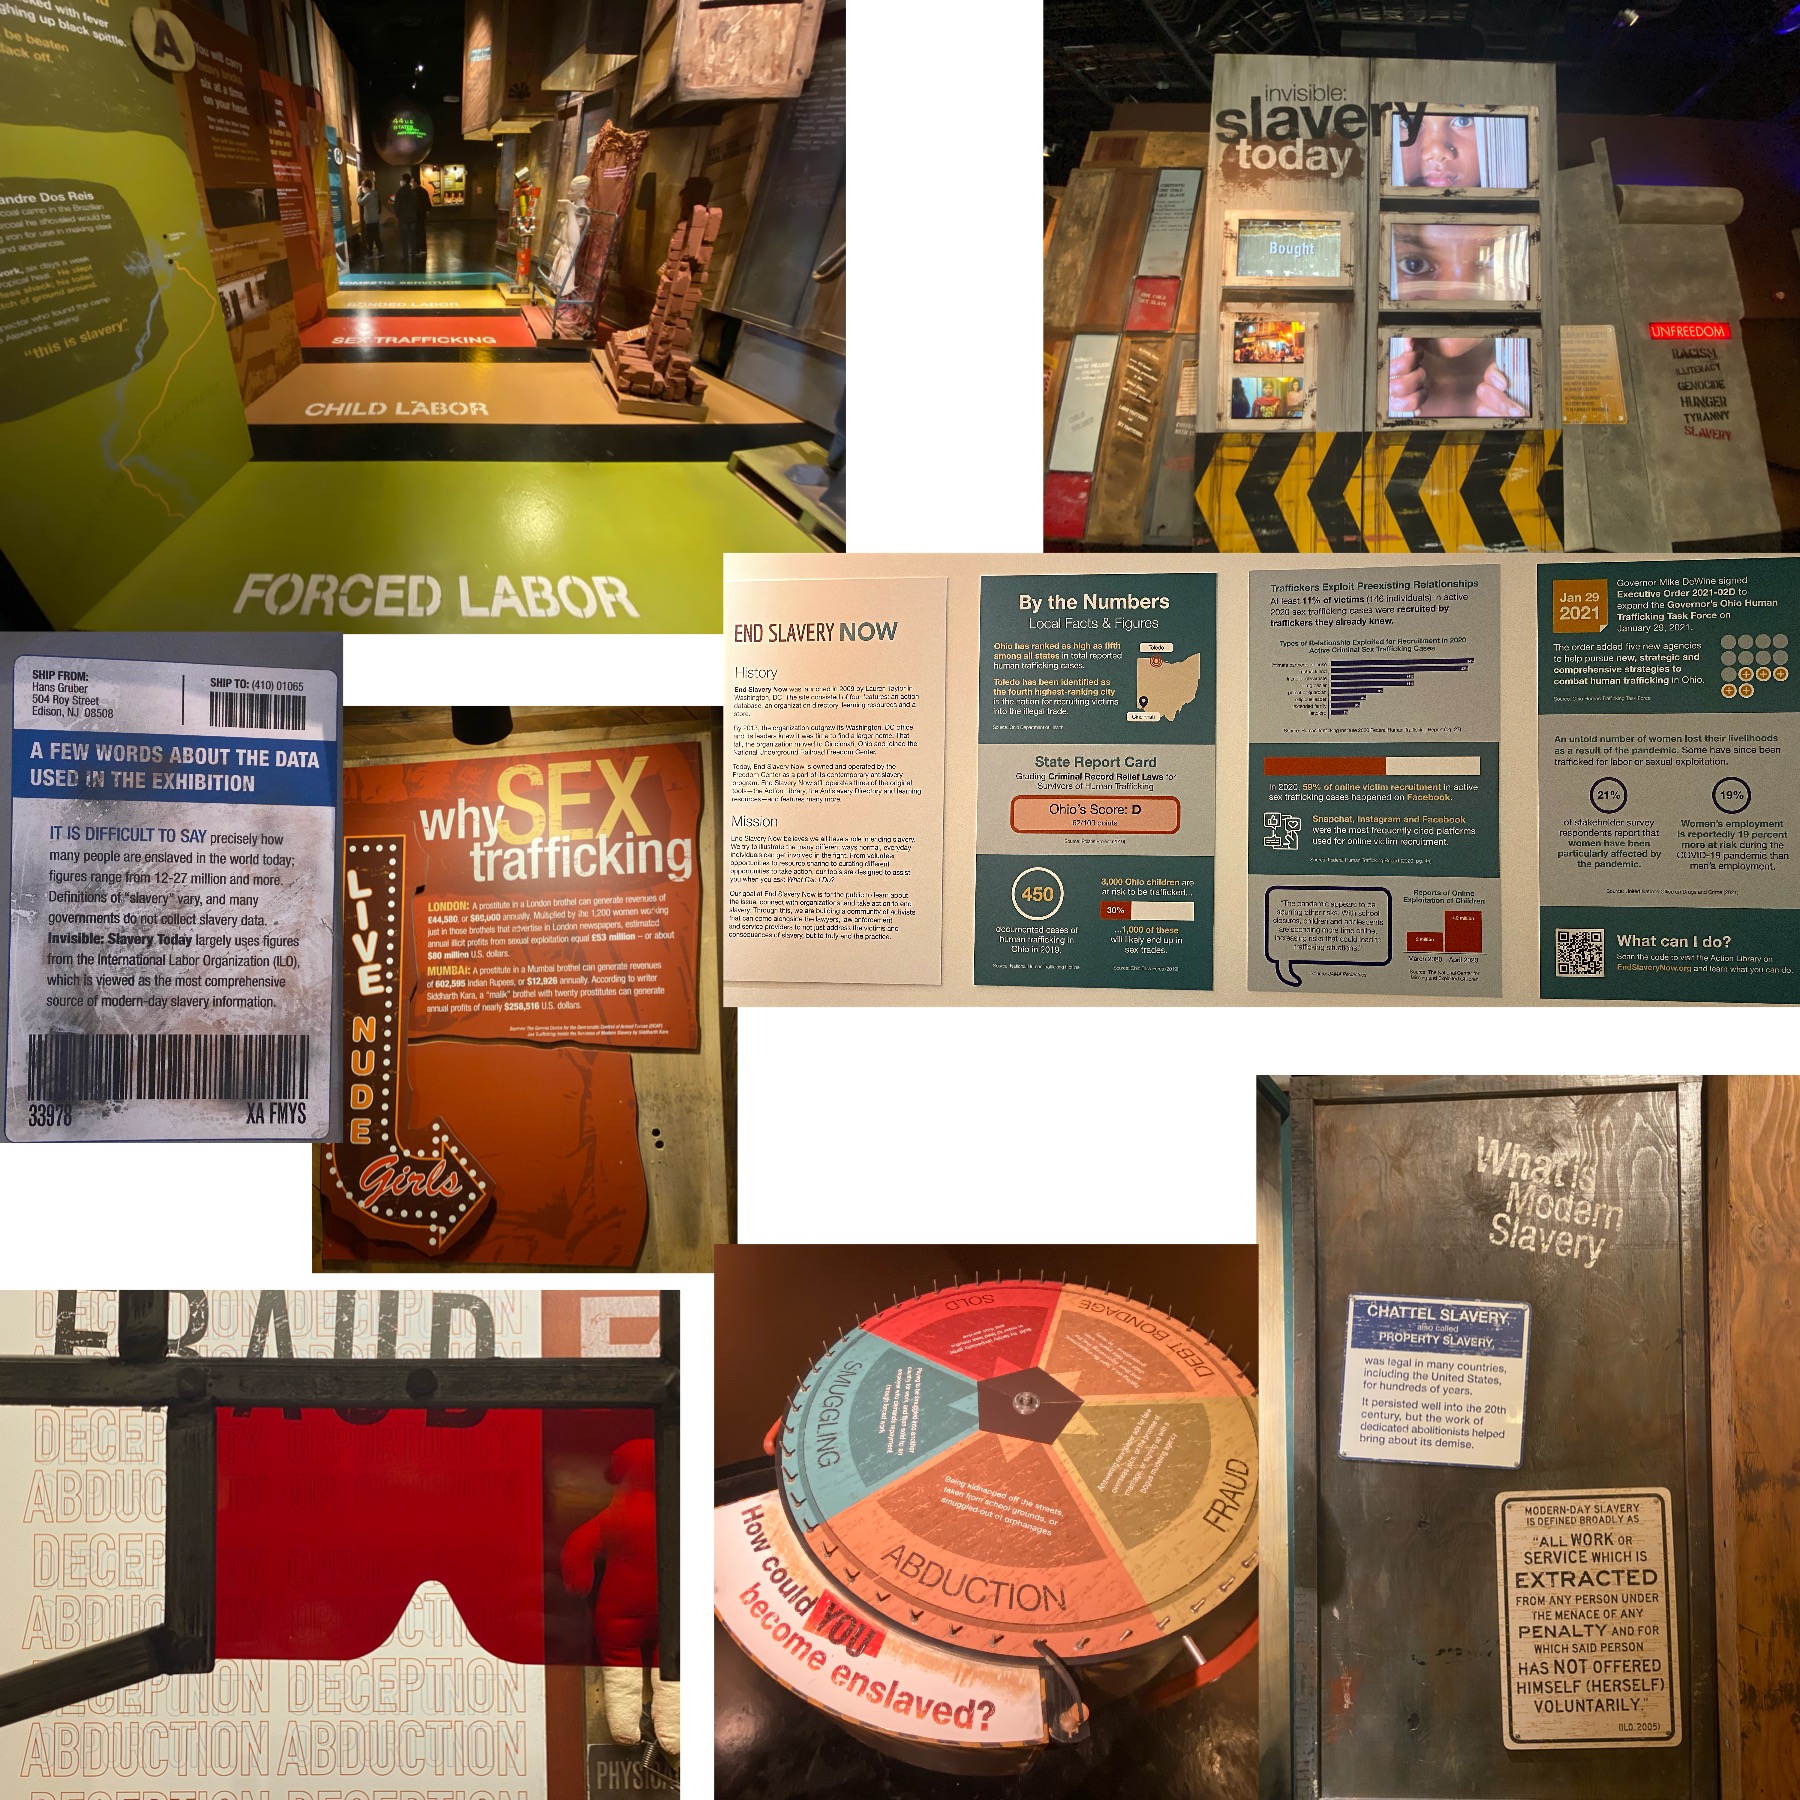
The 3rd floor also had an modern day slavery exhibit that went over Forced Labor, Child Labor, Sex Trafficking, Bonded Labor, and Domestic Servitude. The crazy statistic that I saw was that 59% of online recruitment for sex trafficking victims was on Facebook.

Click to Enlarge
Click to Enlarge
Click to Enlarge

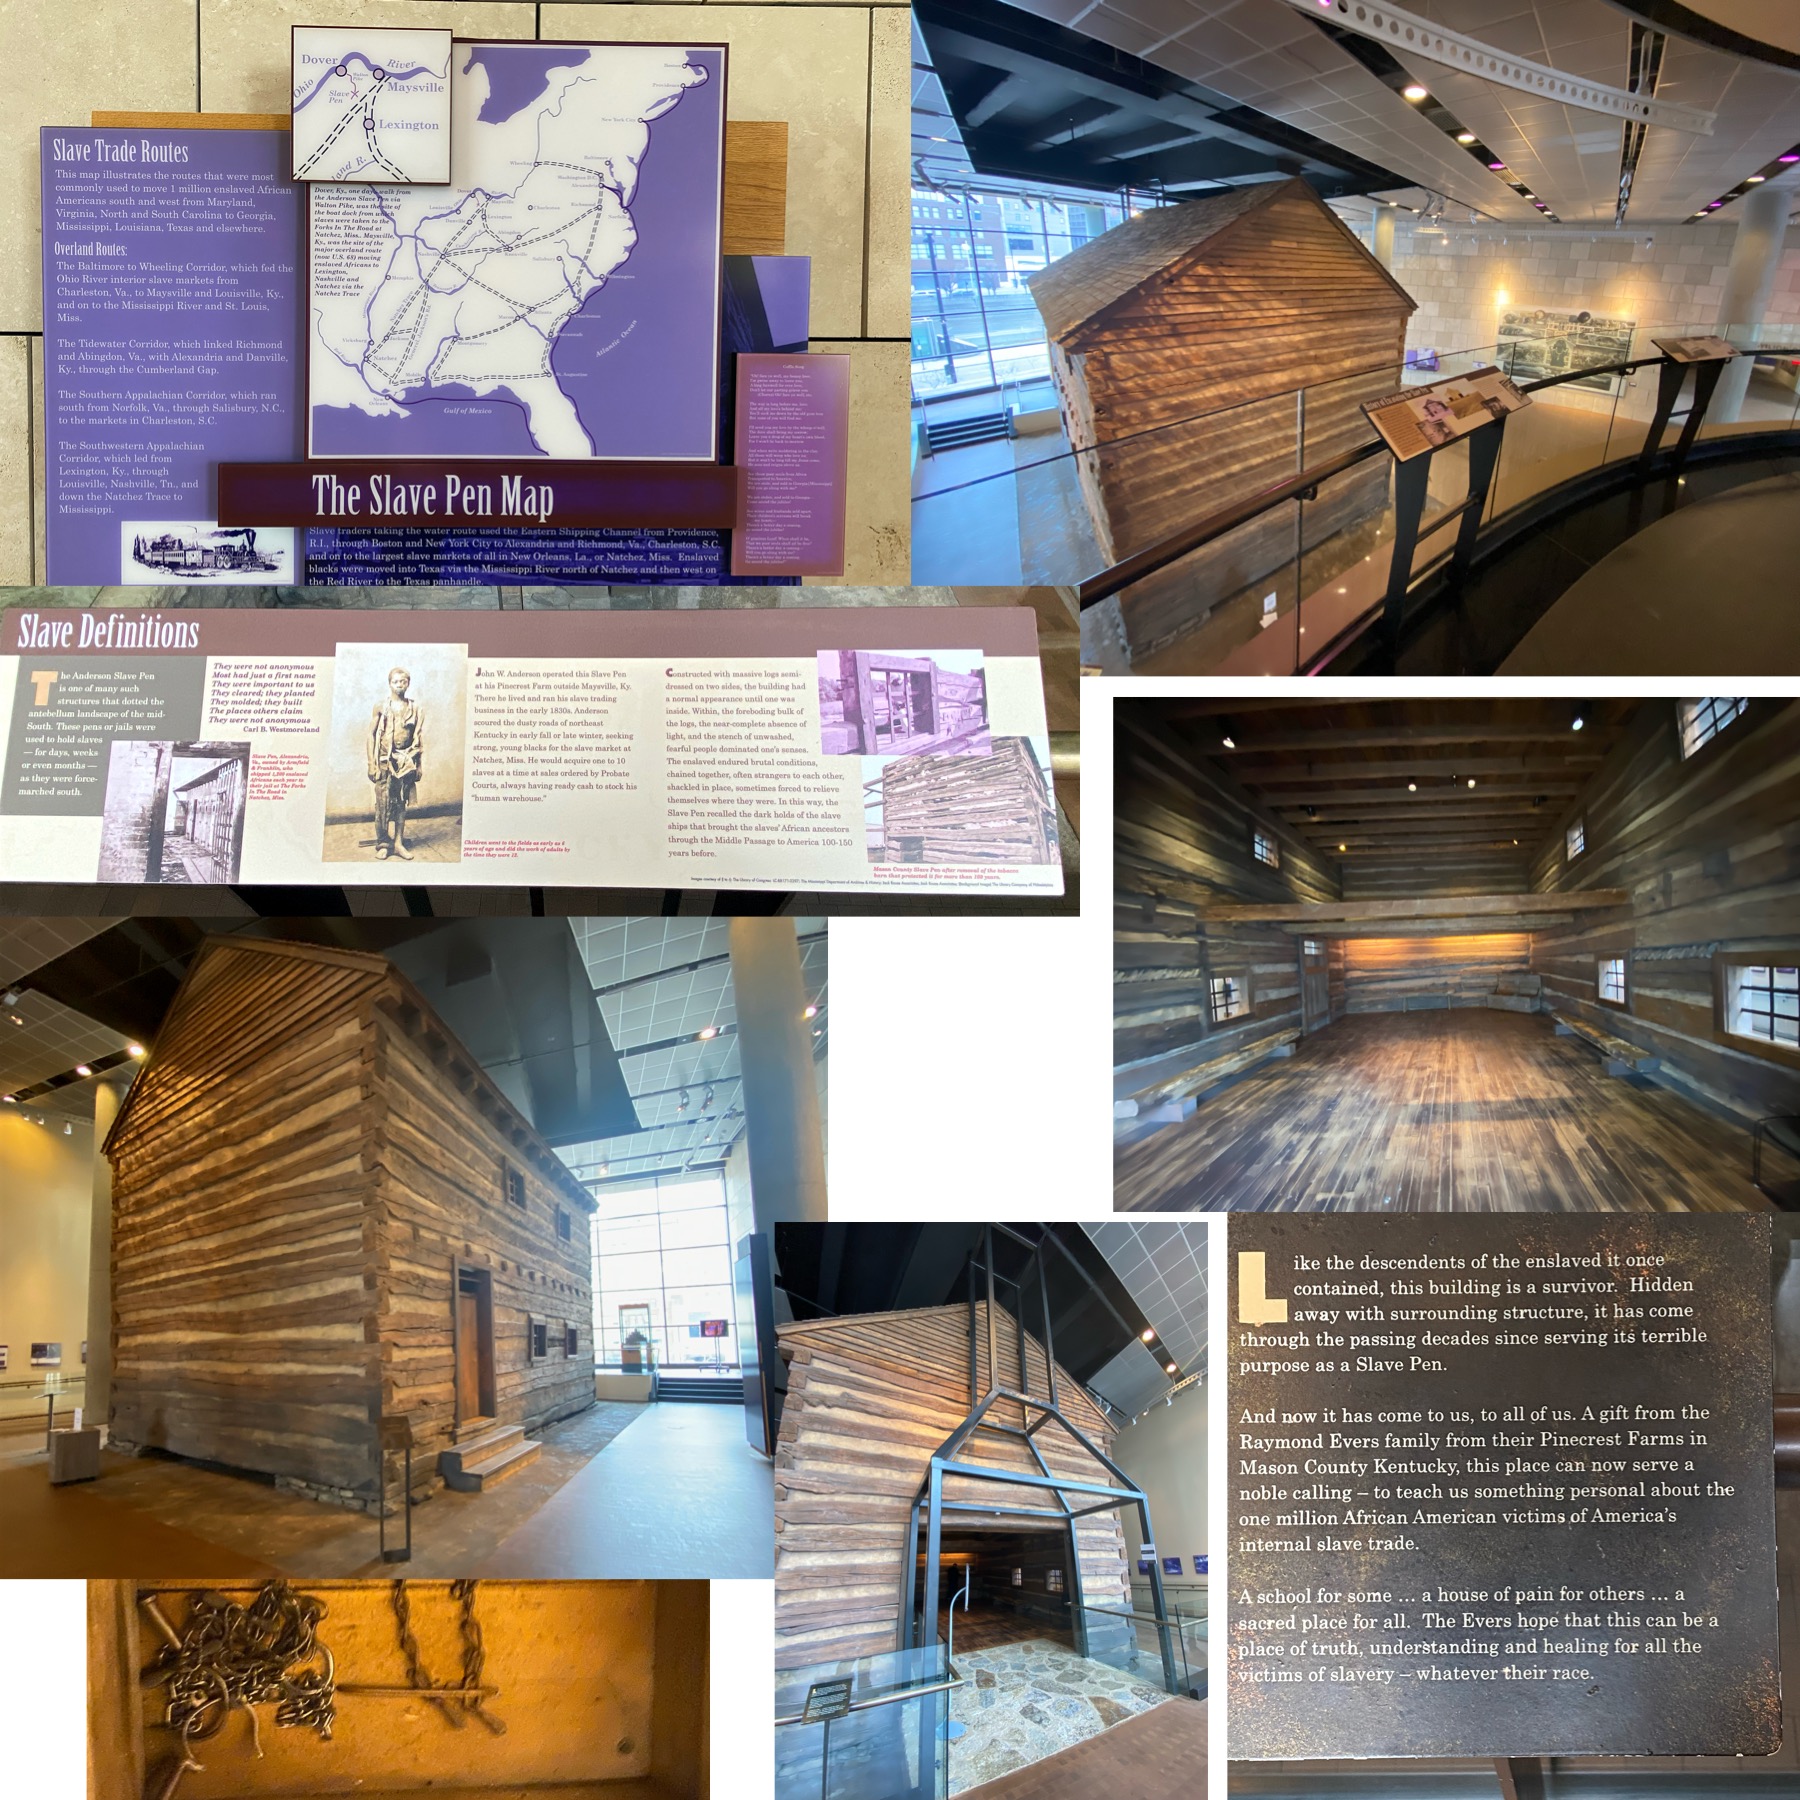
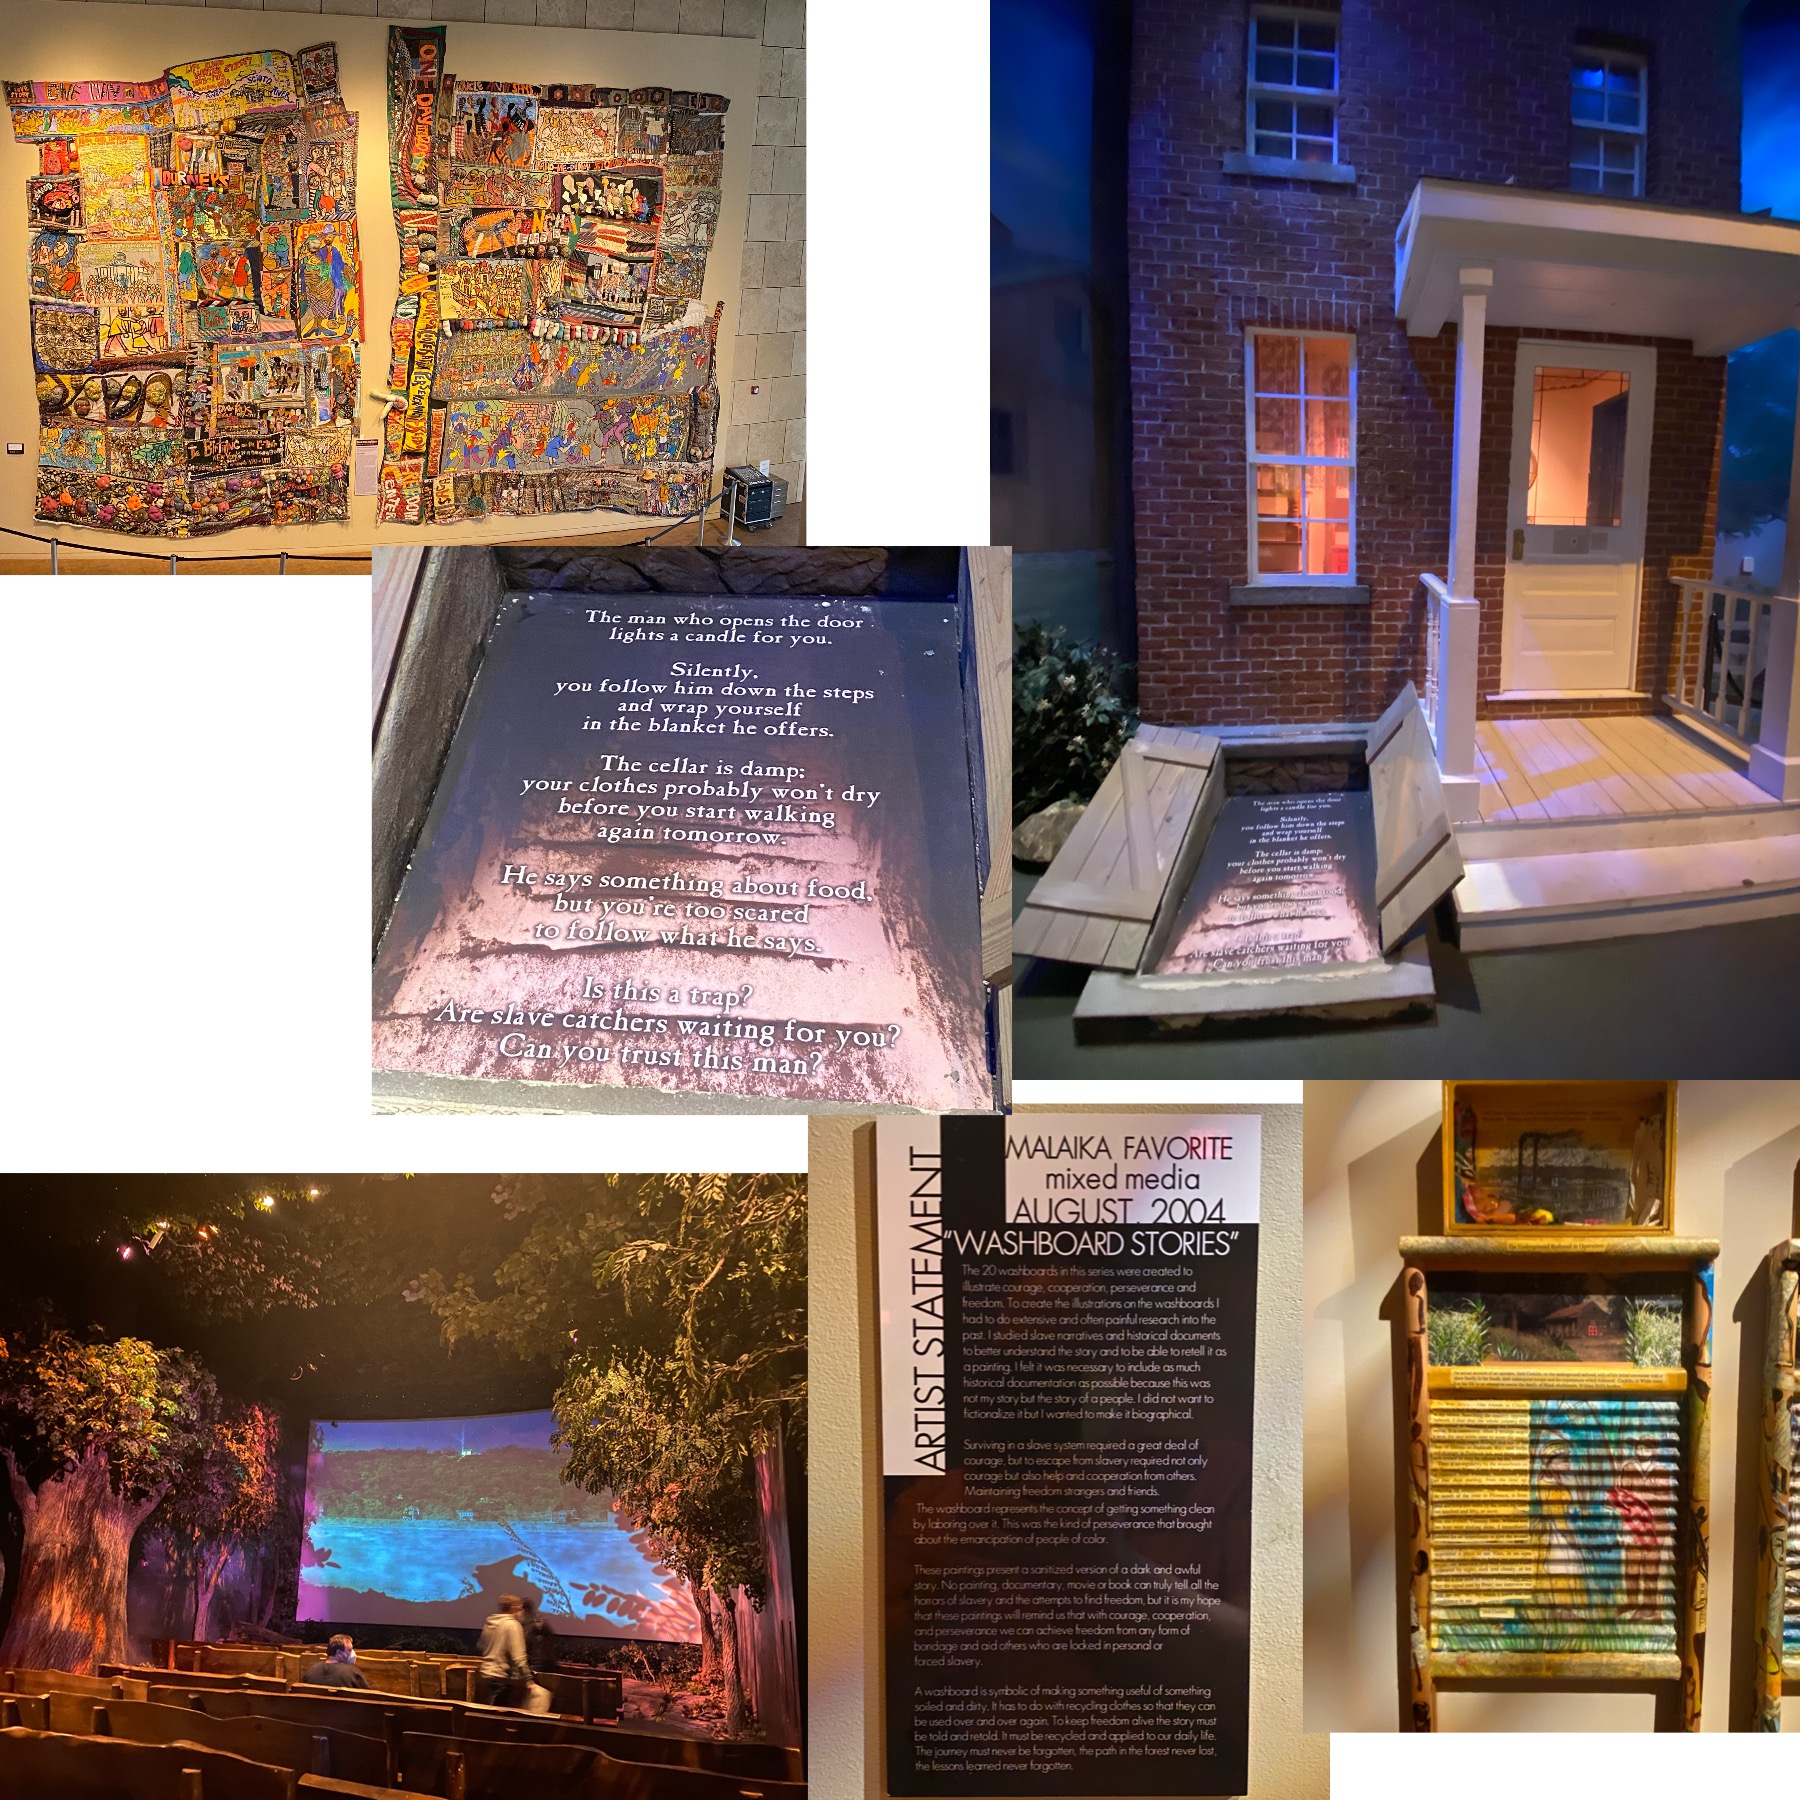
The second floor had a Pavilion, which is currently closed. There was a Slave Pen (an original structure brought into the Center) that you could walk into. The inside was very empty, other than a wooden box that had some shackles in it. There were several films available on the 2nd floor. You first walk into a waiting room and listen to a short film with Oprah Winfrey. The doors automatically open to go to the next theater. I thought the movies were well done. One of the theater rooms was even decorated with trees to help set the mood for the film.

Click to Enlarge
Click to Enlarge

There were only a few interactive exhibits. I think there is a lot of opportunity to do several more interactive exhibits. (For example: an example of hidden stairs and rooms that you could walk through, touching cotton plants.) There were some visual aids, but it was mostly reading. It was definitely an older child/adult type of museum in terms of attention level and retention. It would have been nice to see a map of known Underground Railroad stops in Cincinnati. Ben and I both knew of two, but I’m sure there plenty more.

There is small store on the main floor. (The postcards were $3 each, which I think is the most expensive postcard we have bought!)

DETAILS:

  • WHERE: 50 East Freedom Way, Cincinnati, OH 45202
  • HOURS: Wednesday to Sunday, 10:00 am to 5:00 pm
  • COSTS: $15/adult, $10.50/children ages 3-12, under 3 free. (Family Season Pass is $65)
  • PARKING: Yes (Paid parking available on-street or nearby parking garages.)
  • BATHROOM: Yes (On our visit, only the 3rd floor bathrooms were open.)
  • TIME RECOMMENDED: 2-3 hours
  • COVID RESTRICTIONS: Masks are required (as of January 2022).
  • *Details correct at the time of posting, but please double check before you go.

RELATED POSTS:

Posted in: Exploring Ohio, Museums & Tours, Sightseeing

The Voice of America Museum: Exploring Ohio

We have driven by the Voice of America Museum for years, but have never gone through it. As part of our New Year’s resolution to act more like tourists in our own home state and to see more local things, we finally made it there.

Click To Enlarge

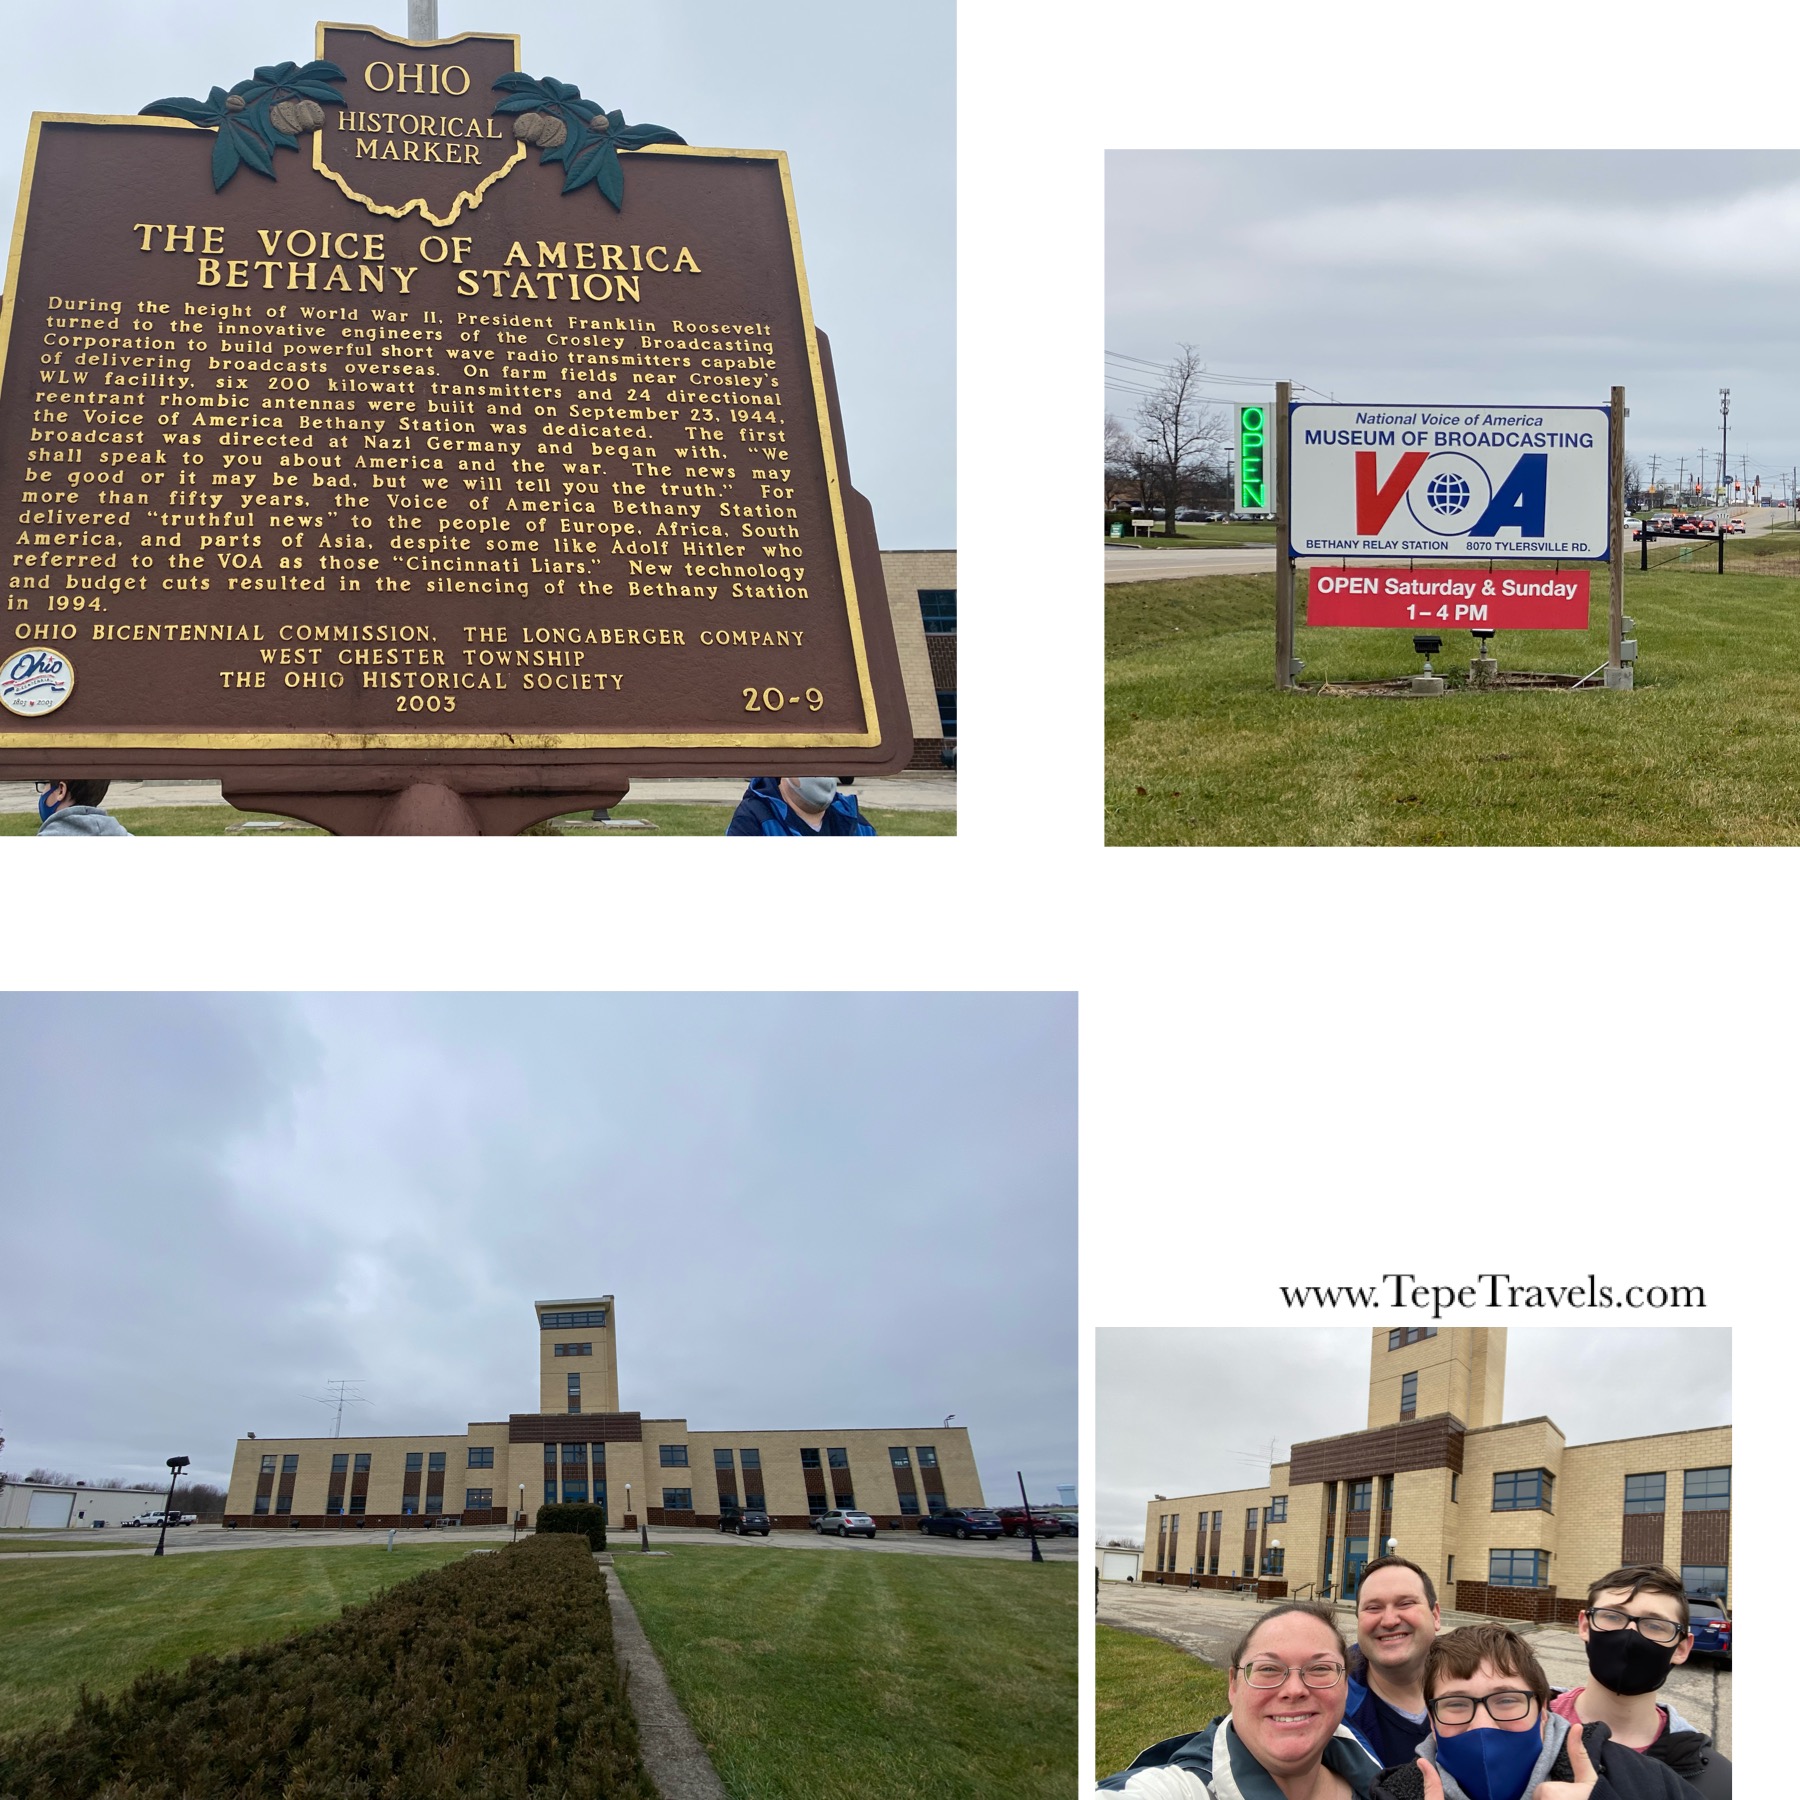
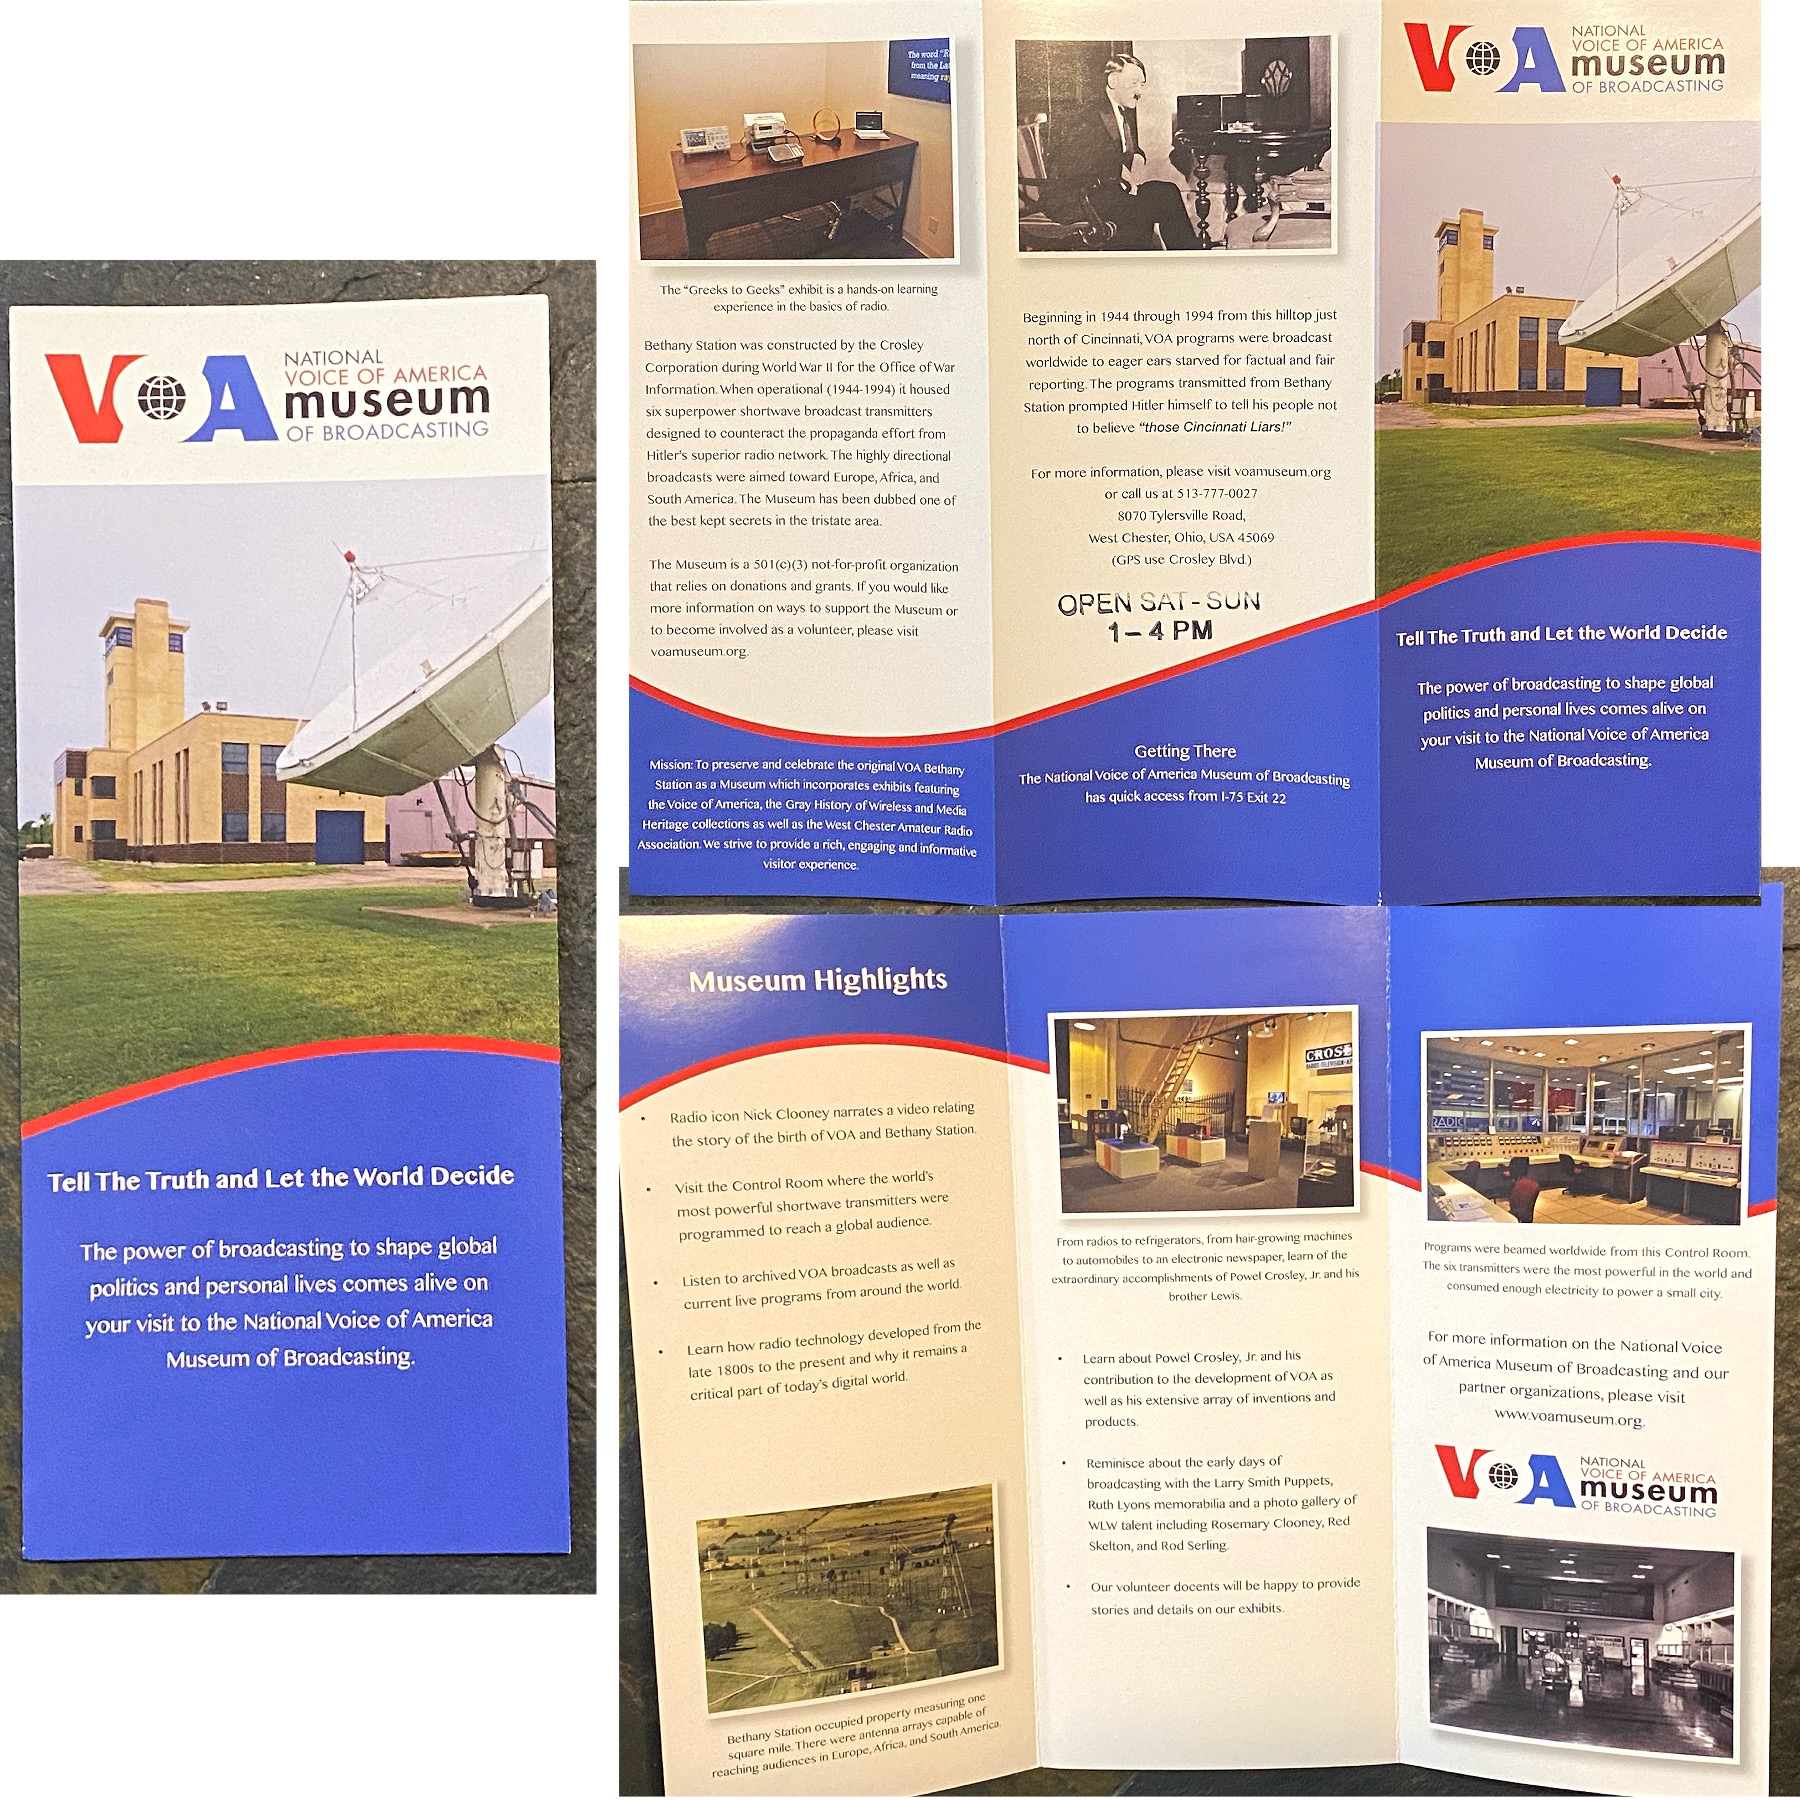
As you turn onto the long driveway, you get a great view of the Museum building. The museum is housed in the former Voice of America Bethany Station. There is parking along the front and side of the building. They are only open Saturday and Sunday from 1:00 pm to 4:00 pm. During your visit, you can walk around on your own or go on a guided tour with a docent (included with admission). The Docent provides a lot of helpful information and can answer questions you might have during the tour. The Voice of America Bethany Station (named such due to its proximity to the Bethany phone exchange) opened in 1944.

Click To Enlarge

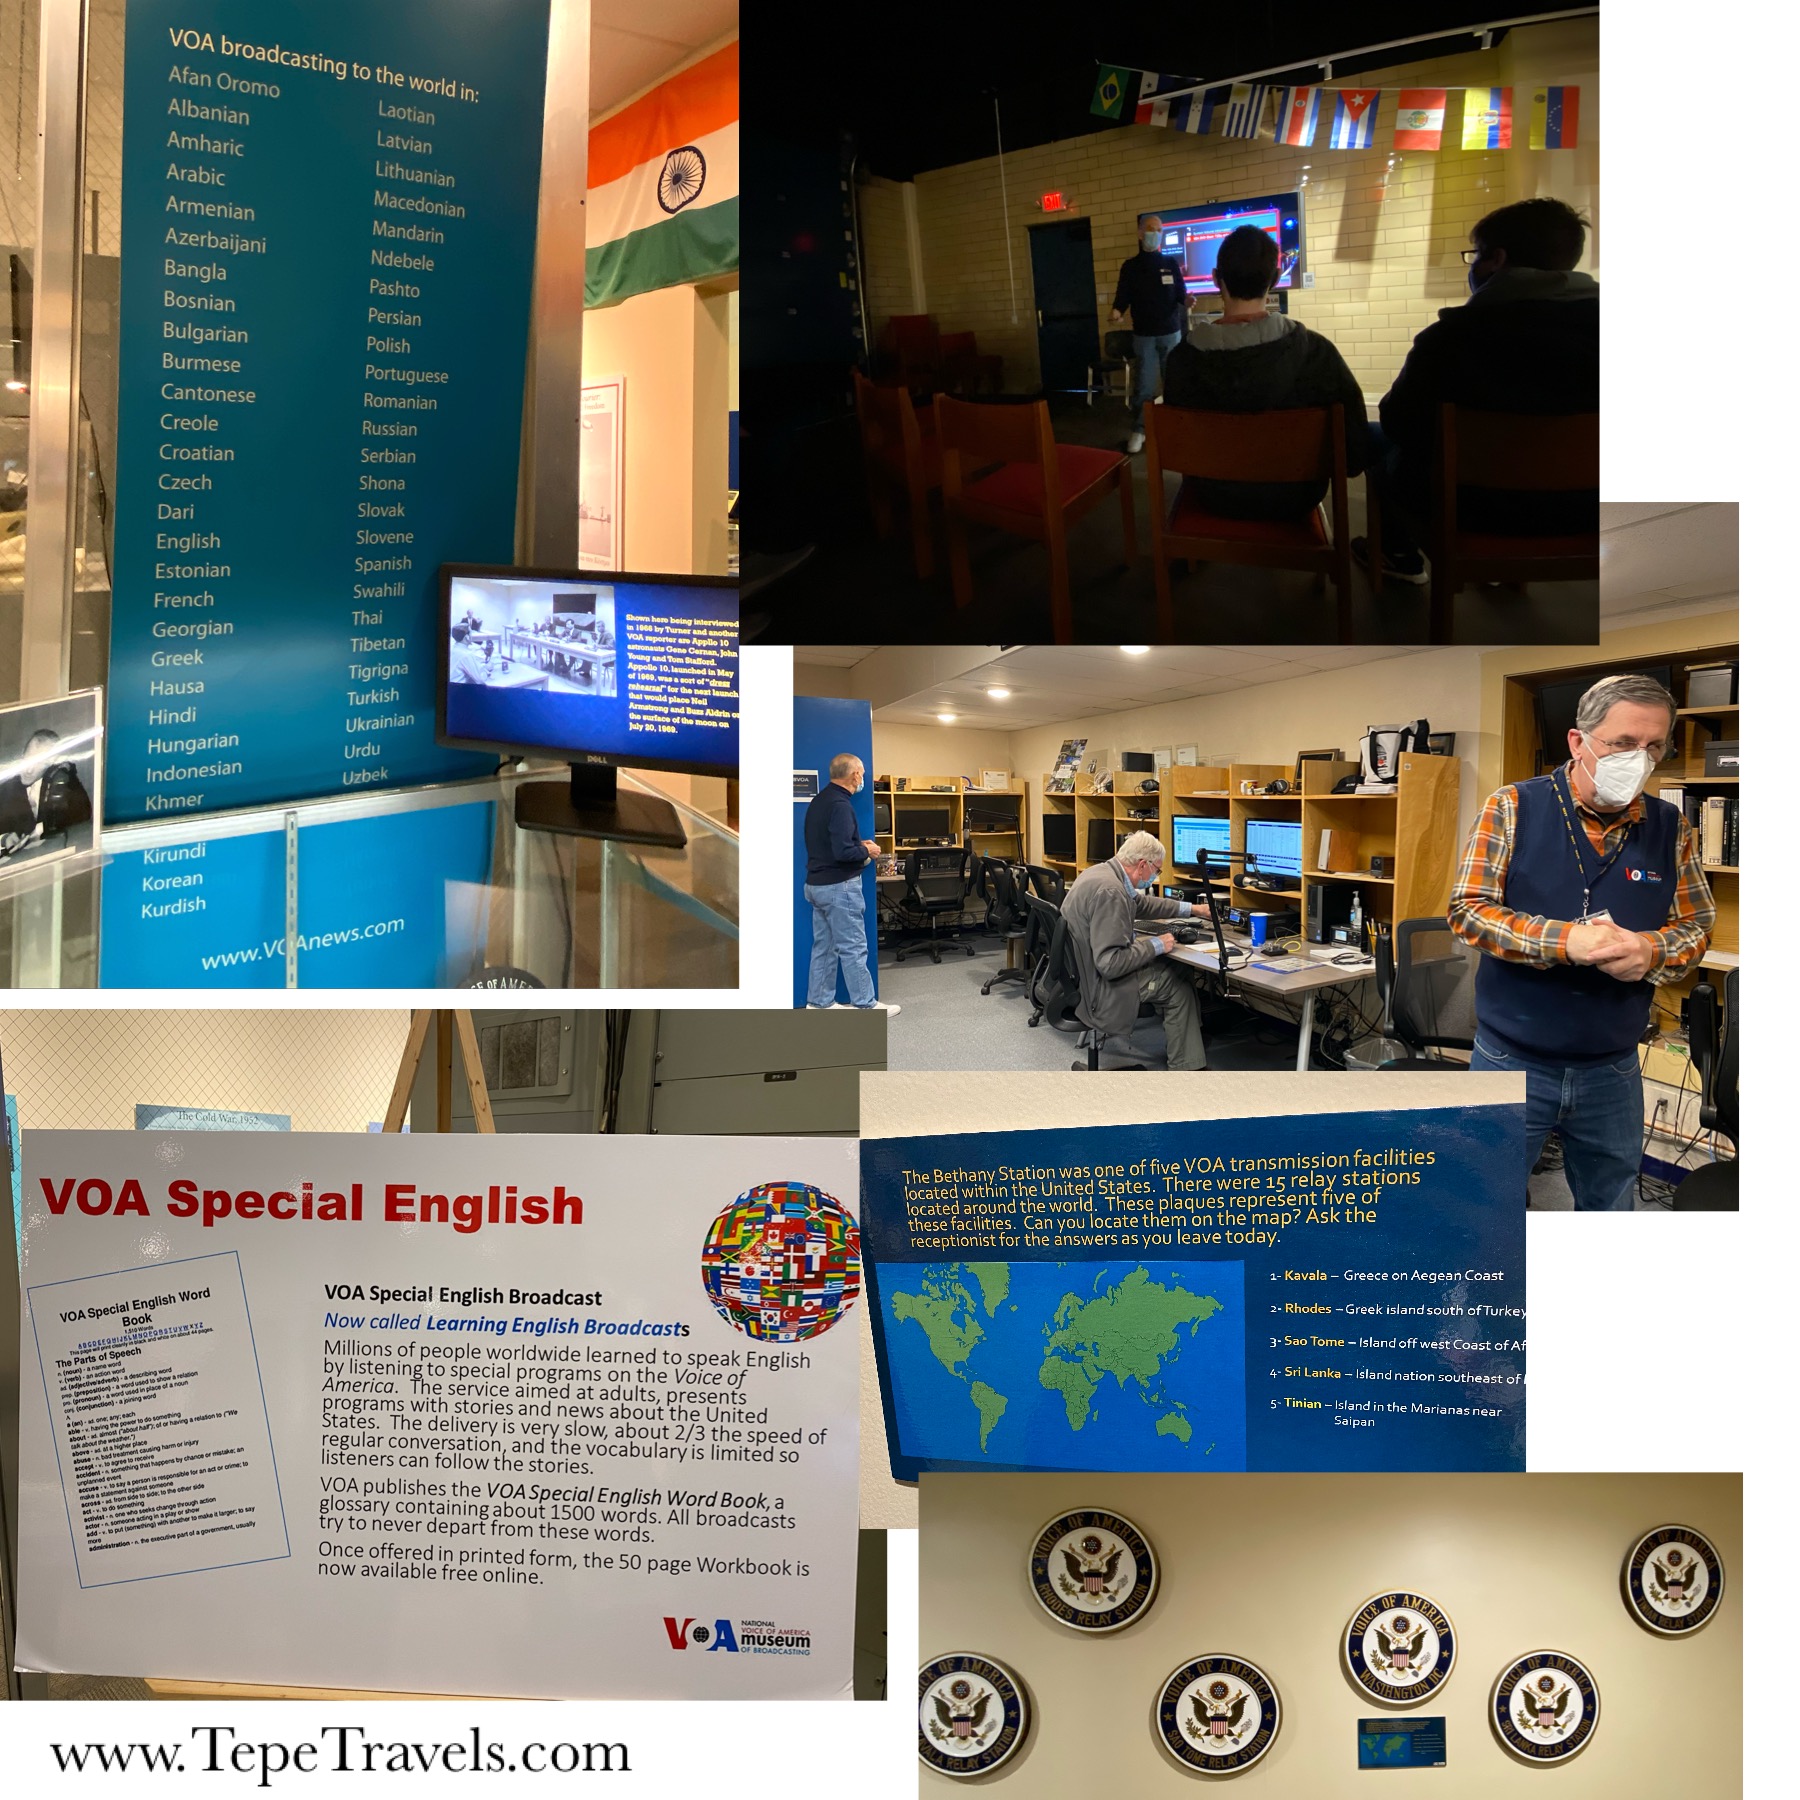
The Voice of America began broadcasting different radio programs in 1942. The purpose of the radio station was to send news and the “truth” to other countries where information was limited and outside radio contact was frequently banned. Although you can hear the broadcasts (including a program where they teach basic English), the broadcasts are meant for international audiences.

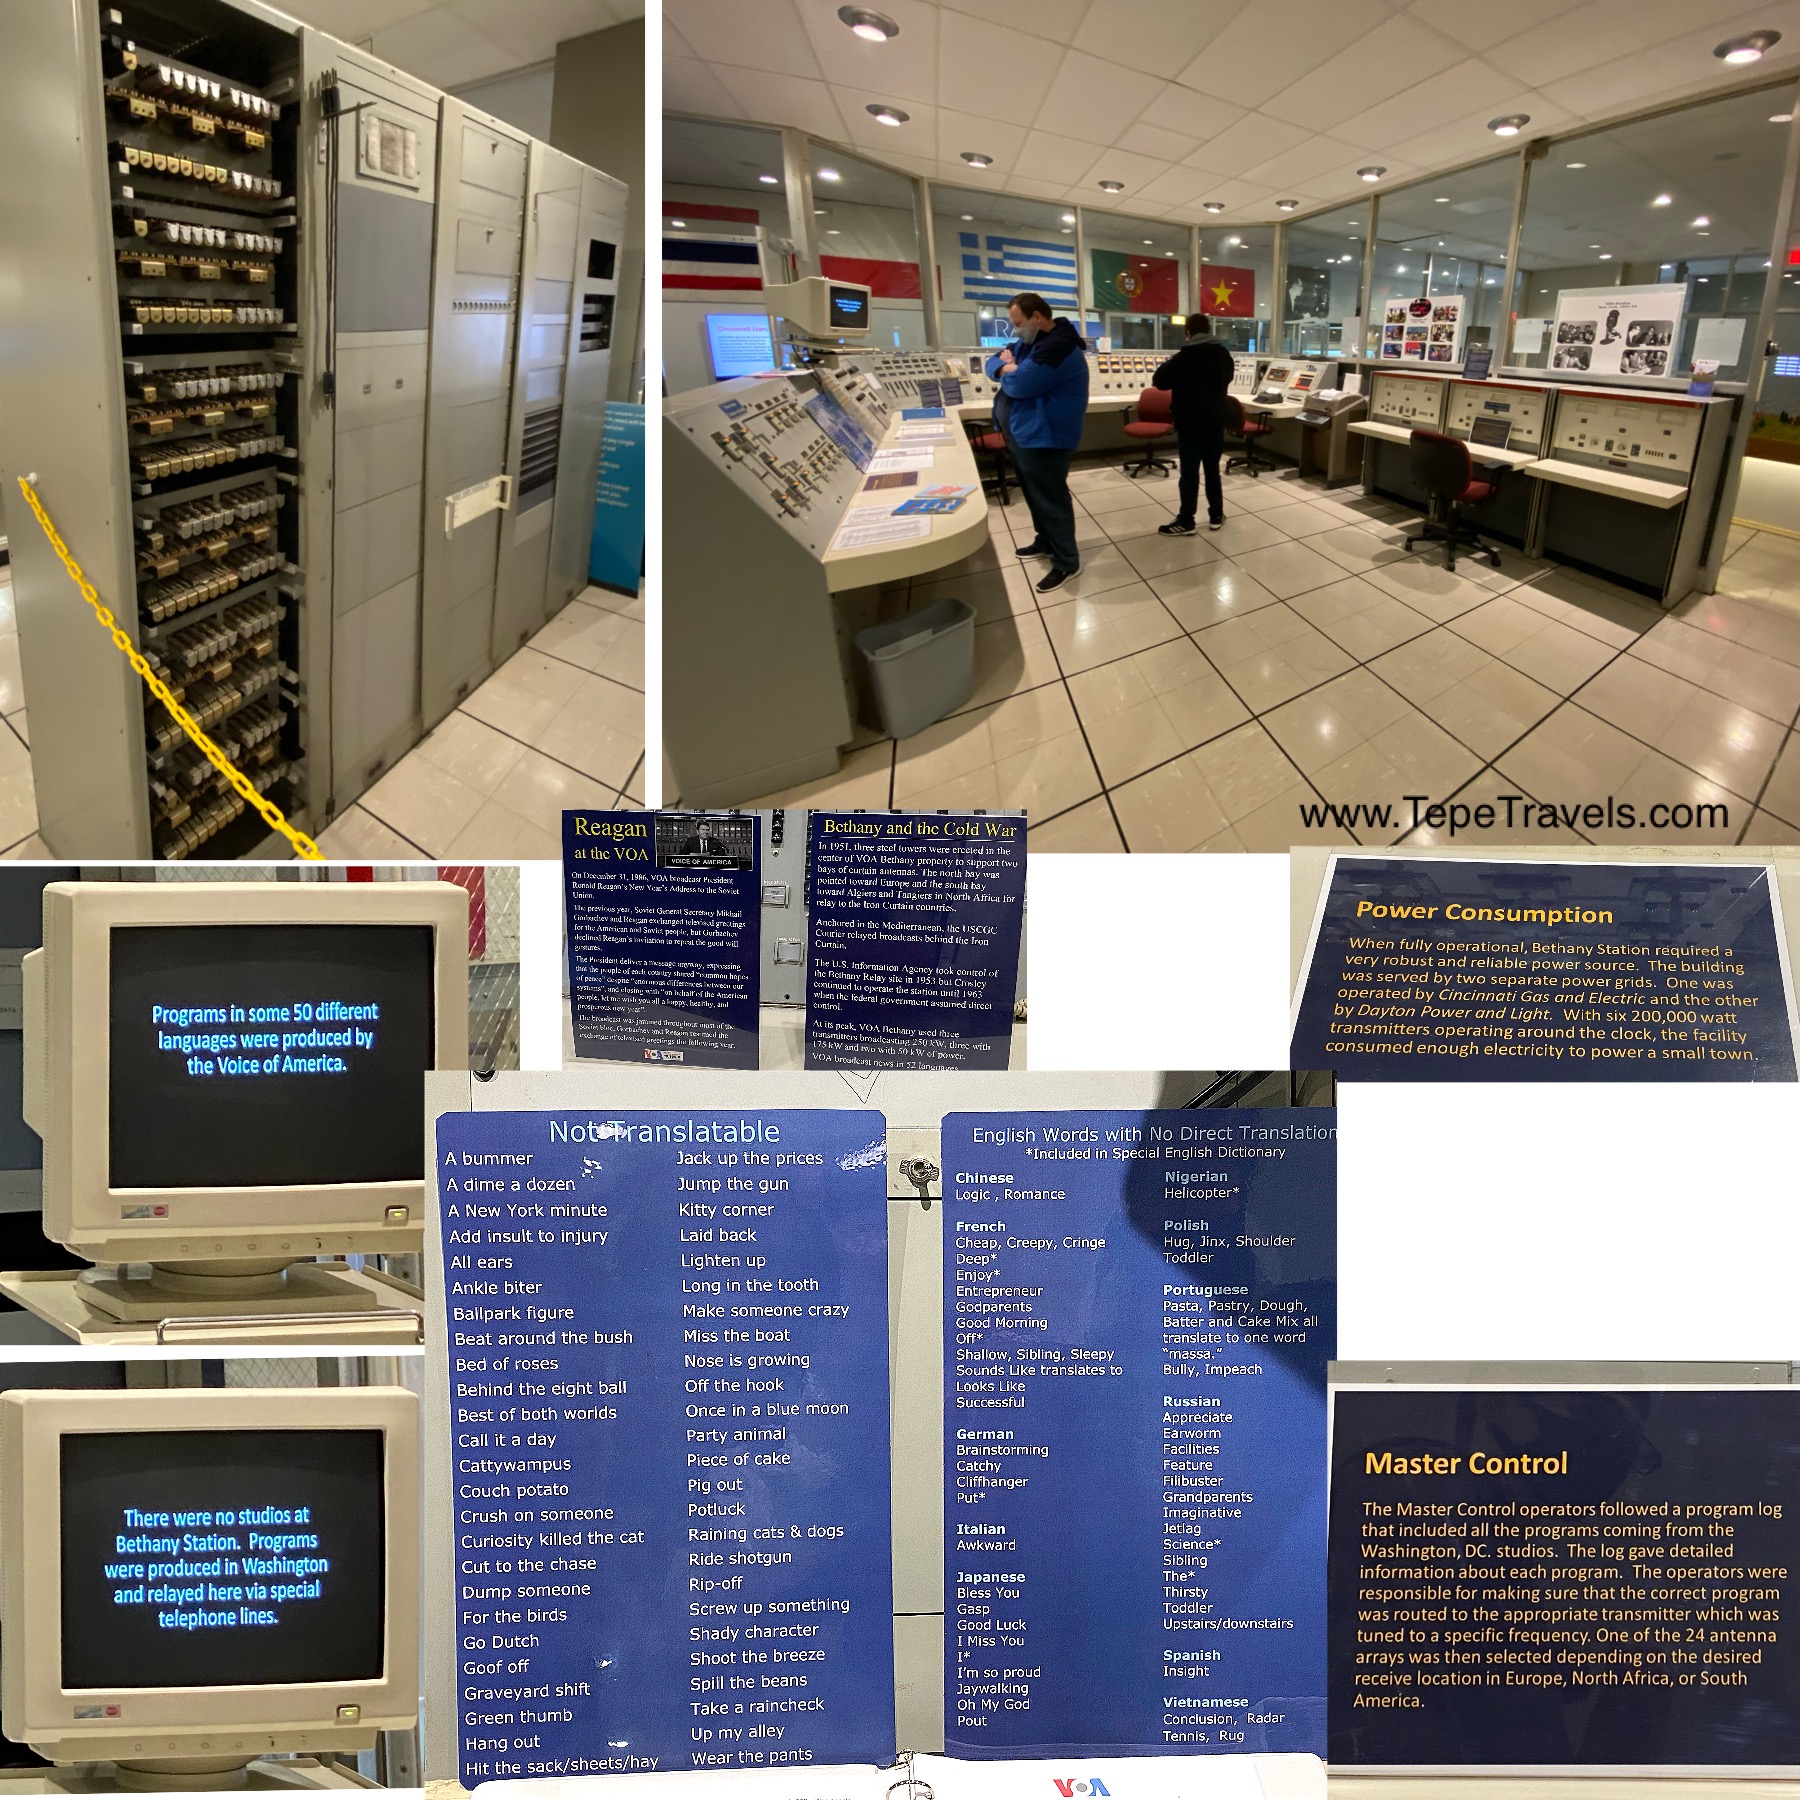
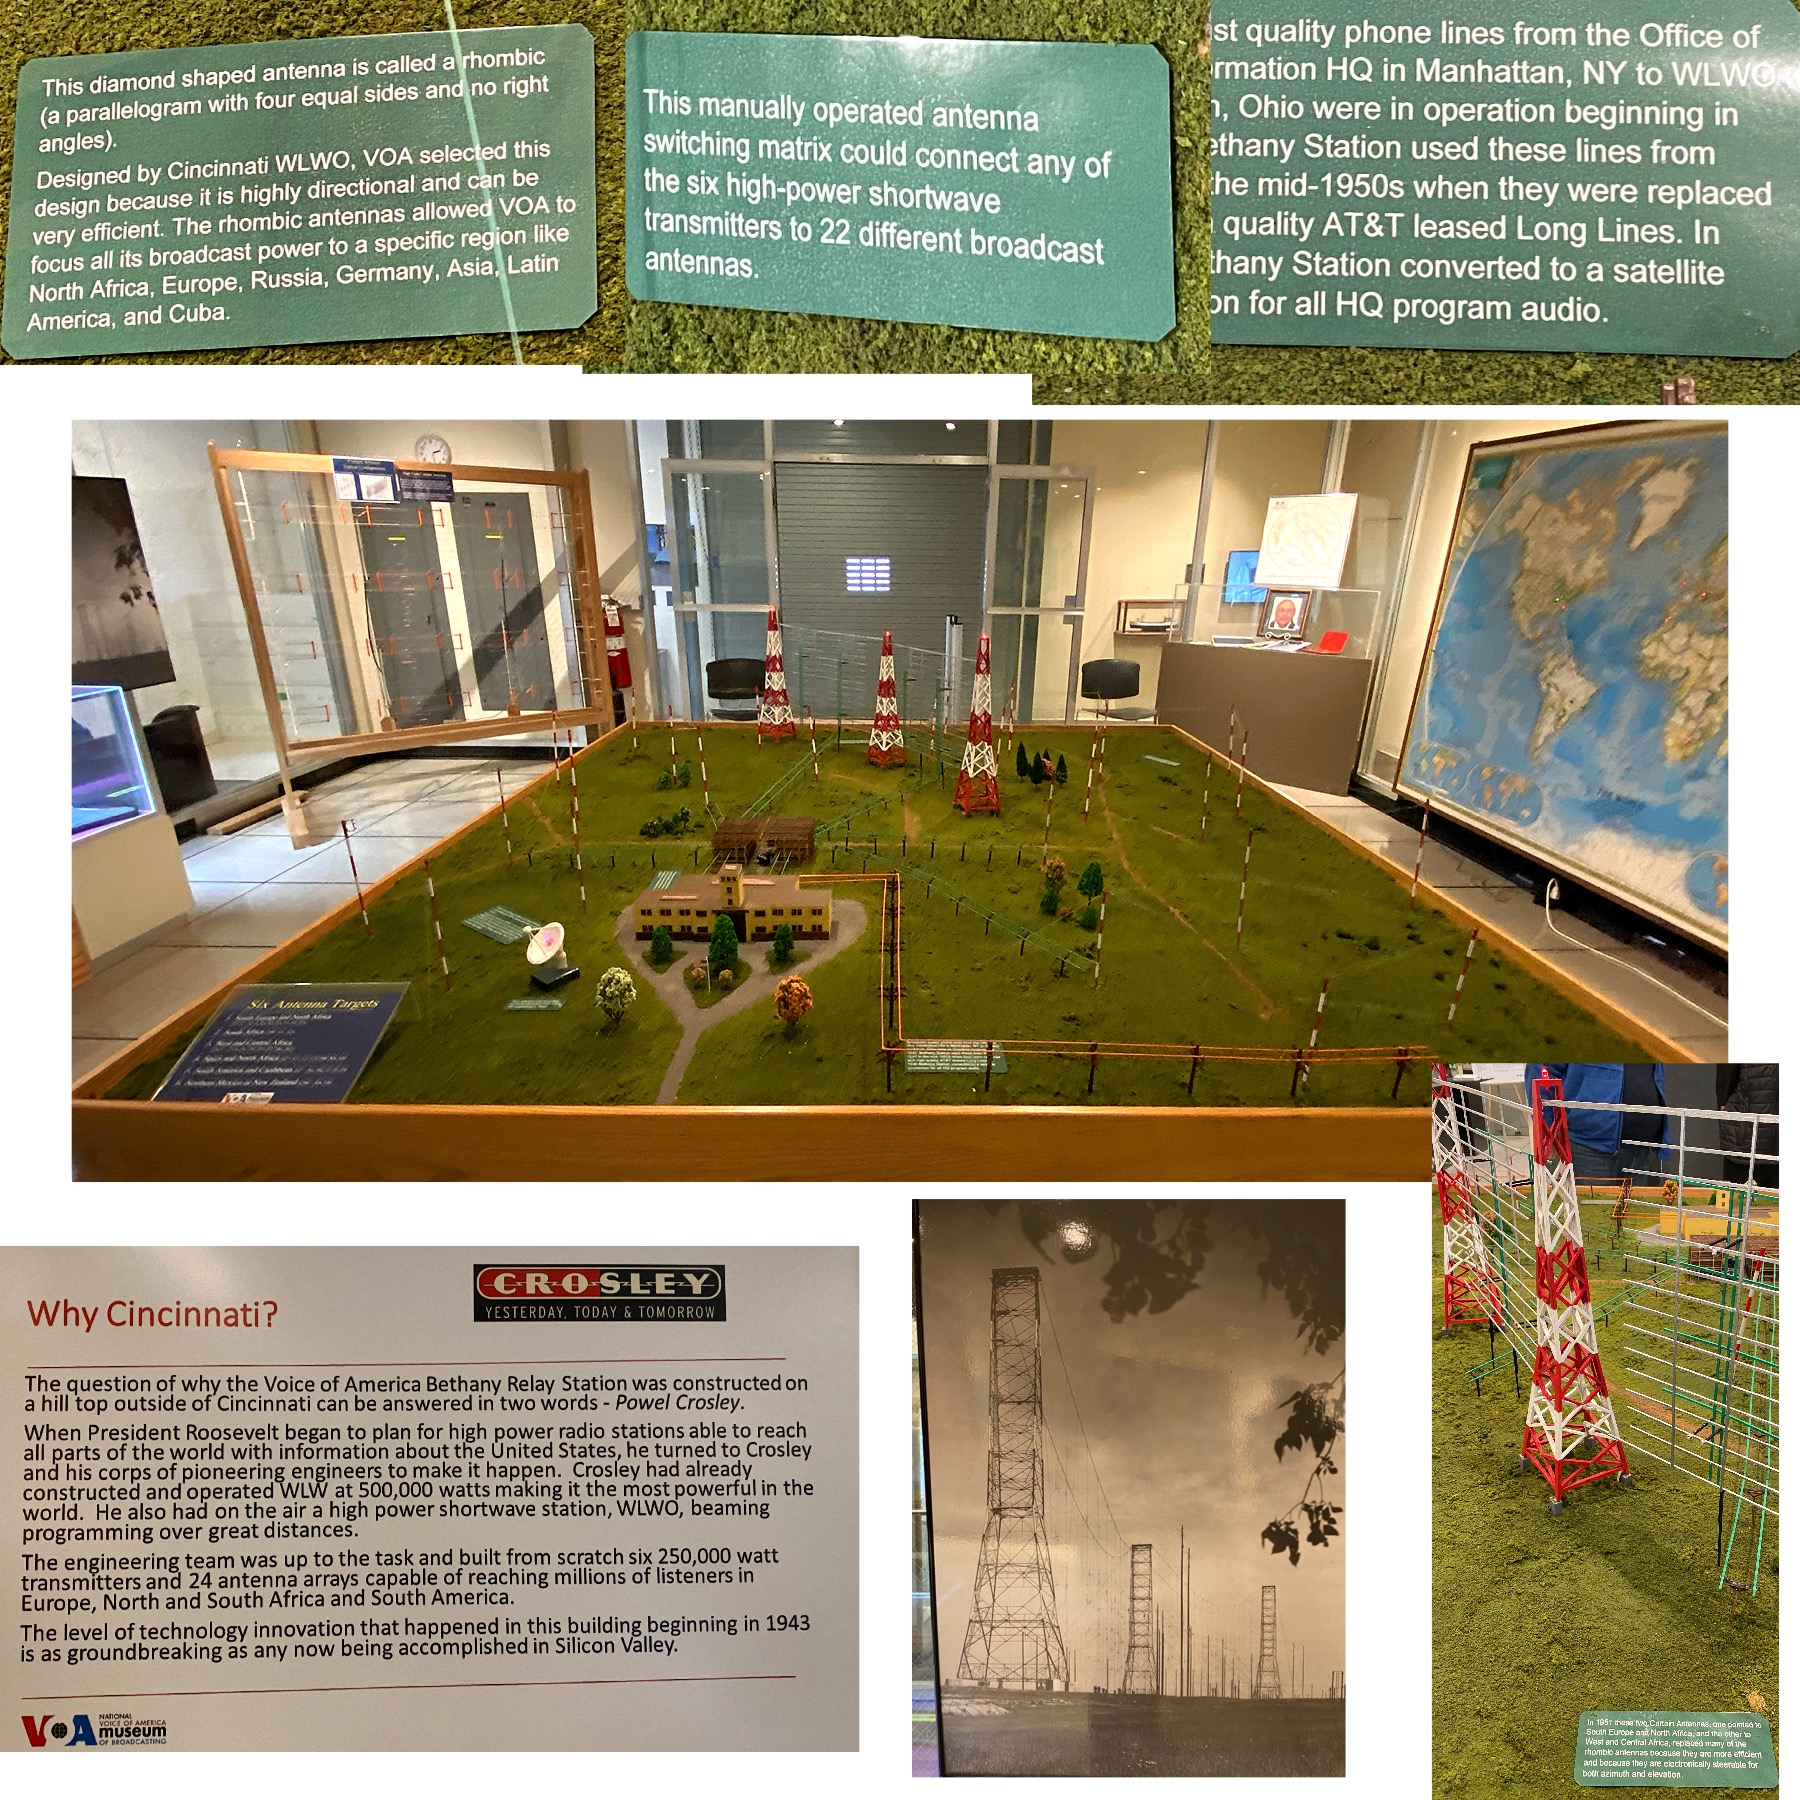
During World War II, Germany sent out propaganda over the radio. To counteract Nazi propaganda, The Voice Of America sent out broadcasts through five different transmission stations, including the VOA Bethany Station. All content was created in Washington and sent out via special lines to the Bethany Station. The broadcasts were sent out in over 50 languages. The VOA Bethany station would send out the programs through their multiple antennas, including two curtain antennas (a new type of antennae at the time that could send radio waves out farther than before). There were also several relay stations located throughout the world.

Click To Enlarge
Click To Enlarge

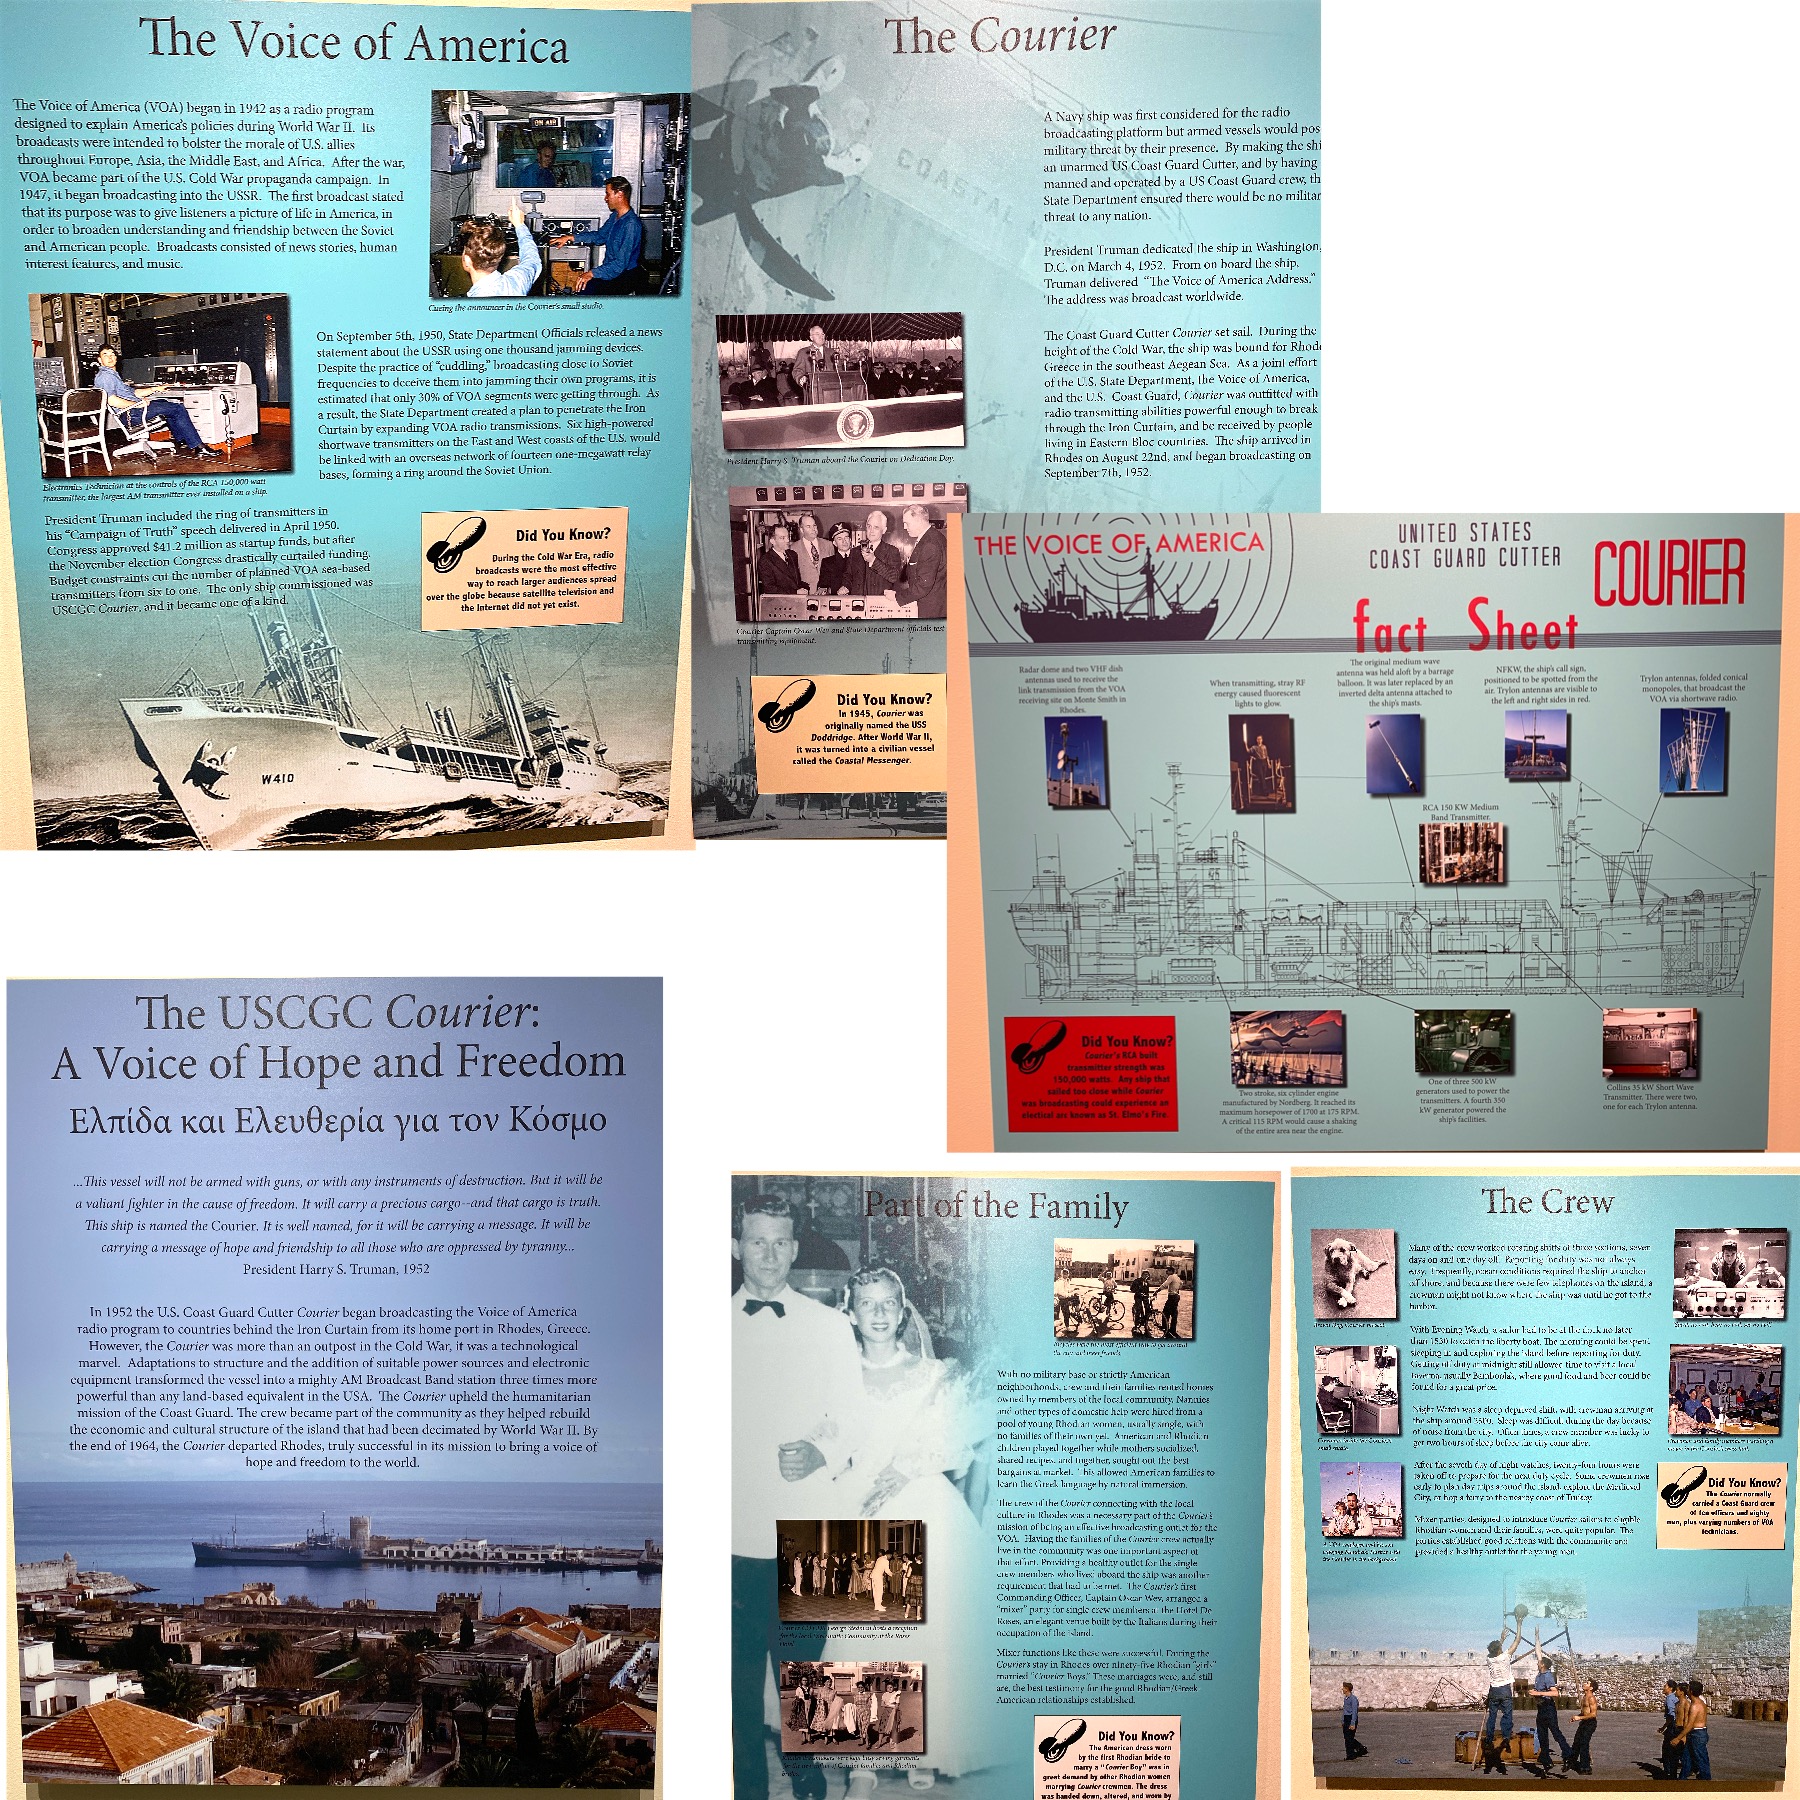
During the Cold War, the radio broadcasts were aimed at countering Soviet propaganda. One of the coolest relay stations during this time was a Coast Guard vessel called the USCGC Courier. This wartime vessel was converted to be an unarmed ship with the ability to transmit strong enough signals to get through the Iron Curtain. It was stationed at Rhodes, Greece from 1952 to 1964. It received the VOAs signals and would then broadcast them into the USSR and nearby countries.

Click To Enlarge

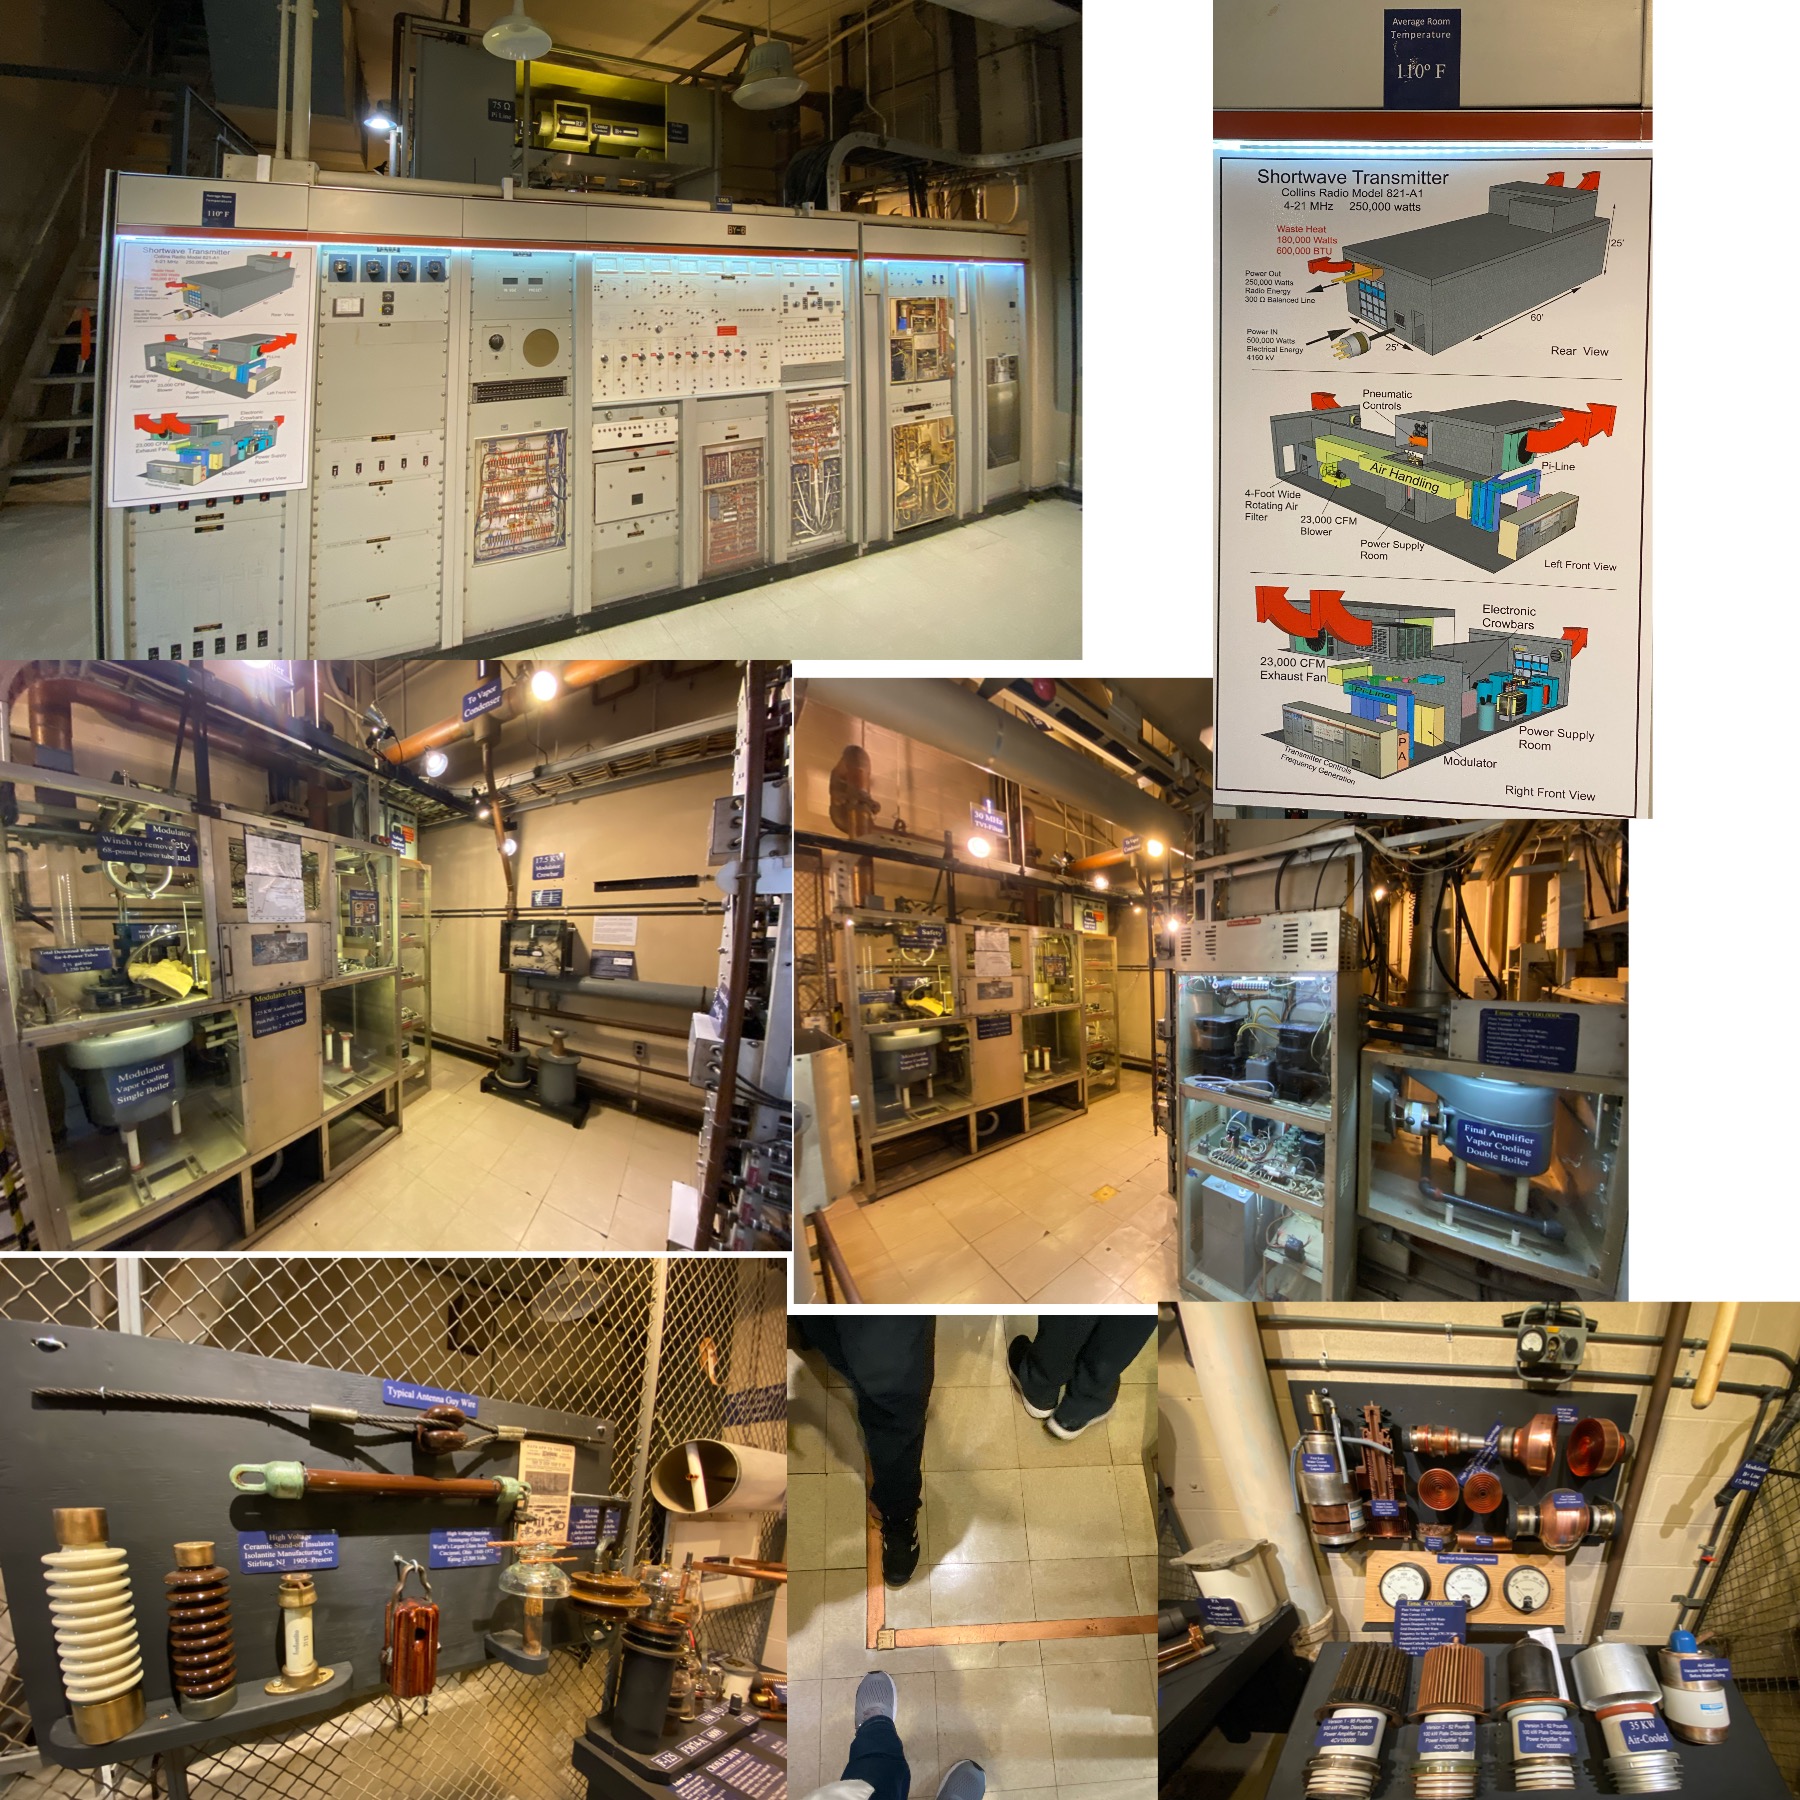
There were a lot of entertaining things to look at during our tour. They had a mix of informational signs and original equipment (control room, transmitter room) from the days when the station was still up and running. There was even some of the original copper grounding throughout the building, including in the floor.

Click To Enlarge

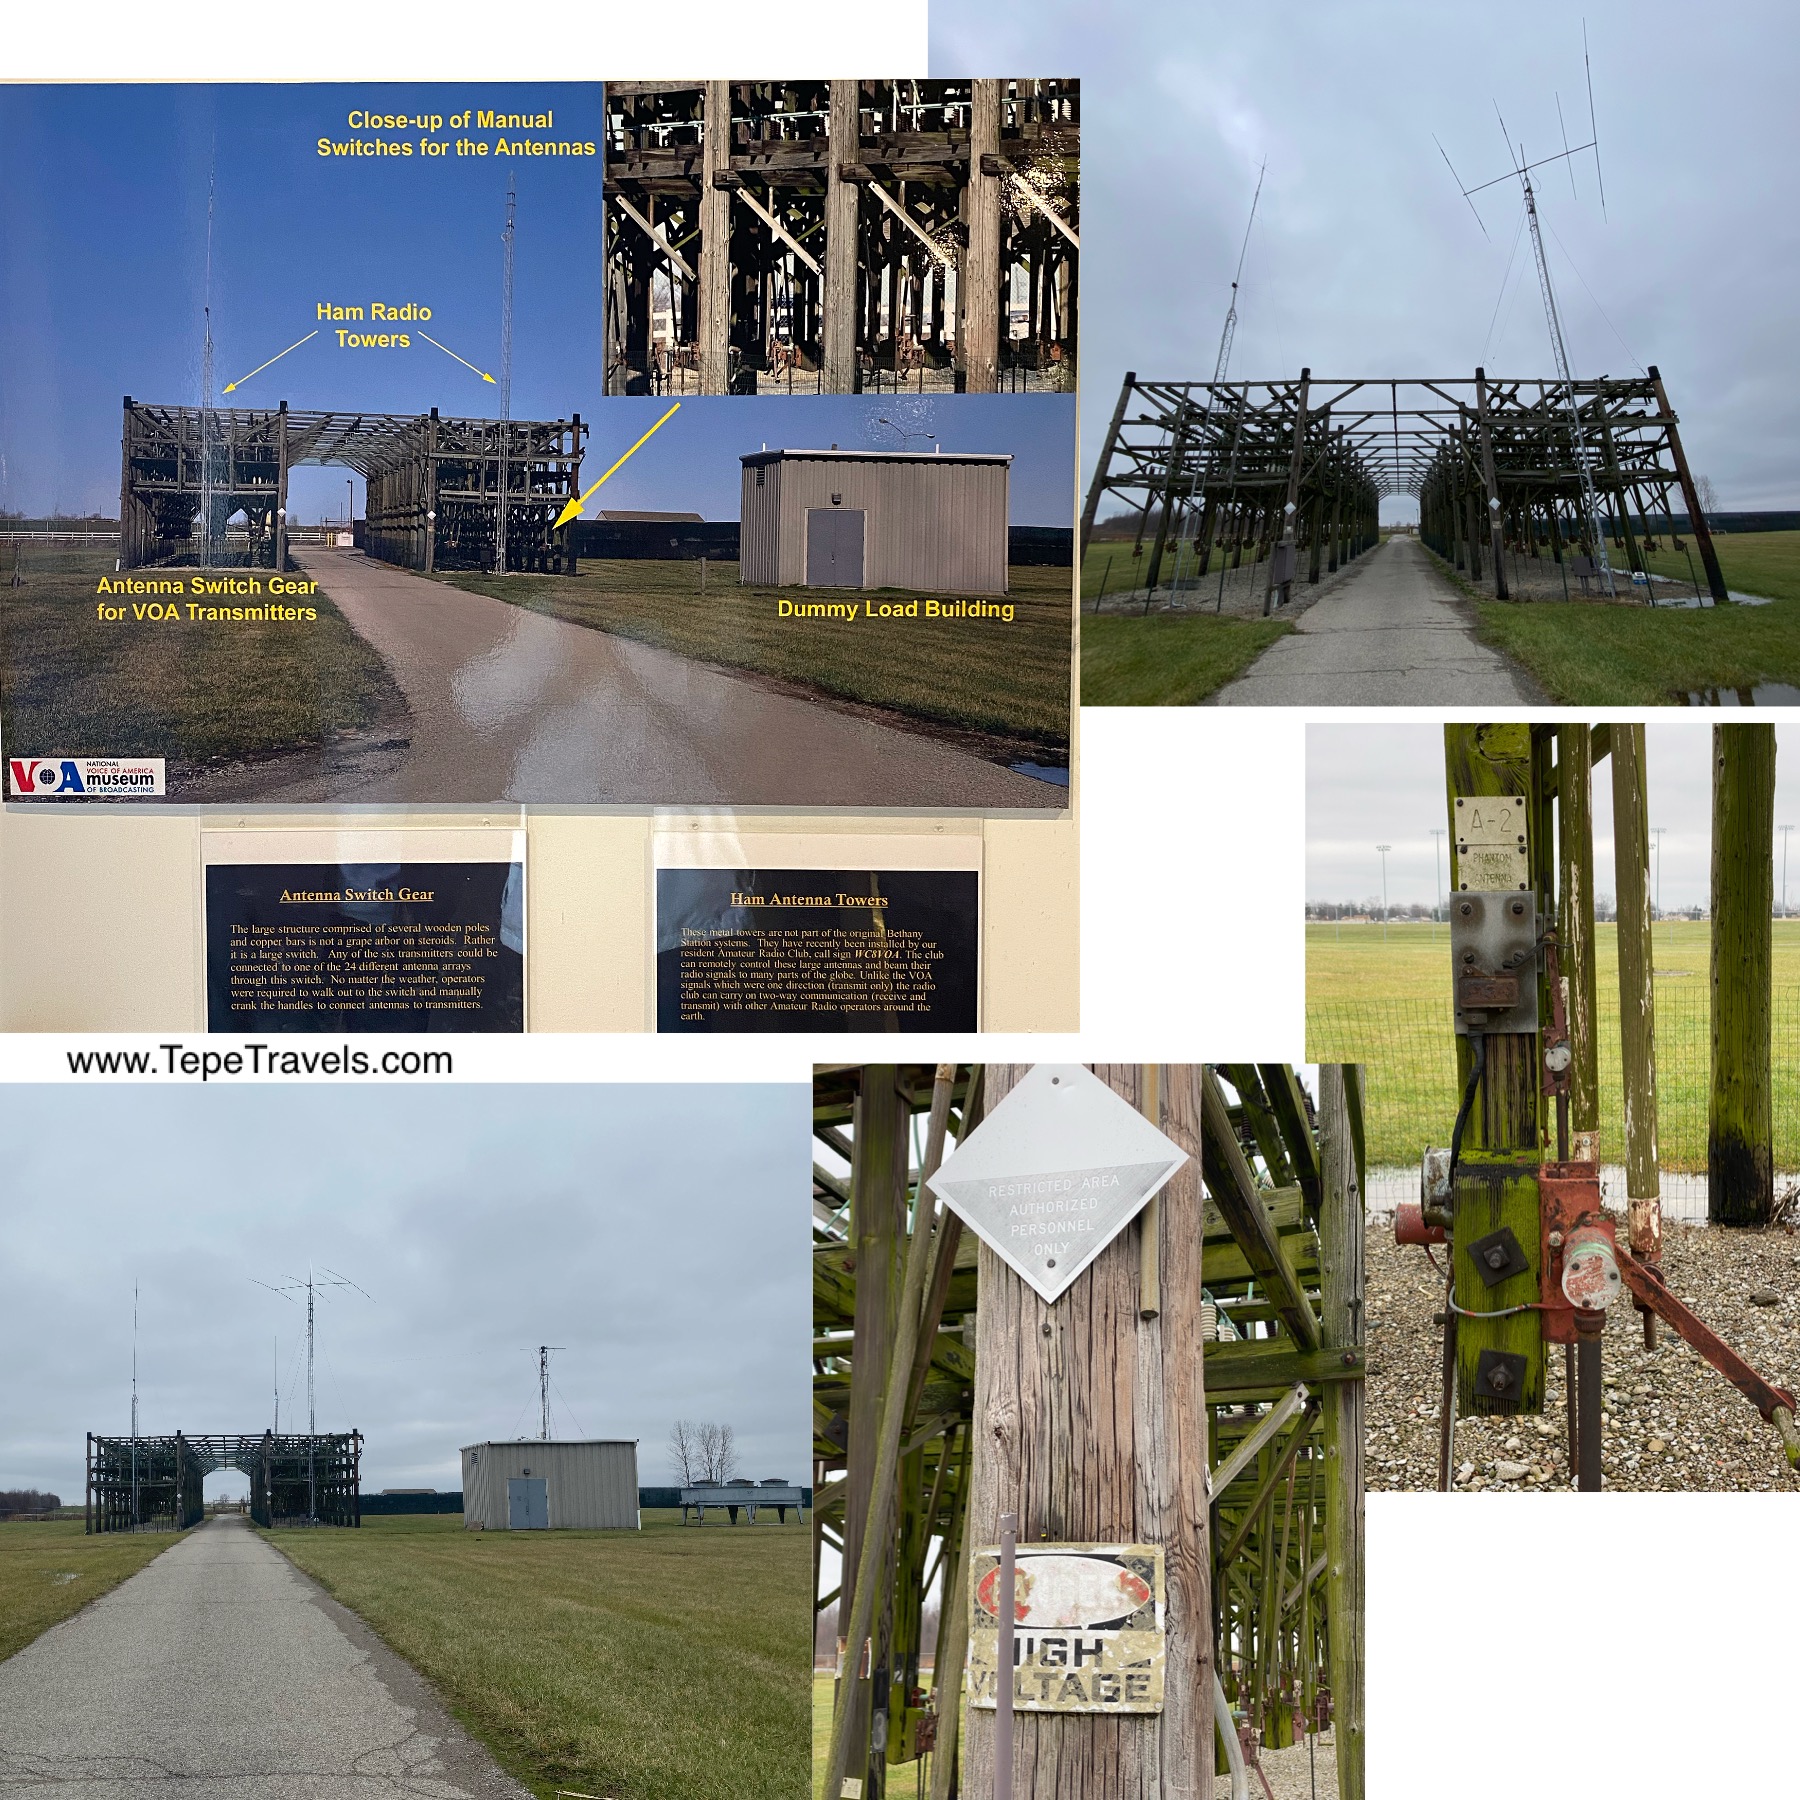
Behind the museum building, you can walk out and see the antennae switch station. When engineers had to go outside to switch the antennas, they could only be near the switch station for 10-15 minutes a day! They had to do this even in the cold and rain. Could you imagine having to be near those electrical currents while it is raining or snowing around you?

Click To Enlarge
Click To Enlarge
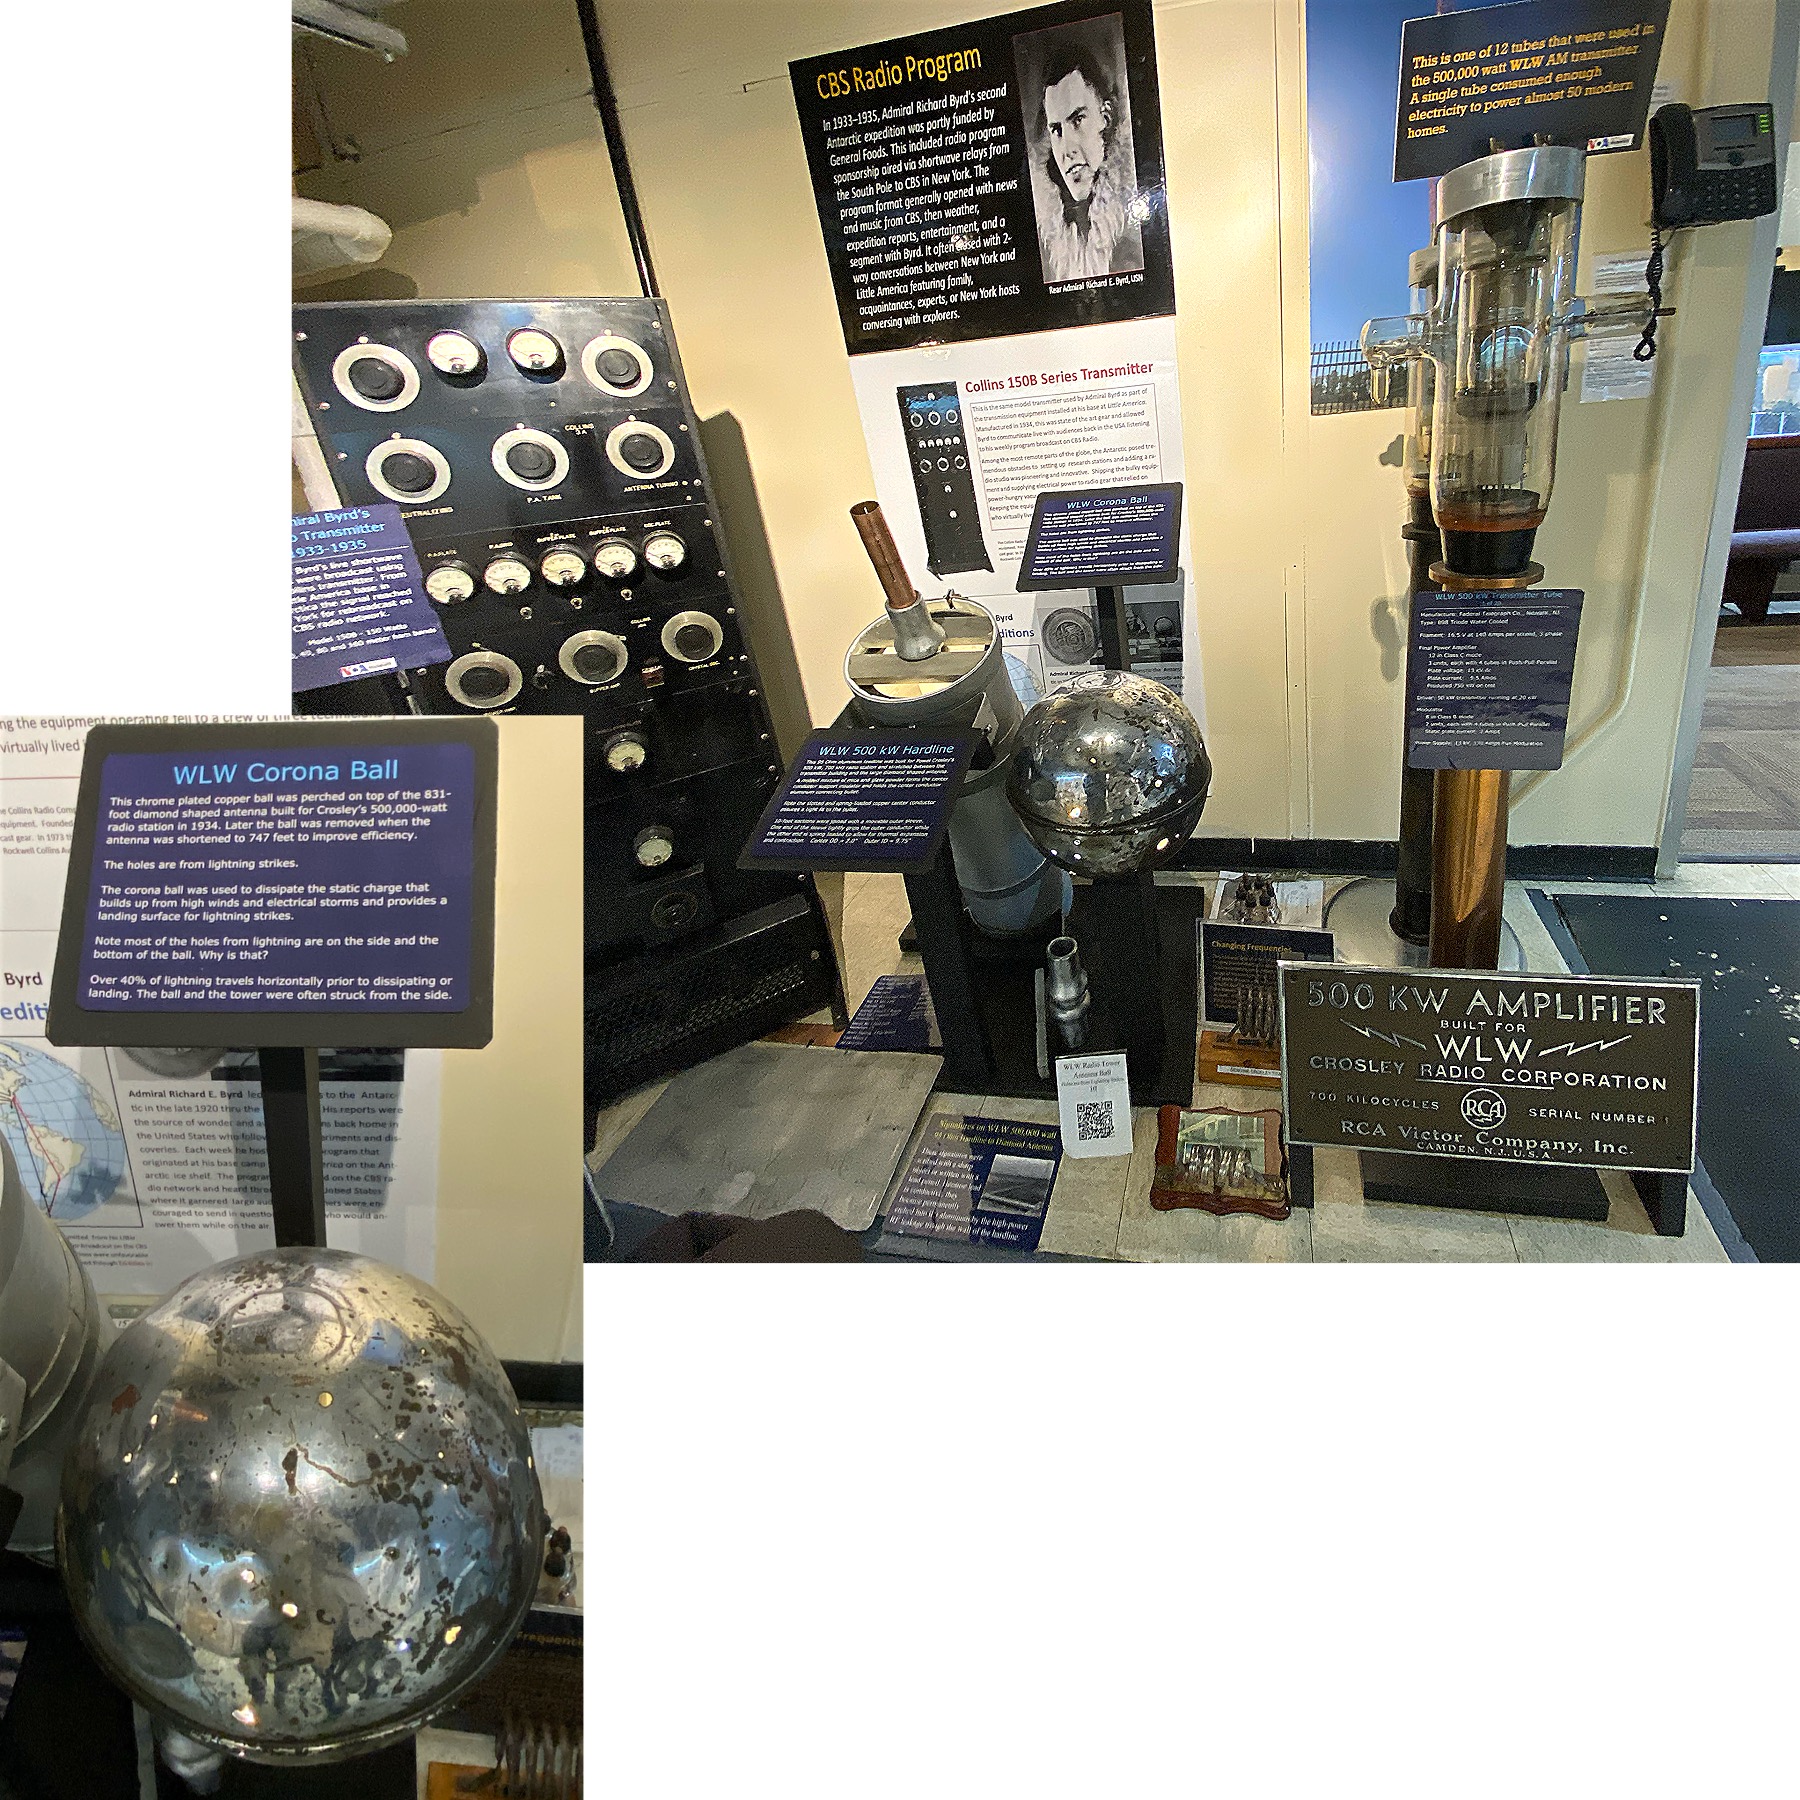
Click To Enlarge. WLW tower Corona Ball. It sat at the top of the tower. The holes are from lightening strikes.

Because of the changes in technology, the Bethany station became outdated and closed in 1994. The antennae towers were removed beginning in 1997. The Voice of America still transmits programs, but it is now done digitally and by satellite. The original land of the Voice of America Bethany Station has been converted to a shopping area, a county owned park (Voice of America Metro Park), and the Voice Of America Museum. You can still see some of the concrete antennae bases throughout the Voice of America Metro Park.

If you really want to see a large radio antenna, you can still see the huge WLW tower further down on Tylersville Rd.

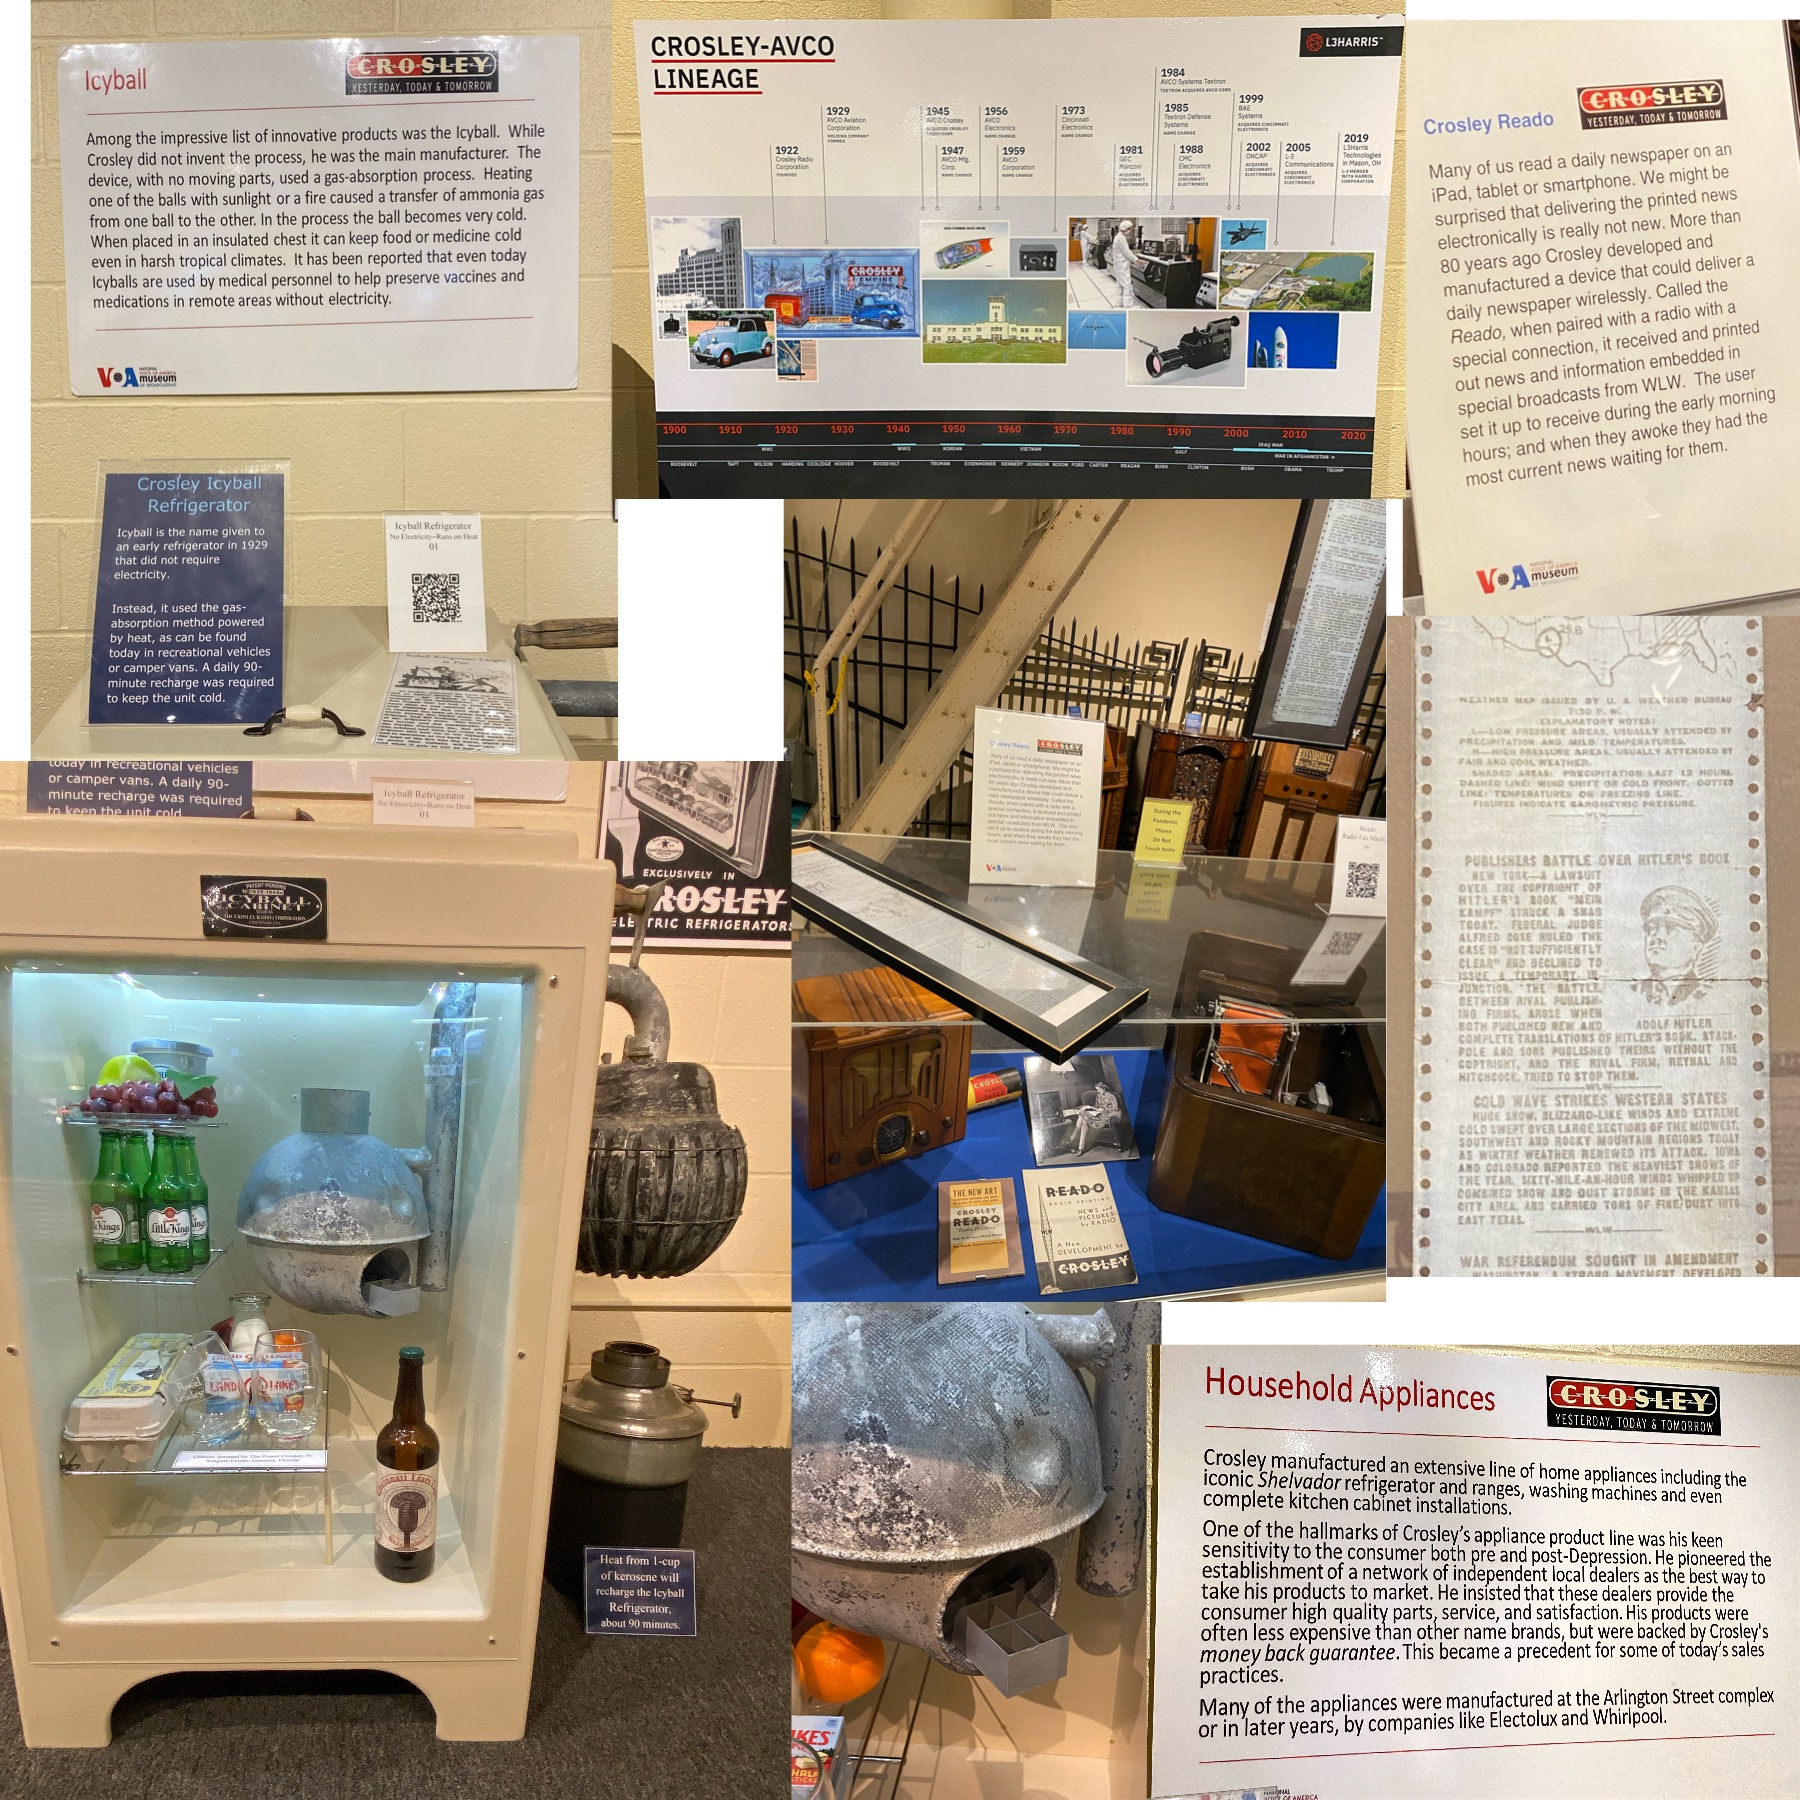
There were other exhibits at the museum as well, including a room full of inventions made by the man who helped make VOA Bethany possible. Crosley was a native Cincinnatian who began in his work in the automotive industry. He then transitioned into radios, where he made radios cheaper and more available for everyone. He began his radio station WLW radio. WLW had its first broadcast in 1922 and also helped with broadcasting during World War II. After World War II, Crosley began making appliances, including a refrigerator with an ice maker.

Click To Enlarge

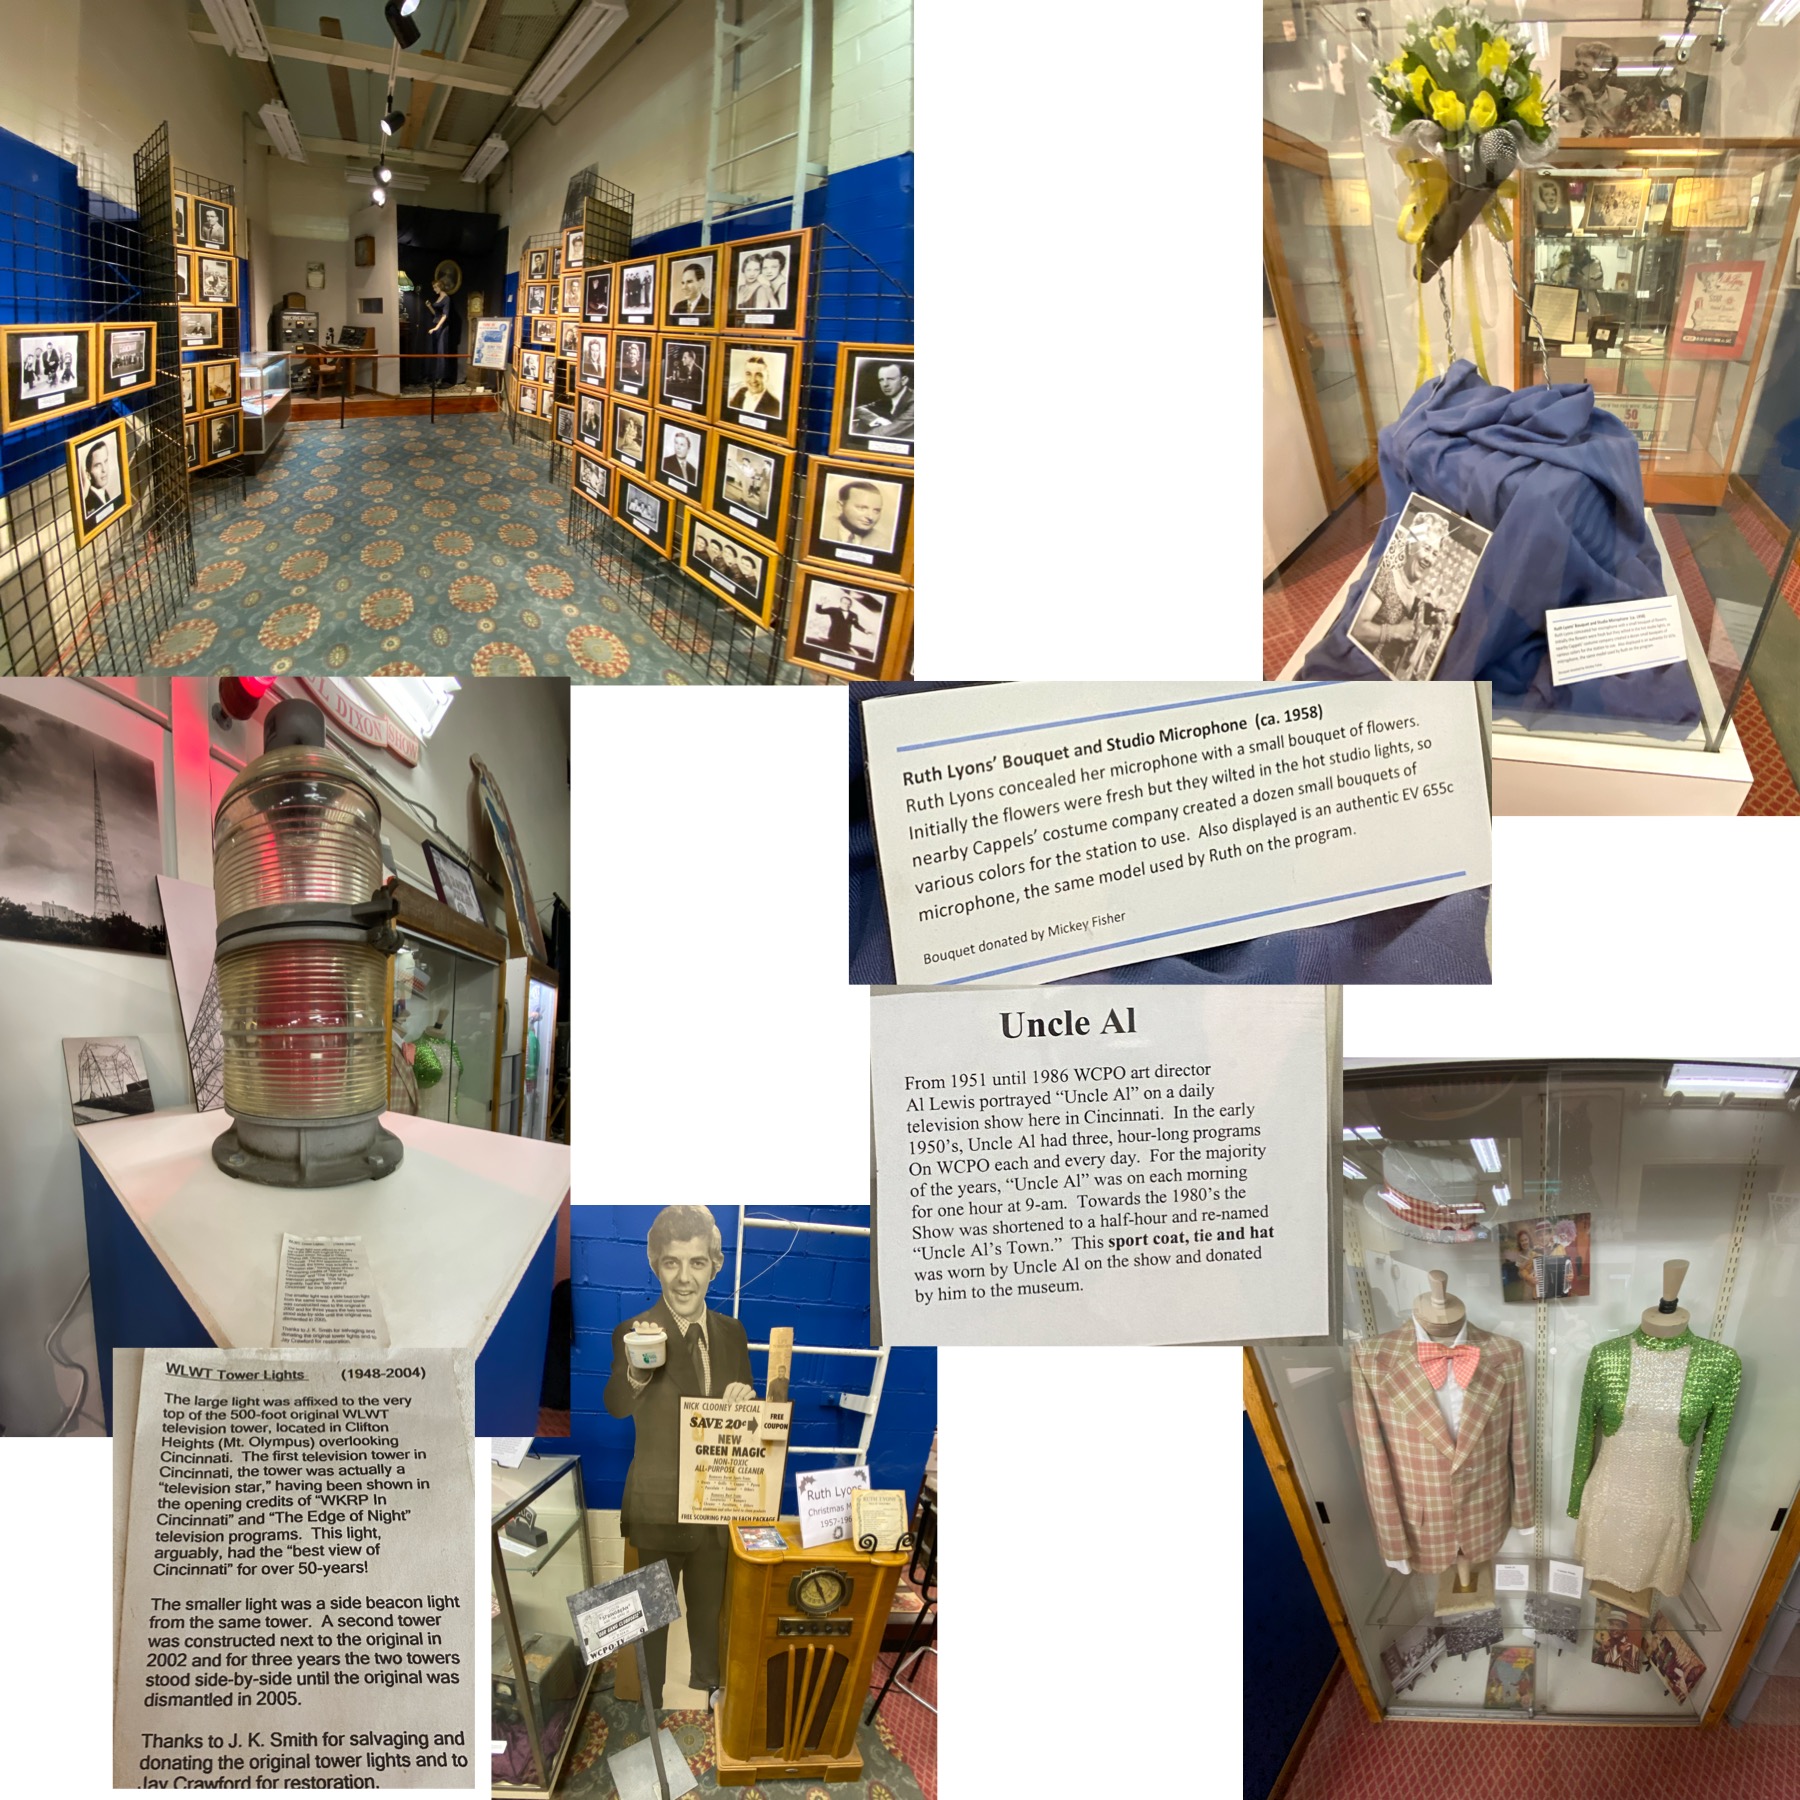
There was also a History of Radio and Broadcasting in Cincinnati room. It had items from several local shows like the Uncle Al show, Ruth Lyons, and Nick Clooney. Ben even starred on one of the Uncle Al shows and it was fun to show the kids something from the past.

Click To Enlarge

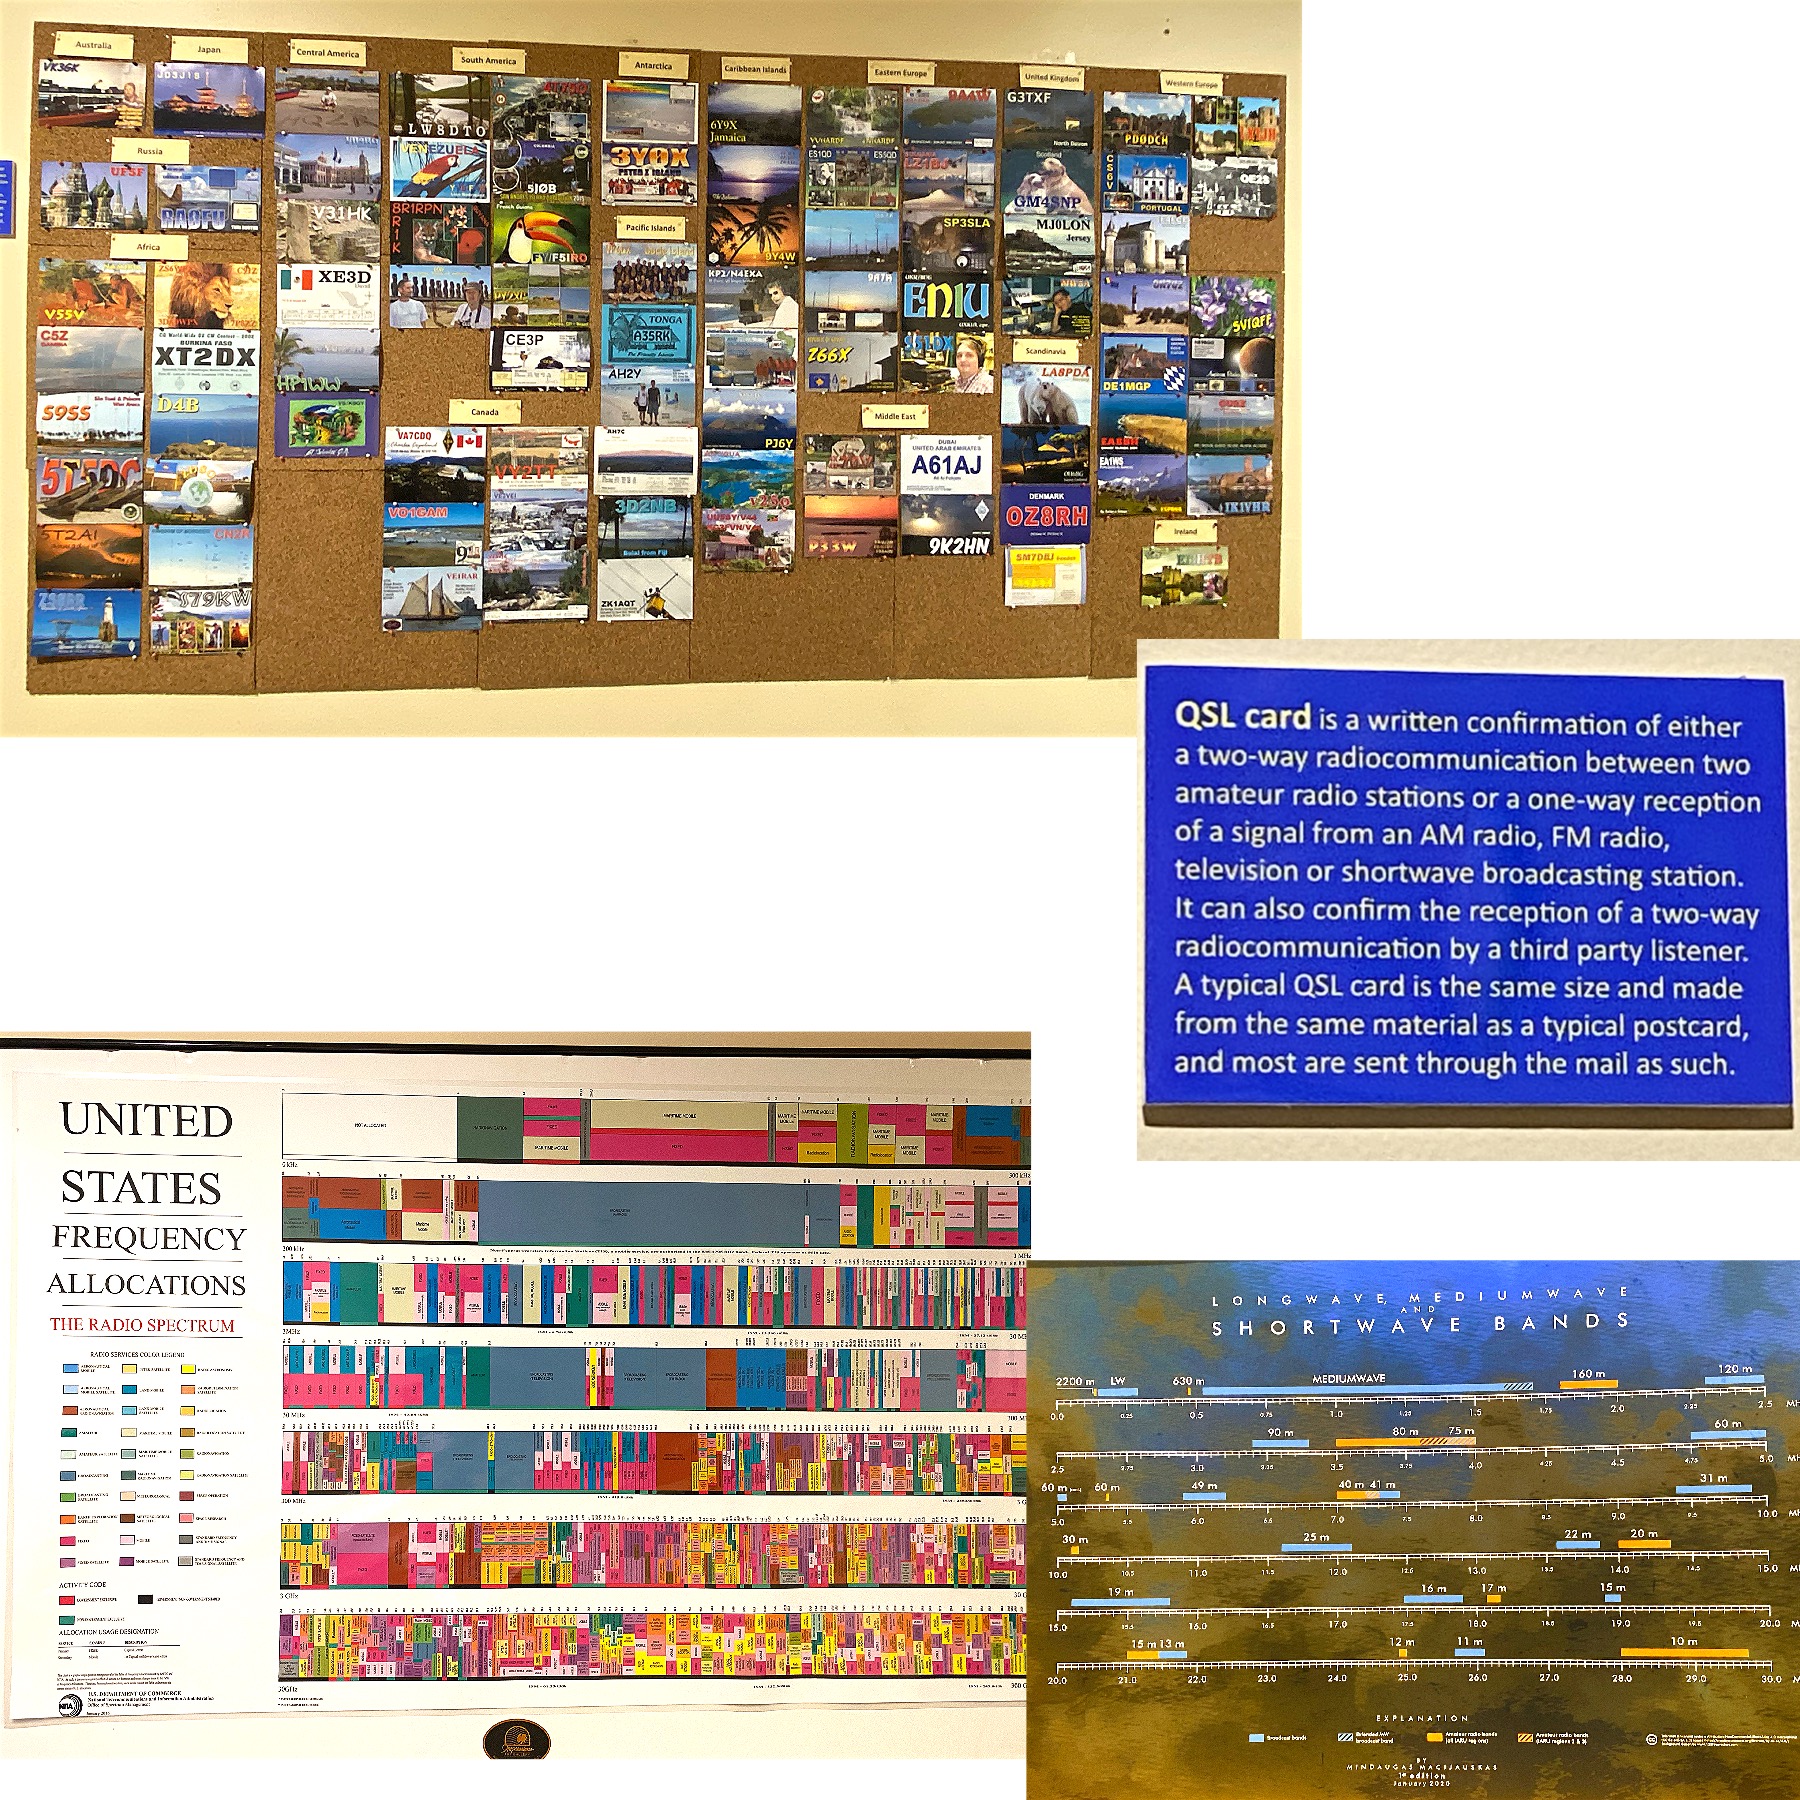
The museum is also now home to ham radio/amateur radio enthusiasts. Their current set-up includes ham radio, Morse Code, digital, and a high-powered broadcast. They use about a dozen amateur radio satellites. The white dish that remains outside the museum is used to bounce the signal off of the moon! There are competitions for amateur radio and the current VOA amateur radio has quite the cool collection of QSL postcards from around the world. These postcards are from around the world, from South America to Asia!

Click To Enlarge

There is a small gift shop in the museum. It has some note cards, books, etc. No postcards though!

DETAILS:

  • WHERE: 8070 Tylersville Rd., West Chester, Ohio 45069
  • HOURS: Saturday and Sunday, 1:00 pm to 4:00 pm
  • COSTS: $10/person. Under 16 free.
  • PARKING: Yes
  • BATHROOM: Yes
  • TIME RECOMMENDED: 2-3 hours
  • COVID RESTRICTIONS: Masks are required (as of January 2022).
  • *Details correct at the time of posting, but please double check before you go.

If you would like more information on The Voice of America, check out these sites:

Posted in: Christmas, Exploring Ohio, Holidays

Light Up Middletown

Ben and I had a date night and went to Light Up Middletown. The drive through Christmas light display has lots of displays. Some of our favorites were the Calling Birds (on cell phones) and the reindeer with whales. There were a few unique ones including a steel smelter and an OH-IO.


We have a YouTube video of the drive (about 16 minutes long) or the super sped up version below.

The light display entrance fee is by Cash Donations! For more information, here is the link to their website. I would recommend going early, as the line gets very long to get in (we were in a line for about 45 minutes).

Posted in: Food, Frequently Asked Questions, Newbie Tips

Cooking In The RV: Salmon In The Air Fryer

Ben and the boys love fish (me, not so much). I used to make fish on an outdoor grill, but we do not have a grill at the new apartment. However, I found an easy way to make it: the air fryer! It doesn’t take very long and the boys seem to enjoy it every time.

You will need:

  • Salmon filet(s)
  • Olive oil
  • Paprika
  • Salt
  • Pepper
  • Lemon juice
  • Any other seasonings you enjoy (I like to sprinkle a little Cajun)
  • Pastry brush
  • Optional: non-stick spray

Directions:

  1. Using a pastry brush, gently spread a thin layer olive oil over the filet. Season with paprika, ground pepper, salt, and any other seasonings you like on your fish. Sprinkle with lemon juice.
  2. Cut filet into smaller sections to fit in the air fryer. (I normally cut ours into about 6-7 inch wide sections).
  3. Oil the basket tray of the air fryer using a non-stick spray or the olive oil.
  4. Place a filet in the air fryer and cook at 390℉ for 7 minutes.
  5. Check to make sure fish is done and enjoy! (Repeat cooking steps for each filet.)
Posted in: Christmas, Exploring Ohio, Food, Holidays, Sightseeing

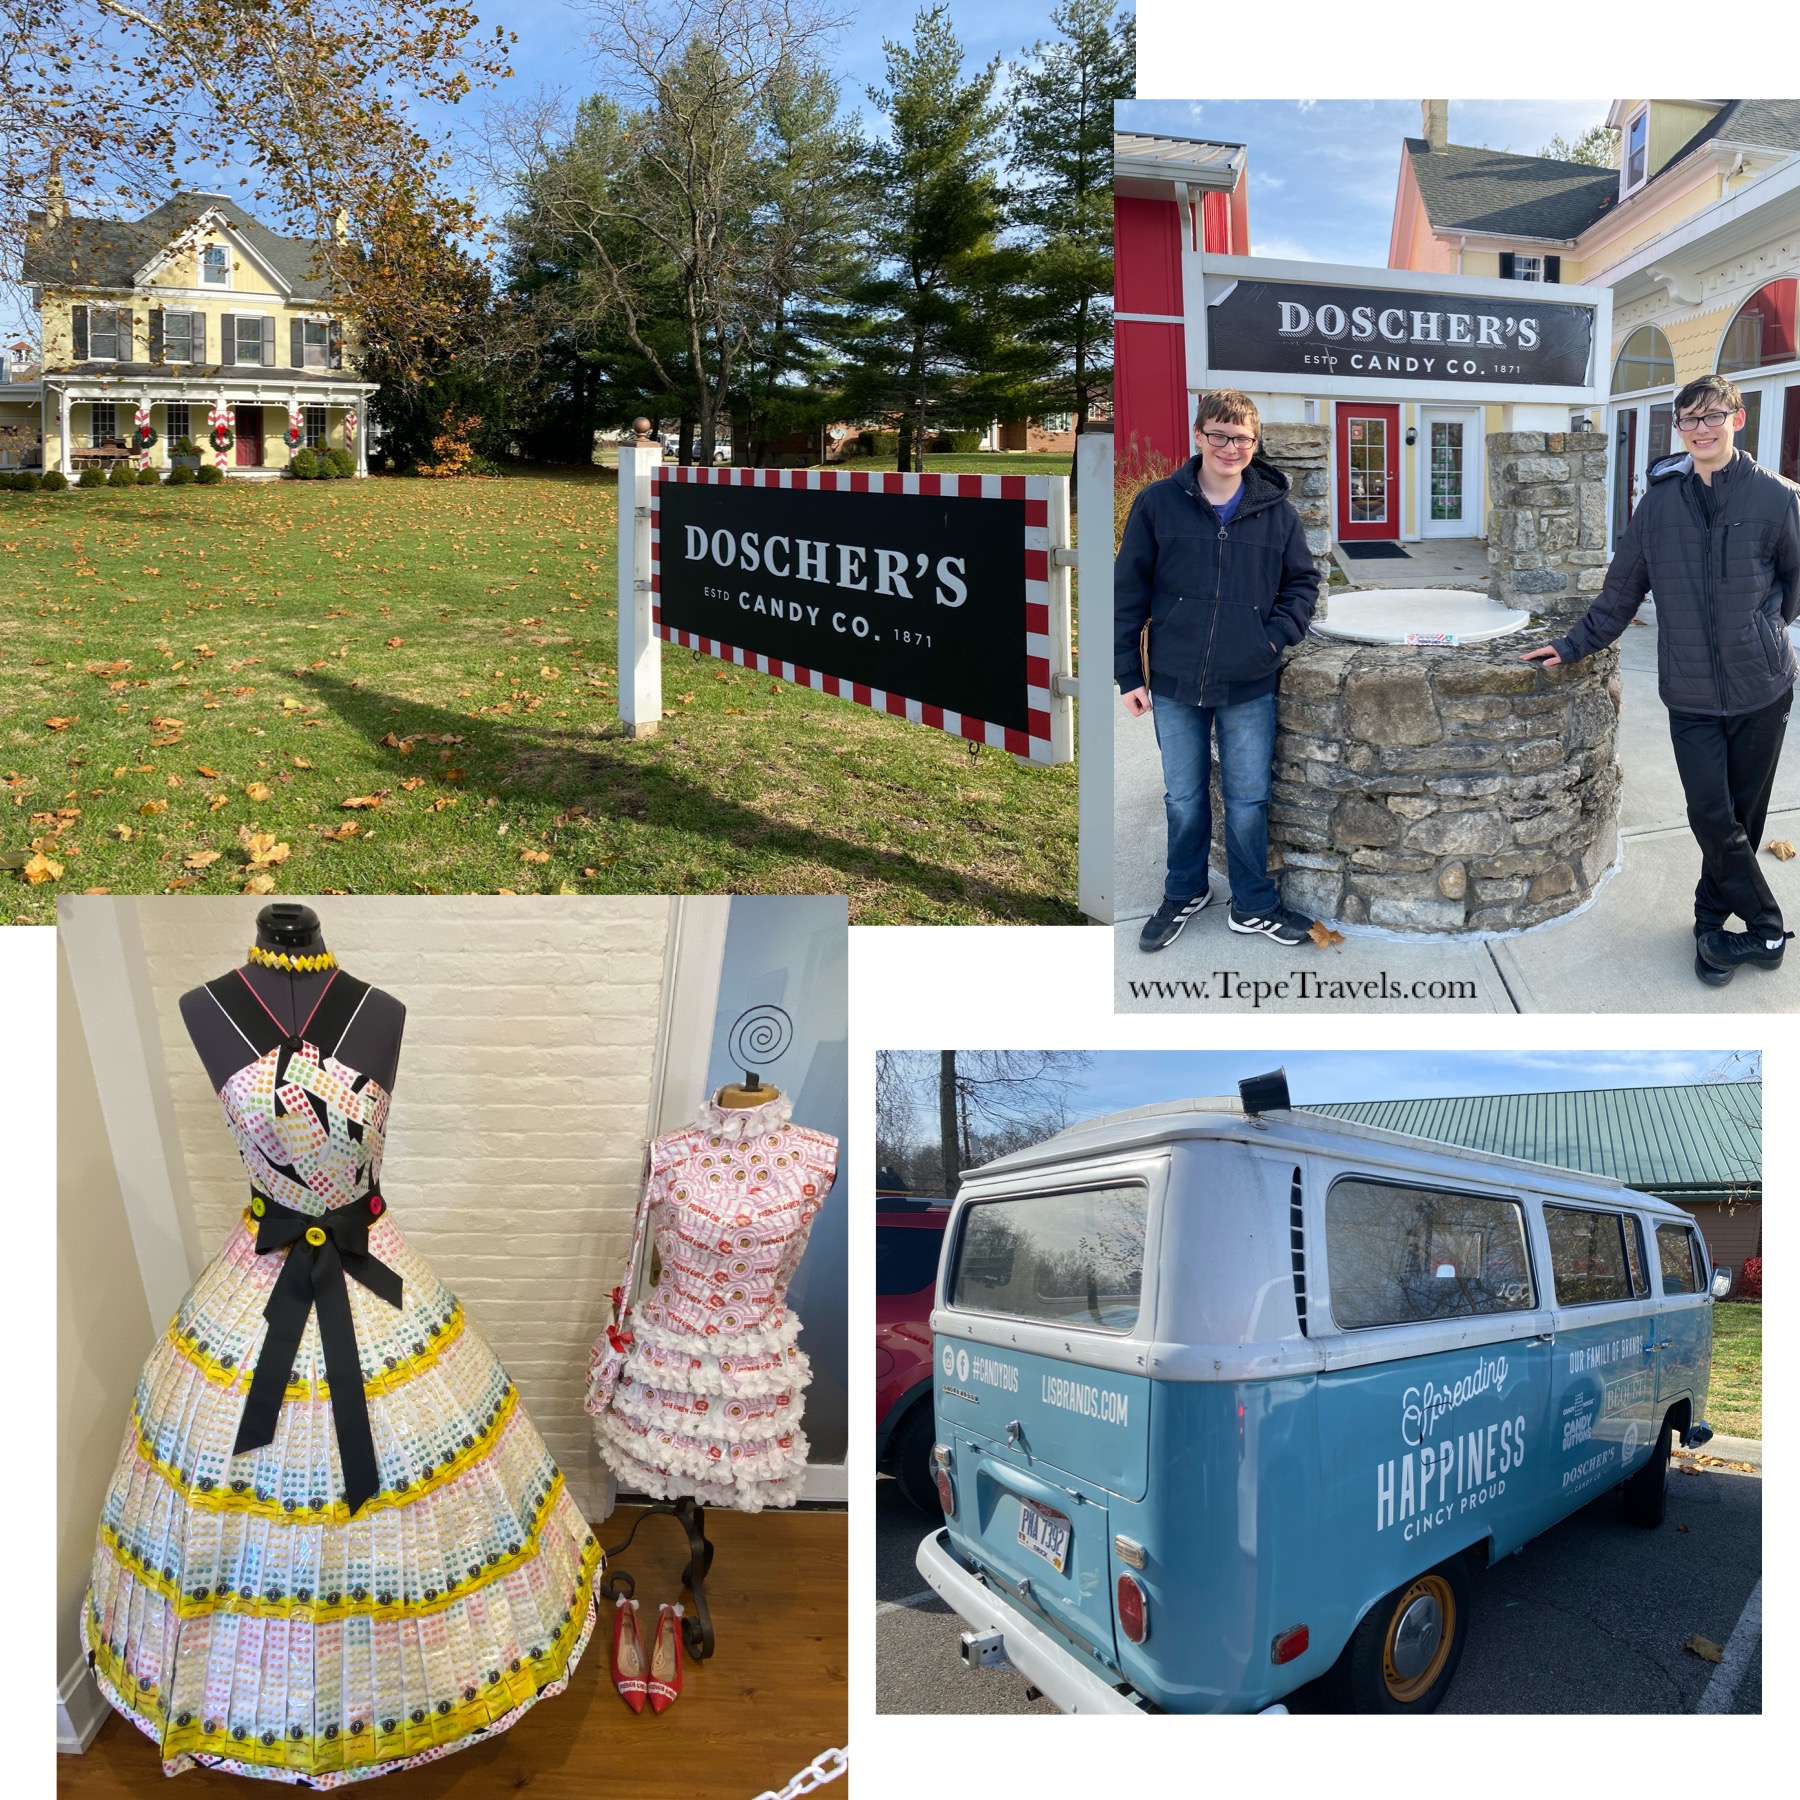
Exploring Near Home: Doscher’s Candies

One of the things I really wanted to do when we got back home was to explore our area more, just like we would if we were visiting the area. Our year of travel showed me that we get to be complacent and set in our daily schedules when we live stationary.

I happened upon an article about Doscher’s Candy Company while scrolling through my social media feeds. When I saw that they were the makers of the French Chews that Nick loves to get at the grocery store, I knew we had to check them out!

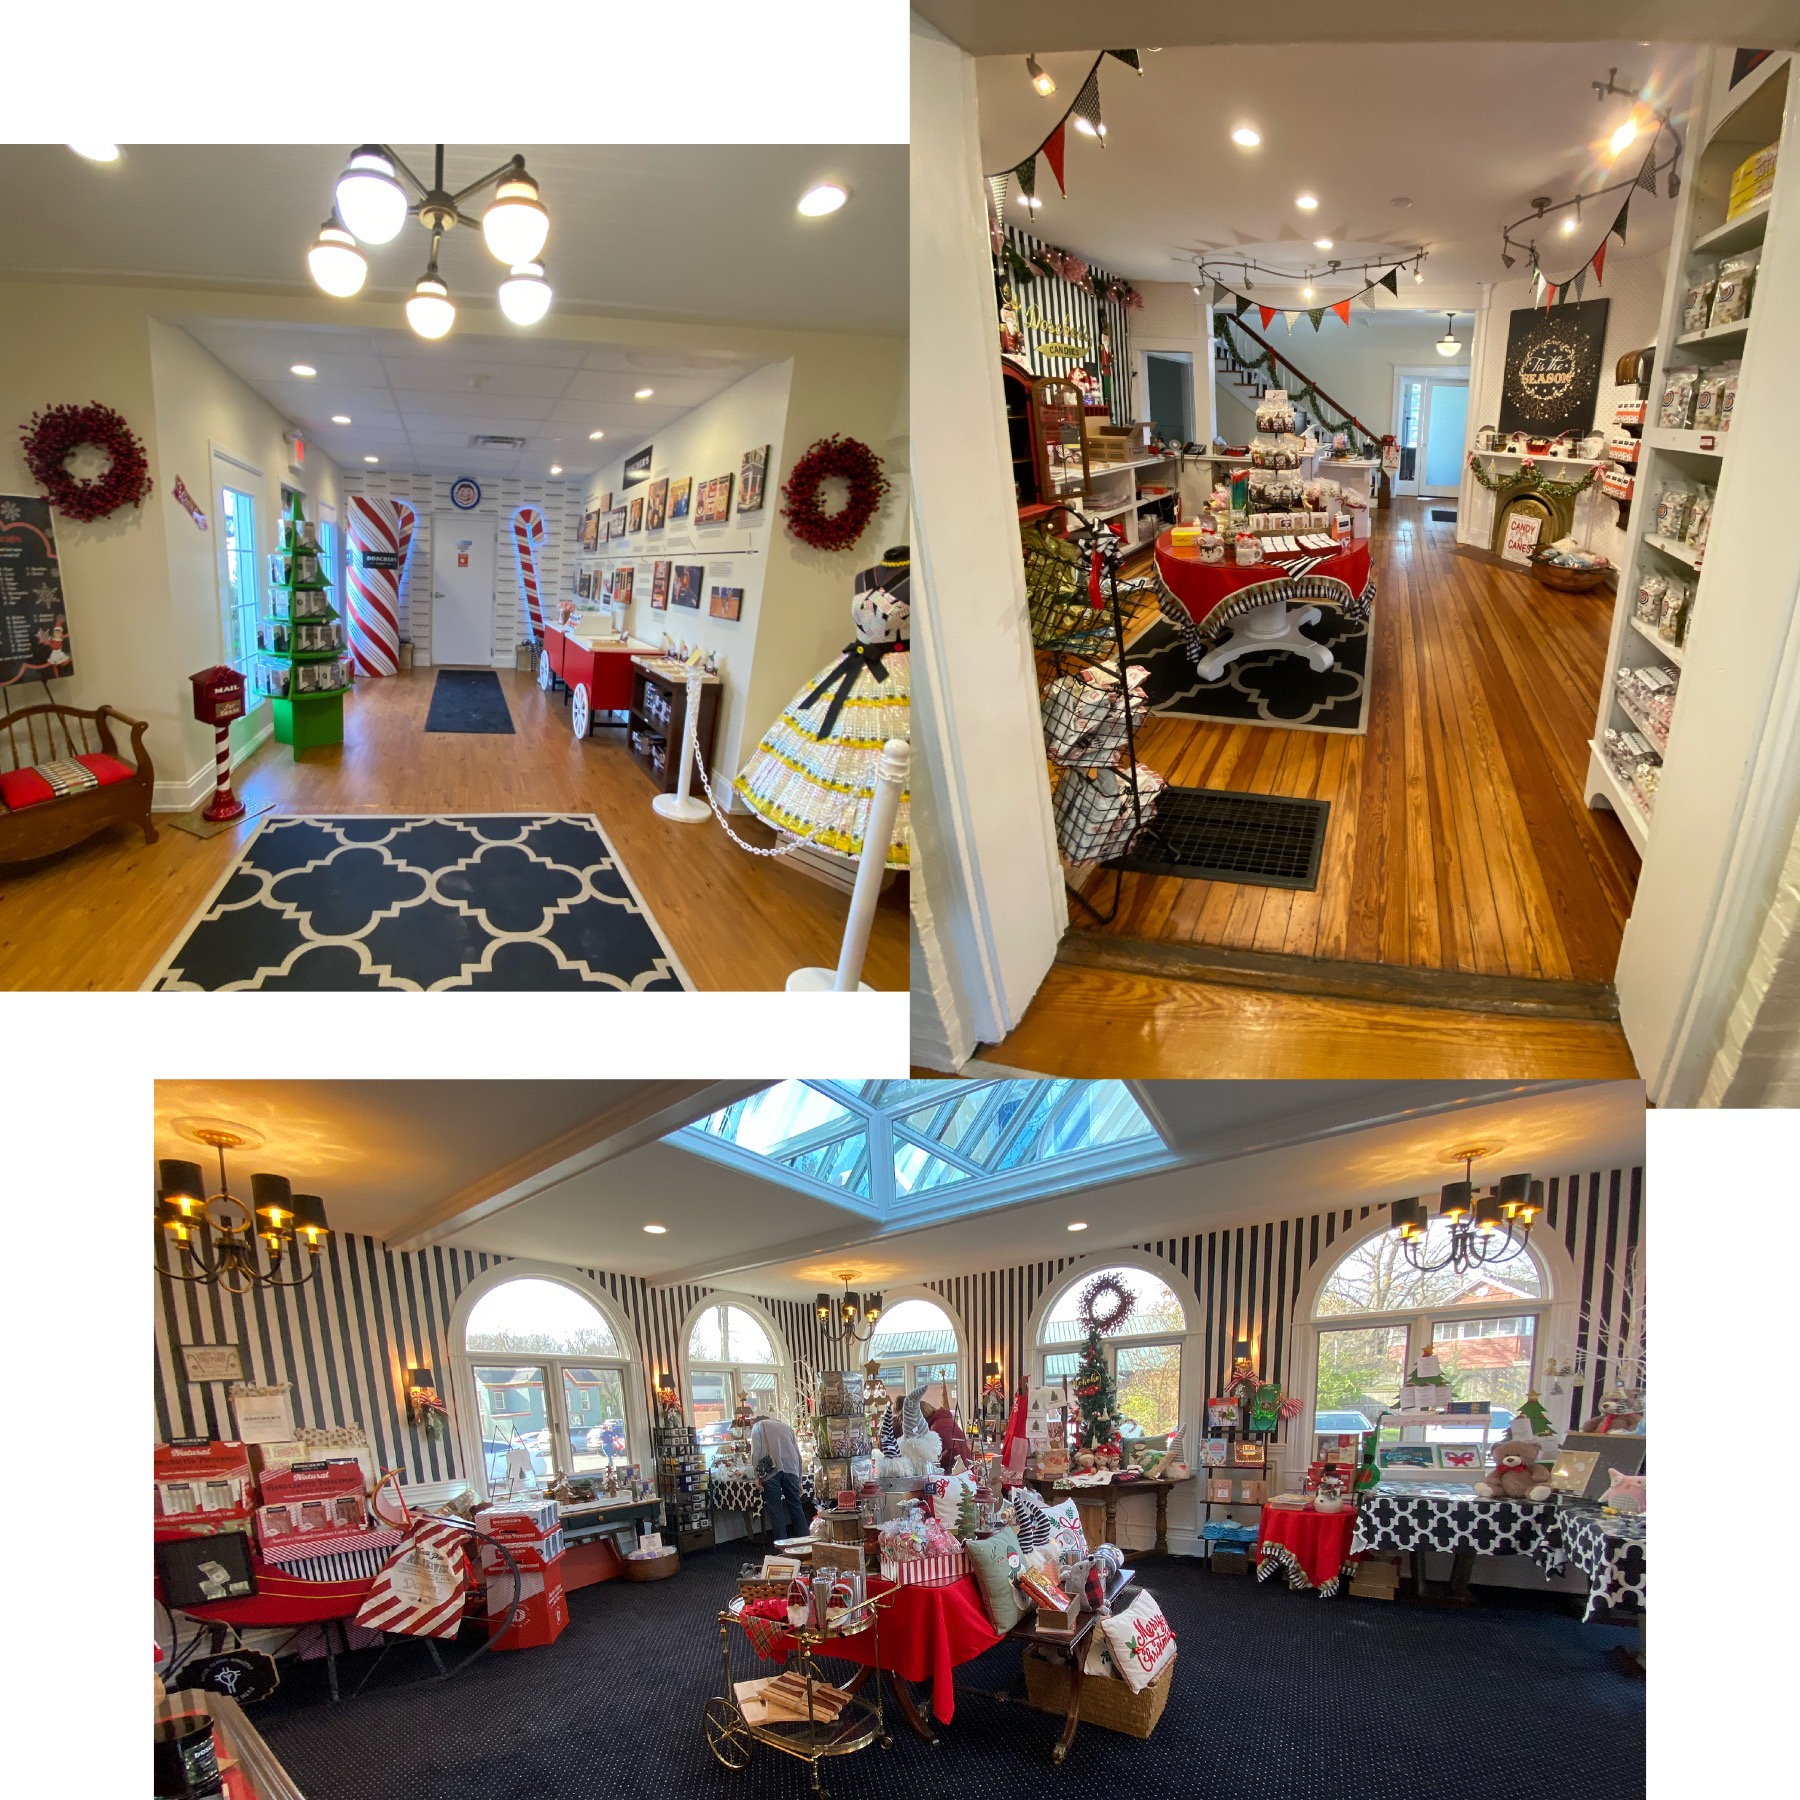
We went on the boys’ next day off of school and got there right when it opened, but it was a lot busier in the store than I thought it would be on a Wednesday morning. Of course, it was the day before Thanksgiving. The store is currently in a cute antique home and has its own large parking lot.

Click to Enlarge

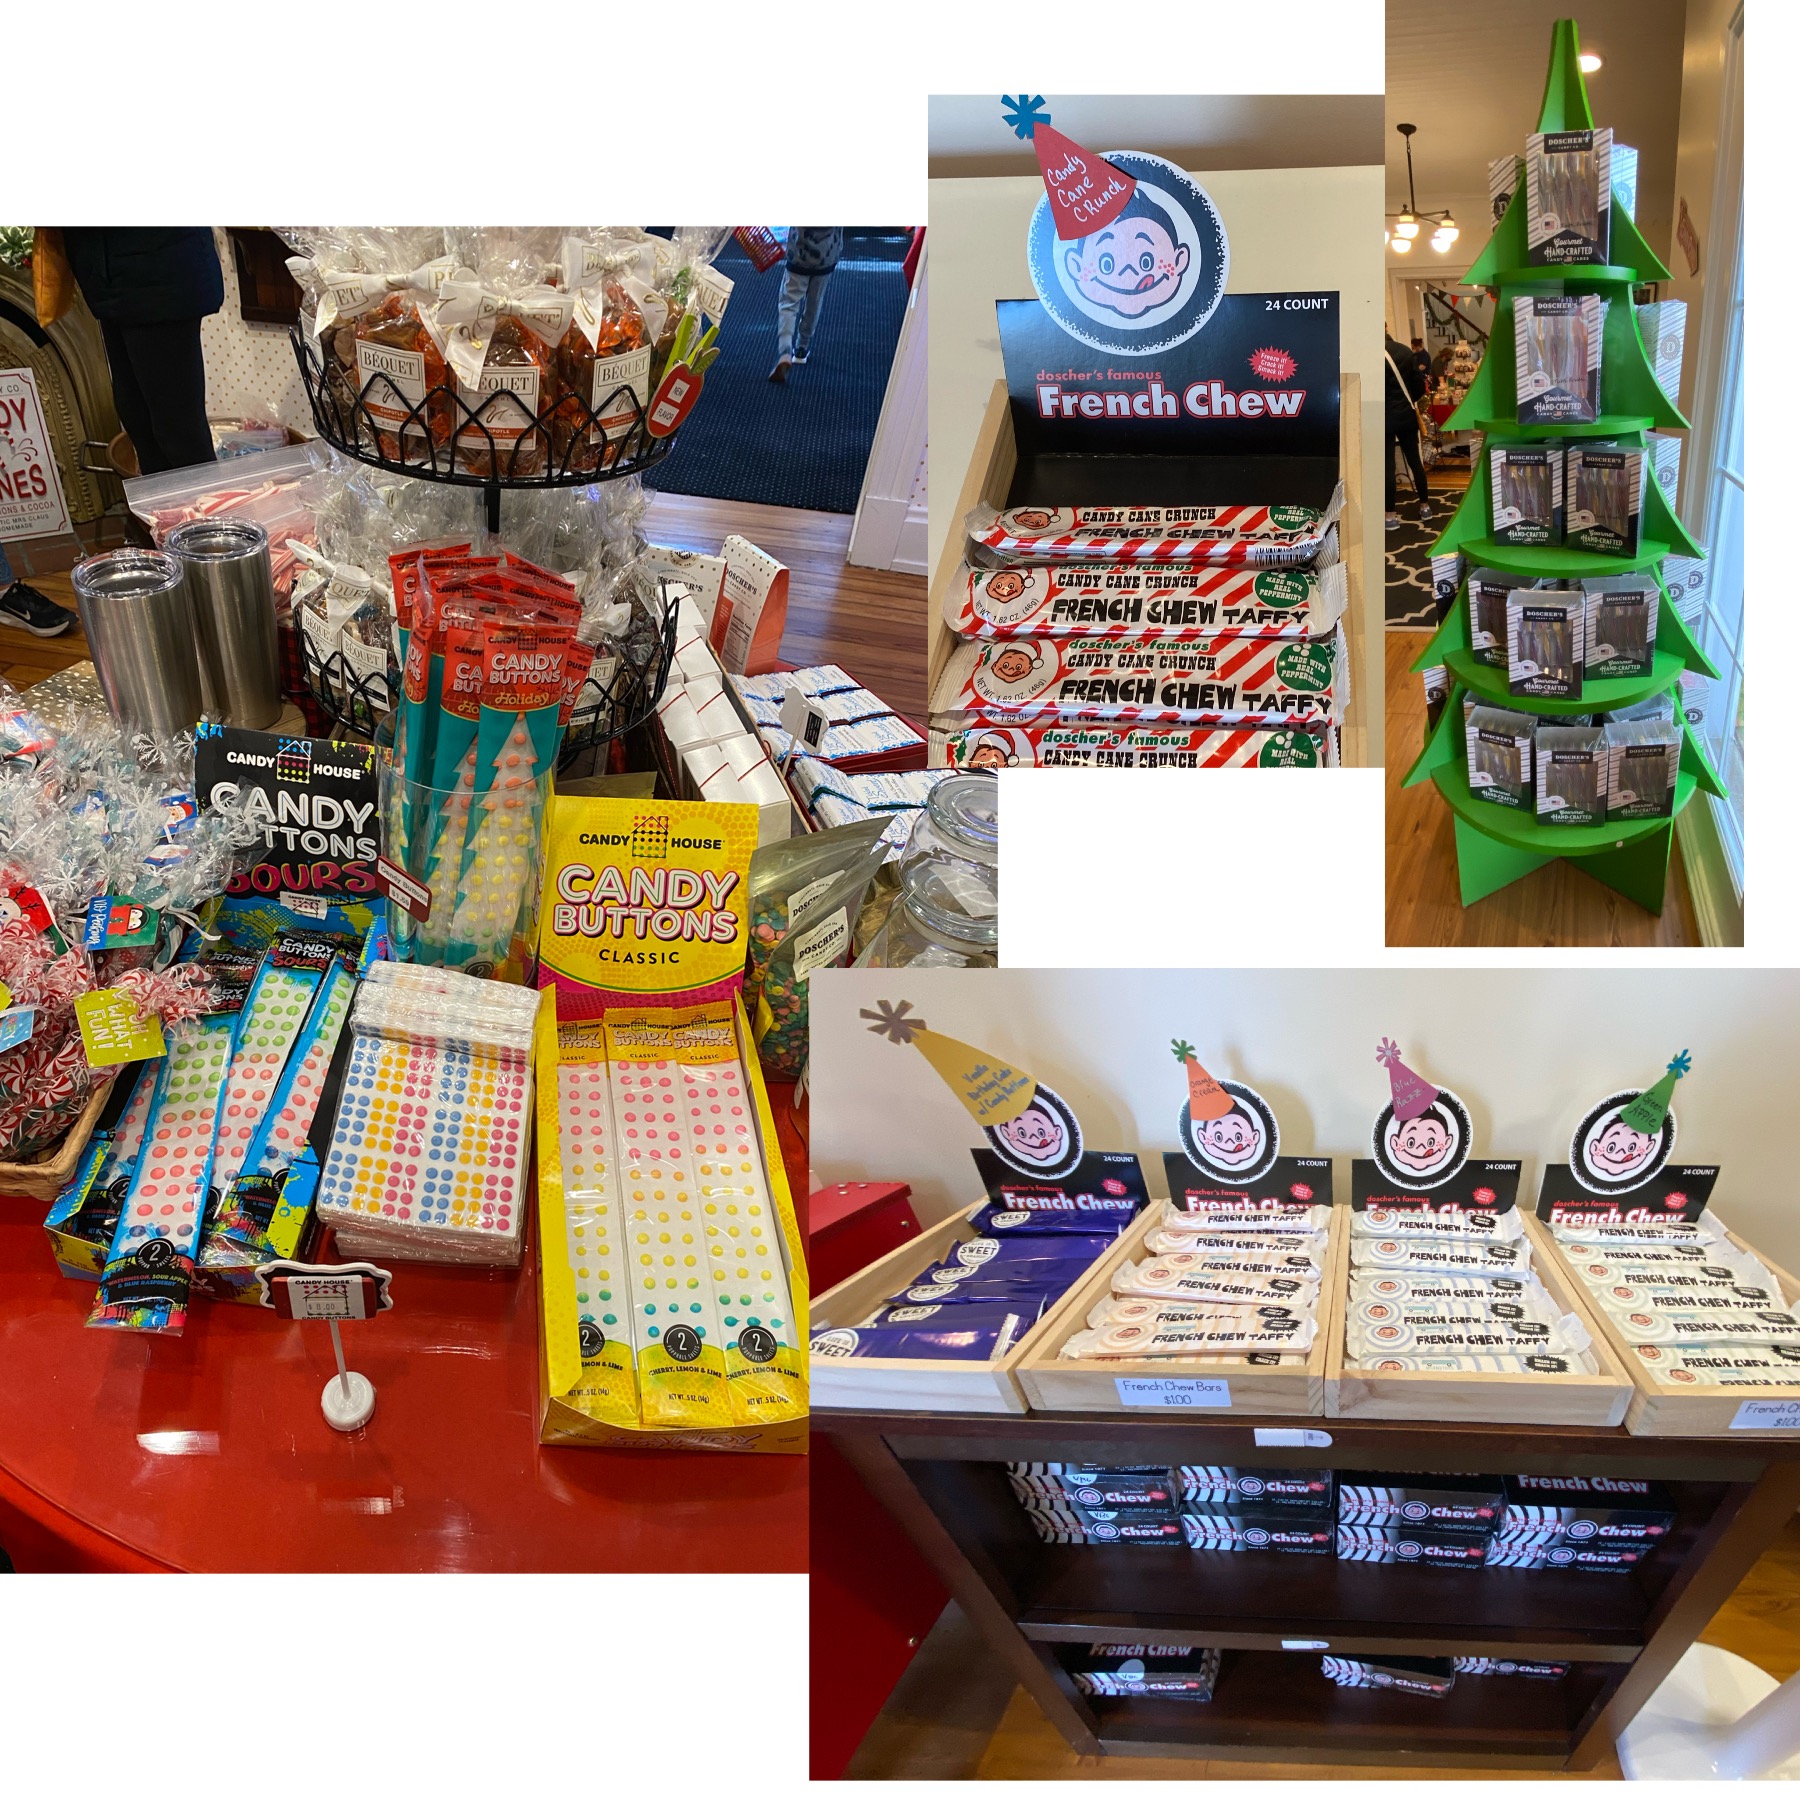
I loved the interior of the store. It was set up incredibly well, and everything looked so appealing. We saw many different types of candy canes, including dye-free. The boys were there for one thing, and one thing only: French Chews. Normally we only see the vanilla, strawberry, and chocolate French Chews at the grocery store. However, Doscher’s store had so many different kinds including were several new, holiday, and limited edition flavors (candy cane crunch, birthday cake, green apple, blue razz, orange cream).

Click to Enlarge

We had a lot of fun exploring the space and picking out some candy. The gift shop also offered non-candy gifts including candles, books, seasonal gifts, and locally sourced items. I may have went a little overboard, but how could I resist the cute mini-French Chews and all the different flavors? St. Nick picked out some candy canes for the stockings as well.

Click to Enlarge

If you are in the Cincinnati area, I would check out Doscher’s! Of course, it’s fun to look and find candy all year long, but St. Nick’s Day and Christmas are coming up as well (wink, wink).

HISTORY:

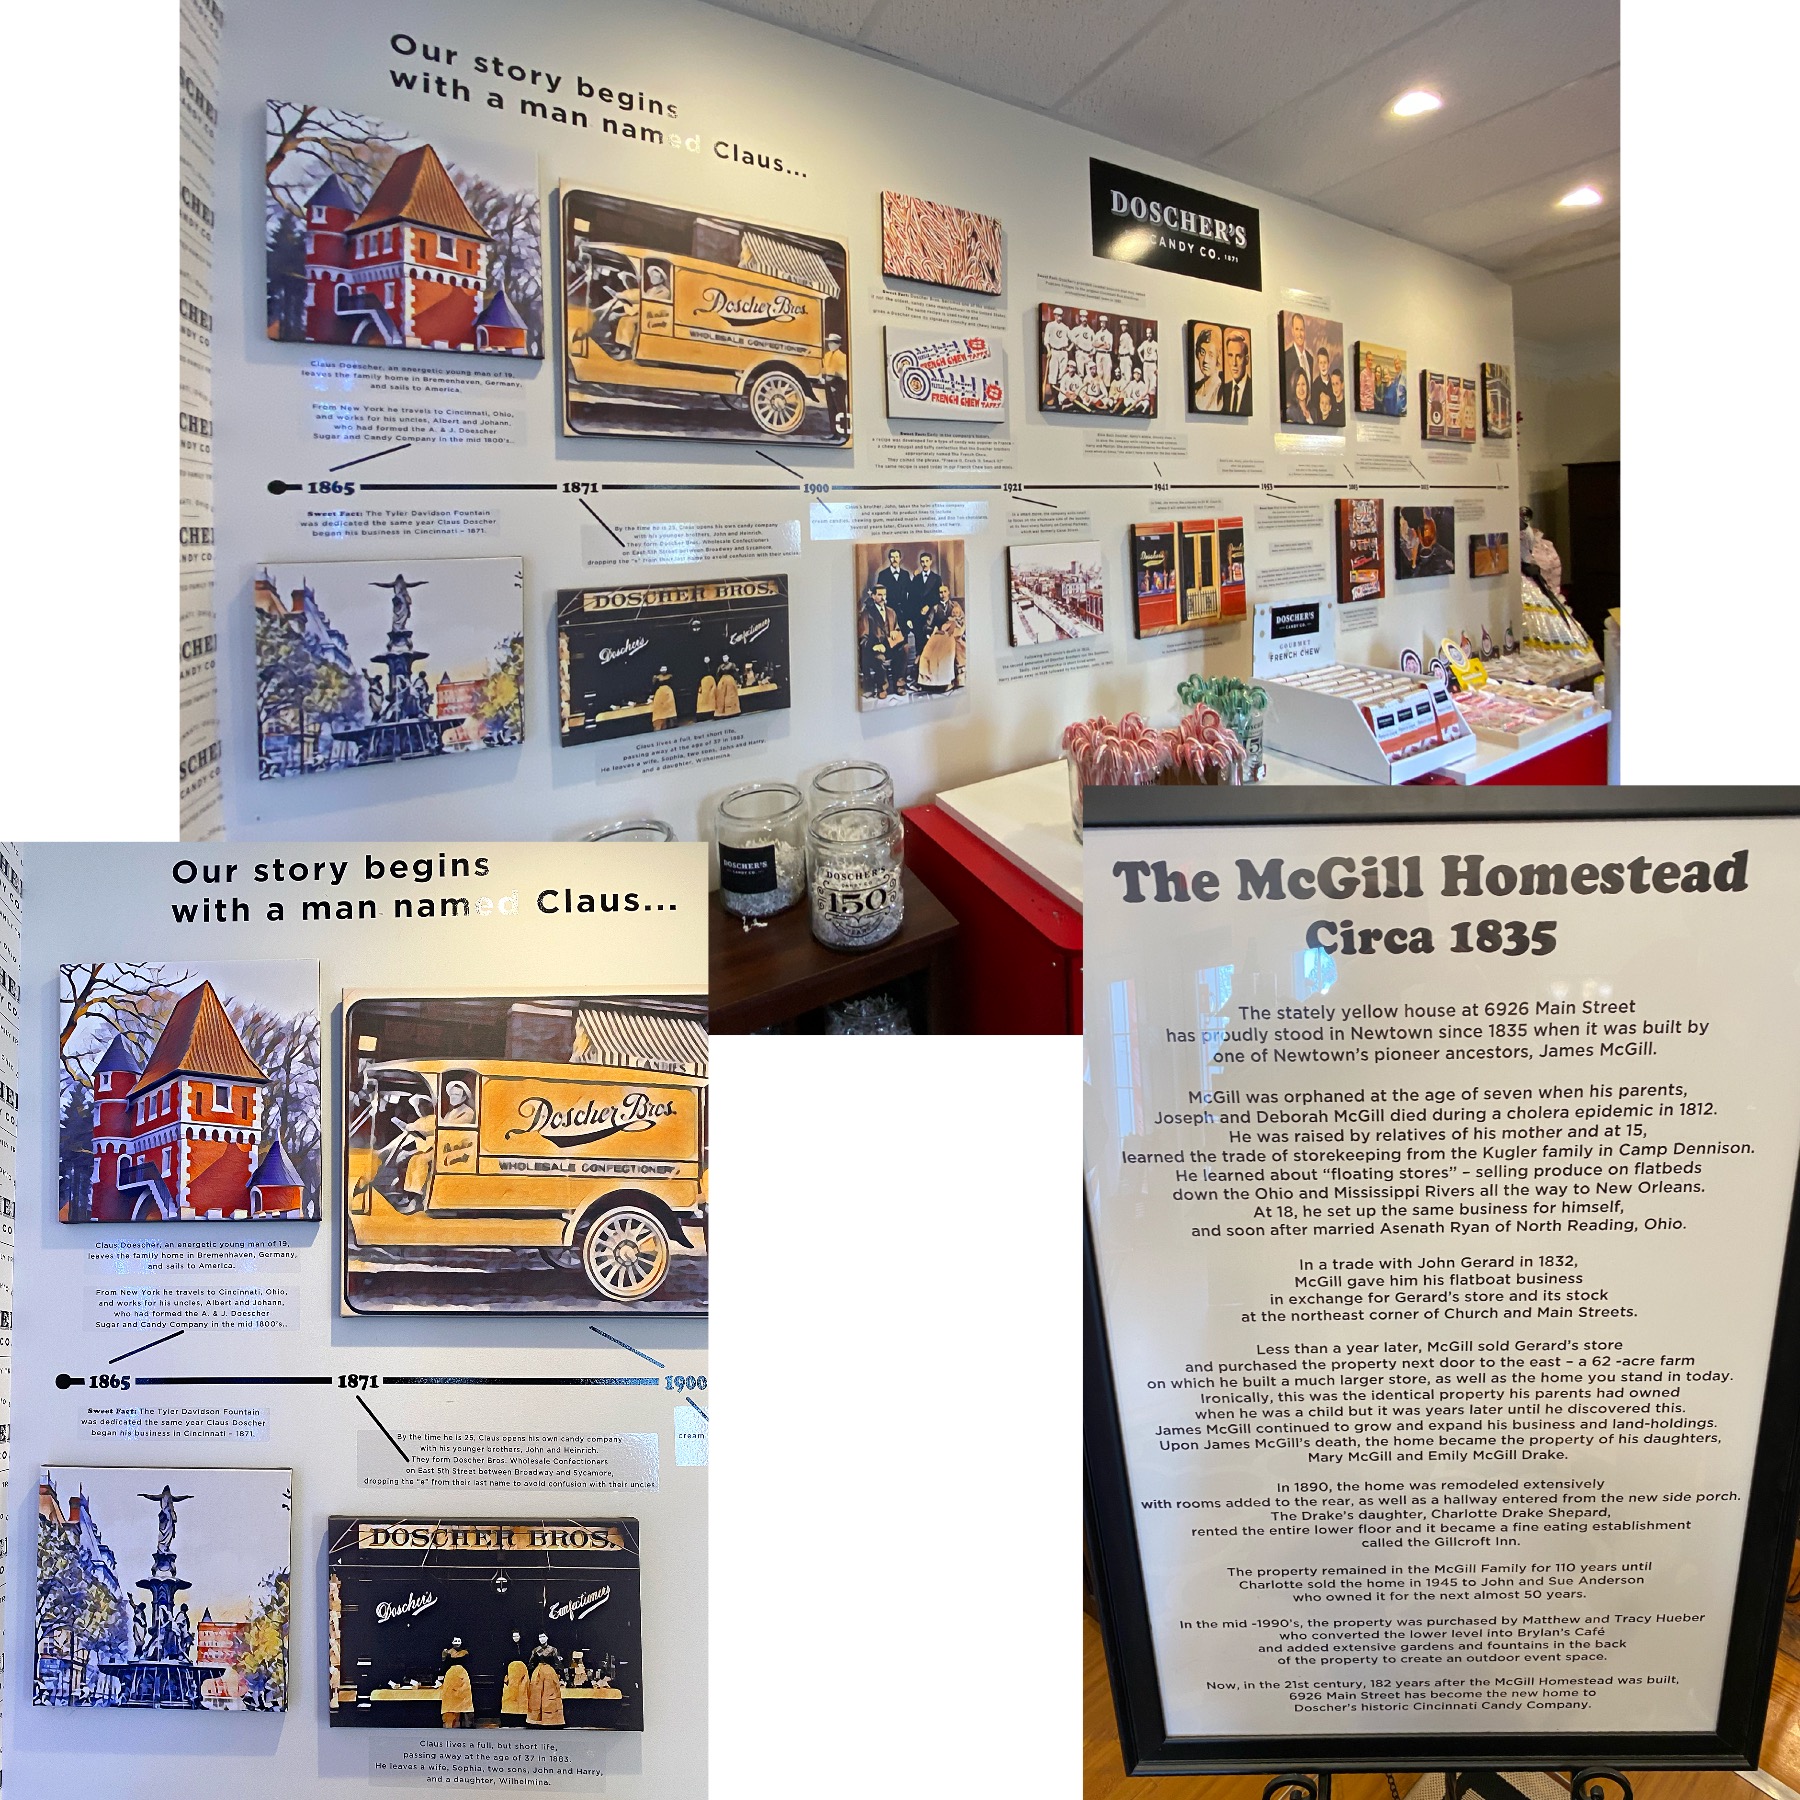
Doscher’s is the oldest candy cane maker in the US. The company began in 1871 making candy canes. They currently make candy canes, Candy Buttons, French Chews, and caramels. The location we were at makes the candy canes, candy buttons, and French Chews. They still make the candy canes by hand! The caramels are made in Bozeman, Montana by a store they own.

Click to Enlarge
Our haul

How do you like to eat your French Chews? I like mine nice and soft, whereas Nick likes to freeze and then crack his into pieces.

DETAILS:

  • WHERE: 6926 Main Street, Cincinnati, OH 45244
  • HOURS: Tuesday to Friday, 11:00 am to 5:00 pm
  • PARKING: Yes
  • NOTE: Currently, they are not offering factory tours. If they open the tours back up, I would love to go.

SIMILAR POSTS:

Posted in: Christmas, Frequently Asked Questions

Practical Christmas Gift Ideas for RVers

It’s day two of RV gift recommendations! If you need to buy presents for a RV enthusiast these are sure to please.

RV/SET UP:

  • LevelMatePro* While some of the newer (and nicer) Class A and C’s have auto-leveling, ours does not. It does have an electric jack and stabilizers, but you still have to level it. Instead of taking a level and doing it the old fashioned way, LevelMatePro was recommended and we love it. It mounts in your rig and uses your phone to show how level you are from left to right and front to back. I would recommend this product especially for those that are in travel trailers or have an older rig. Unless you are parking on a perfectly level concrete pad, it is super useful on travel days. (Cost: $145)
  • WeBoost* This helps boost all signals in the area, so we use it for our cell phone hotspots and the independent hotspot. There are a few different types of the WeBoost (home, car, RV, etc.) to meet your needs. We have seen a little bit of a difference in the signals. When you work/school from home, it’s important to have good internet signal. (Cost: $400)
  • Leveling Blocks*. These are like giant Legos used to help level the RV. We use these for the stabilizers, the jack, and to level the RV. We’ve even add them under the steps when there is too big of a gap. (Cost: $30 – we bought 3 sets)
  • Viair Compressor*. As the name implies, this is an air compressor! This guy does a great job with the RV and truck tires that require higher pressures. The real win is the compressor connects directly to the travel trailer battery to run and has plenty of accessories to allow a reach to all of the tires without too much relocation. (Cost: $300)
  • Back Up Camera*. This is a great gift for new RV owners. This made backing into spots and even seeing the cars around us on the highway so much easier! (Please make sure this will work with their RV.)
  • TPMS System. This is another gift that is very practical, but really useful. It helped save us from a tire blow-out on the highway.
  • Telescoping Ladder*. Great for working on the outside of the RV.

KITCHEN/BAKING/COOKING:

  • Blackstone grill*. We do not have one of these, but people rave about them!
  • InstantPot*. We used our InstantPot a lot for cooking meals. The oven took awhile to cook larger items (and used propane, so when there were propane shortages, we used the InstantPot for food and the propane for heat/water.)
  • Baking Pan*. My normal baking pans would not fit in the smaller oven and I found a Quarter Sheet Pan that works really well in the RV sized oven. I still use it for roasting veggies in the full sized house oven.
  • Hamilton or George Foreman Grills

INDOOR:

  • Air purifier*. This is great if you have allergies. As we have traveled the country we have each discovered new pollen and molds to be allergic to. Luckily I had this air purifier at home before we left. It may be a little big for RV life. It does work really well though! (Cost: $85)
  • Blackout curtains. Great for keeping the sun out for sleeping, heat out on hot days, and the cold from sneaking in on cold days. (Link to post on hanging our curtains.) (Cost: $25 each – we bought 4 sets for our 11 windows)
  • Dehumidifier. We have been in locations with unusual heat waves and deserts lately. There have been a few times (mostly in the beginning of the trip) where the humidity in the RV has gotten high, even with the A/C and the bathroom fan on. The one thing we have read a lot about, is that RV’s can grown mold somewhat easily. We try to keep the humidity at a normal level. I have used this humidity/temperature sensor* for years, and it does pretty well. We brought it with us on the trip. We ended up buying a small dehumidifier* to help with the humidity in the RV. (Cost: Dehumidifier $45, sensor $17)
  • Fire extinguisher*. Most new RVs come with a fire extinguisher by the front door (kitchen area). We have one in the outdoor kitchen and one in our bedroom as well. You just can’t be too safe. (Cost: $30)
  • First aid kit*. My mom made ours for us before we left. She combined many of our existing kits and confirmed everything was in date. This is a great gift if you have the energy and time to DIY. She did a great job of getting most of what we needed, but still kept it to a reasonable size. We used an art container with internal dividers. It slides nicely between the bed and the wall. We have already had to restock the bandaids from multiple falls from bikes on gravel. If you don’t have the time or inclination to make a first aid kit, this looks like a thorough one that should fit most situations. (Cost: $30)
  • Berkey water filter*. Great for those places with iffy water.
  • Flashlights. We had small flashlights in every room. When we went hiking, we packed a headlamp and a hand held light. These also come in handy when you realize the grey or black tank are full and have to be emptied at night.
  • Happy Camper. We really liked this black tank treatment. It worked a lot better than the drop in tablets.

CLOTHES/SHOES:

  • Crocs. Great for running over to the pool, the showers, or to empty the tanks.
  • Thermals/base layers
  • Hats
  • Hiking boots

ACTIVITIES:

  • Waterproof bag/purse*. I brought this to hike in the Narrows and when we went on to the beach.
  • Gimbal*. Helps take the shaking and sudden movements out of videos.
  • Tripod
  • Hiking sticks/poles
  • Reusable water bottles (for hiking, etc.)

MEMBERSHIPS & APPS:

  • Costco membership. Although we don’t buy quite as much as we used to (just don’t have the room for it), we still love our Costco membership. We love the organic ground beef and chicken, as well as the frequently changing inventory. It’s fun to discover what each Costco has. Many of them carry different things. For example: Ohio doesn’t sell liquor; New Orleans sold Ben’s favorite “souvenir” (a collapsible tote); California sold boogie boards; Many have specific city/sports team gear. Gas prices are usually pretty good as well, but we’ve only come across a couple that carry diesel. Plus, it’s hard to beat their hotdog/soda ($1.50 special) and pizza ($9.95 for a very large pie) prices! (Cost: $60 for Basic; We upgraded years ago to the Executive for $120 because we spend enough that the 2% cash back just makes sense for us.)
  • RVLife. This app allows you to input your RV height/weight/width to help navigate on road trips. It helped us avoid low bridges and other roads were we would not have fit.
  • If you are traveling full-time, a campground membership may be helpful. Thousand Trails, KOA, etc.

Hope these suggestions make your holiday shopping a little easier! If we missed any RV essentials, please remind us in the comments. Happy holidays!

NOTE: The costs listed are what we paid and may have changed. Please use these as estimated prices and check for yourself as you may be able to get better pricing.

*Affiliate Link. If you buy an item from Amazon using my links, I may receive a small commission for the referral. It does not affect your cost at all! If you want more information, please visit the Disclosure page.

Posted in: Christmas, Frequently Asked Questions

Fun Christmas Gifts For RVers

We’re going to start off our RV gift buying lists with the fun items! Check back tomorrow for the more useful and practical gift ideas.

OUTDOOR FUN:

  • Solar Decorations*. I bought these on a whim, when we were at a super dark campground and we ended up loving them. We got the solar powered coloring changing balls and would hang them on the awning arm. It made it nice to find the RV in the dark and added some ambience when sitting by the campfire. (Cost: $17)
  • Propane Fire Pit. We just got this and have only used it twice. It had great reviews, rather light weight, small enough, and runs on propane. There are separate things you can buy for it, including a rack to cook on top of. We were looking for a wood alternative (although Ben loves a wood fire), since most of the places in the West have had a wood fire ban. NOTE: These can go out of stock quickly. Call the store directly to see if they have it in stock and can hold it for you. (Calling helps because the online inventory does not update as quickly as you may need it to.) (Cost: $150)
  • America The Beautiful National Park Pass. This was one of the best gifts we received. It allowed us to see so many of the National Parks along our trip. This is such a good deal if you are planning on seeing a few parks in a year. (Cost: $80)
  • Hammock Chairs*. These are foldable like camping chairs, but give you more of a reclining, hammock feel.
  • Hammock*. For when you want an actual hammock. These go up quickly and store in a small bag. We got these for the kids last year for Christmas and they loved them. (Cost: $23)
  • Football or basketball. Most campgrounds will have either an open area to throw a ball or Frisbee or a basketball hoop.
  • Kayak: there are so many options now including the standard, inflatable, and foldable.
  • Extendable roasting sticks (hot hot dogs and marshmallows)
  • Electric bike. We bought a folding electric bike at Costco and it worked fine for us. There are ones that have the larger tires and are more of a mountain bike* that people seem to love!
  • Propane pizza oven. These look so fun! We don’t have one, and it may be impractical for trips, but it looks fun.
  • Christmas tree. Of course, this would be needed to give ahead (maybe as a St. Nick’s Day gift!). We bought a felt tree to hang on the wall for Christmas. It came with Velcro ornaments. Ben cut little slits in the tree and we added battery operated lights. There are also small artificial tabletop sized trees.

GAMES:

  • Nintendo Switch*. What?! Electronics for camping? If you are traveling full time in a RV, you quickly find that there are some days where no one wants to go explore outside or it’s raining. We had the Switch before we left and brought it with us. It is small, which is great in an area where space is limited. We even hooked it up to the large TV and played family game nights on it. Since it is small and portable, it also came with us in the truck on long move days.
  • Furglars*. We absolutely love this board game. It is great in the RV (it’s small) or in a house. We play it a lot; it’s a fun and quick game.
  • Roadtrip themed games like Radical Road Trip or Road Trip Board Game.
  • Roku stick*. The TV in our RV was a smart TV, but did not have the Roku app. We bought a Roku Stick so that we could access Amazon Video and Netflix.
  • Christmas RV themed books, like Ben’s Twas The Night Before Christmas: Campground Edition.

INDOOR:

  • LED Coloring Changing Light Strips*. We had a strip of these LED lights in the living room. It was nice to be able to change the color of the lights for the different holidays!
  • RV Shaped Planter. We found one at a local grocery store during our travels. I loved having a small enough plant/planter that I could pack it in the sink for travel days. There are several different kinds available on Etsy and Amazon.
  • US Sticker Map. We took turns placing the stickers on our map. We now have it hanging on our living room to remind us of all the places we have been.

APPS:

  • All Trails. There is a free version, but the Pro/paid for version allows you to download the maps which is really useful in areas of low to no cell service.

Hope these suggestions make your holiday shopping a little easier! If we missed any RV essentials, please remind us in the comments. Happy holidays!

*Post Contains Amazon Affiliate Links. If you buy an item from Amazon using my links, I may receive a small commission for the referral. It does not affect your cost at all! If you want more information, please visit the Disclosure page.

Posted in: Newbie Tips, YouTube Video Link

Buying A New Car Online: Our Carvana Experience

We bought Ben a car a few weeks after we got back to Ohio. Between school starting soon (with no busing) and him having to go physically into work, we needed two cars. I drove the truck as my vehicle. However, with diesel prices high and the truck not having the greatest fuel mileage for short distances/city driving, we decided to sell it. We were on the lookout for larger sized car that we could still take road trips in comfortably. We were leaning towards an SUV and narrowed it down between a Jeep Grand Cherokee and a Subaru Ascent. We looked on Facebook, Autotrader, and Carvana for our new (to us) car. I am sure everyone has heard by now but used car prices are inflated and there is a chip shortage for new cars, so cars were going fast and for higher-than-normal used car prices. However, after spending over $200 in one month for diesel with just local driving, we wanted to get a more fuel efficient car.

CARVANA PURCHASING:

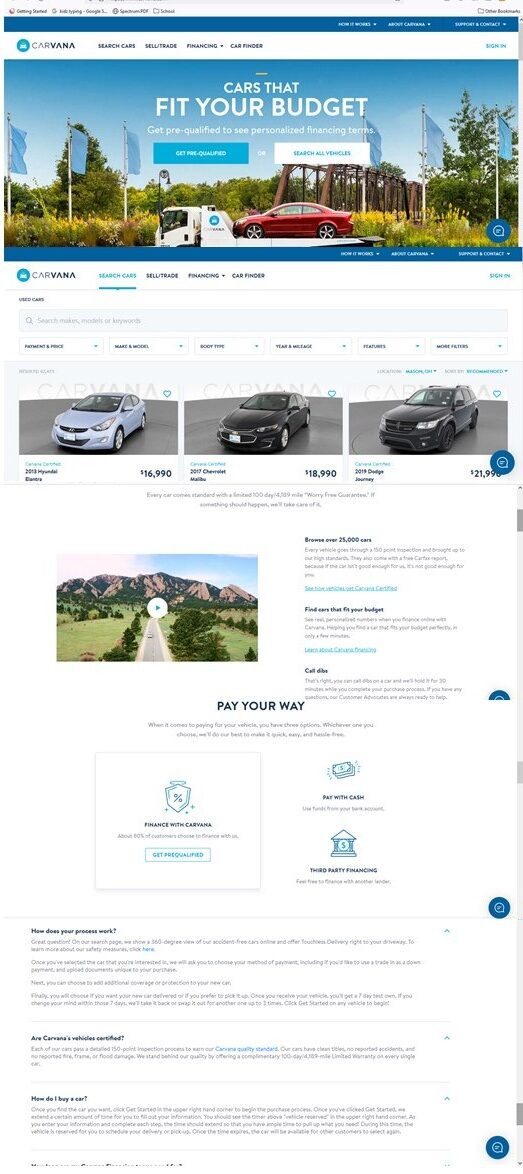
  • SEARCHING FOR YOUR CAR: We had never bought a car online, much less sight unseen. Carvana’s site allows you to search for your car by price, make/model, type, year/mileage, and features. Some cars have free delivery, while others have a delivery fee. There are several pictures of the cars, including any chips or “imperfections”. A detailed list of the car’s features and a Carfax report are provided as well. After searching for a while, we finally found a car that we both liked, a blue Subaru Ascent. There were a couple paint chips and a scratch listed, but they didn’t look too bad. We placed the order and were eagerly awaiting our delivery.
Click to Enlarge
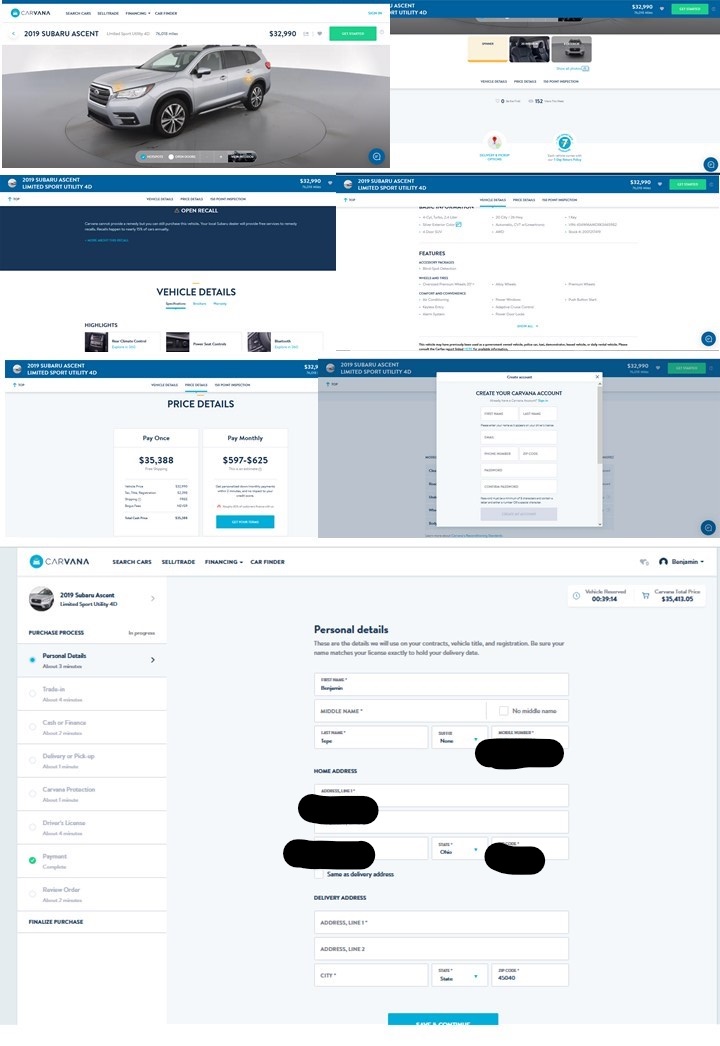
  • PURCHASING: After you find a car you like, you can then start the process of buying the car by clicking the green “Get Started” button. This will hold your car for 30 minutes while you complete the account registration, trade-in options, payment information (cash/Carvana financing/3rd party financing), delivery/pickup (date/time), driver’s license information, and optional items (gap insurance, etc.). After those steps are completed, there are a few more things that need to be done. If you pay with cash, your bank has to verify the funds either through a 3-way call between you/Carvana/bank, or thorough a third-party called PLAID. To use the third-party verification, you need to give them your account information, including password. We picked the 3-way call, as I was not comfortable giving someone my bank log-in information. Your bank funds will be verified, but will not be withdrawn until you accept delivery of the car. There were a few online forms to complete before delivery as well. Buying a car unseen was a little worrisome; however, there is a 7 day return period for a full refund with Carvana, if you decide not to keep the car.
Purchase Example: Click To Enlarge

DELIVERY:

The day of delivery, we received a phone call that they were finishing detailing the car and should be there by our appointment time. We had to send (via text) a selfie with our driver’s license, the back of the driver’s license, and proof that the car had been added to our insurance. Your insurance information has to say the name/VIN of the new car in order for them to release the car to you! Even though I had always been told that any car we bought was covered as long as our insurance was up to date, I called and let our insurance know to start it on the date of delivery. Because delivery was on a Saturday, my insurance agent also sent a confirmation letter in case there was a delay of any kind with the electronic card updating.

The car ended up being about a half hour late, but the driver did communicate delays through text message. It was fun to watch the car being unloaded. (VIDEO link here) Once the car was unloaded, we had the opportunity to take it for a test drive. We drove down a few exits on the highway and then stopped in a parking lot to look it over. There were a few more paint chips than were disclosed on the listing, as well as scratches to the interior roof material (which were not disclosed at all). The car drove really well and was comfortable, so we decided to accept delivery. The car came with 1 key fob and a Carvana key chain.

Just like buying a car at a dealer, there was some paperwork involved but there were only a few forms that we had to sign. The car came with temporary tags and Carvana will mail you the permanent plates so you do not have to go to the DMV. I have to say, not dealing with a car salesman and the DMV was really nice. Once we accepted the delivery, we were also given the Temporary Tag application, a Limited Power of Attorney for Vehicle Registration, and an Application for Dealer Assessment that needed to be signed, notarized, and mailed back in the provided FedEx envelope. Our driver was not a notary and we had not been told ahead of time that we would need one to finish the car’s paperwork. We hurried over to my bank with 10 minutes to spare. Unfortunately, she would not notarize the paperwork. She claimed it was because she couldn’t notarize something that gave someone else power of attorney to take out a loan in our name. We read it carefully and the paperwork stated clearly that it was for the purpose of “applying for a certificate of title, to register, transfer title”, so I am not sure why the bank teller would not notarize it. We then rushed over to the UPS store near us that had a notary on staff. It only cost $5 for the notary service. I still would have liked to have known about needing a notary ahead of time. We probably would have moved the delivery time up so that we would have been able to contact the bank(s) and make sure they were available and could/would notarize it.

POST PURCHASE:

Because the car only came with one key fob, I wanted to buy another one so that we would each have one. Batteries Plus will cut and program car keys for you. When we stopped in to get a new key fob, it was going to be over $200 for the fob and programing if we bought the key through them. It was cheaper to buy the fob on eBay and then take it to Batteries Plus to program it. Some Ace Hardware stores will also program car keys. Your car does have to be present to program the new key fob. It was $85 for the key fob on ebay and $60 for Batteries Plus to cut/program it. (Check for coupons, Batteries Plus runs anywhere from $60-$70 for programming.)

The key fob that came with the car started dying after 3 days. It seems like the battery was just getting low, but it wasn’t something I would necessarily expect after only having the car for 3 days.

I did send some feedback to Carvana about the missed “imperfections”, the key fob, and the lack of knowledge about needing a notary. They were nice and gave back a standard “we’ll pass it on” message and told me we could always return the car if we were unhappy since our 7 day window was not over yet.

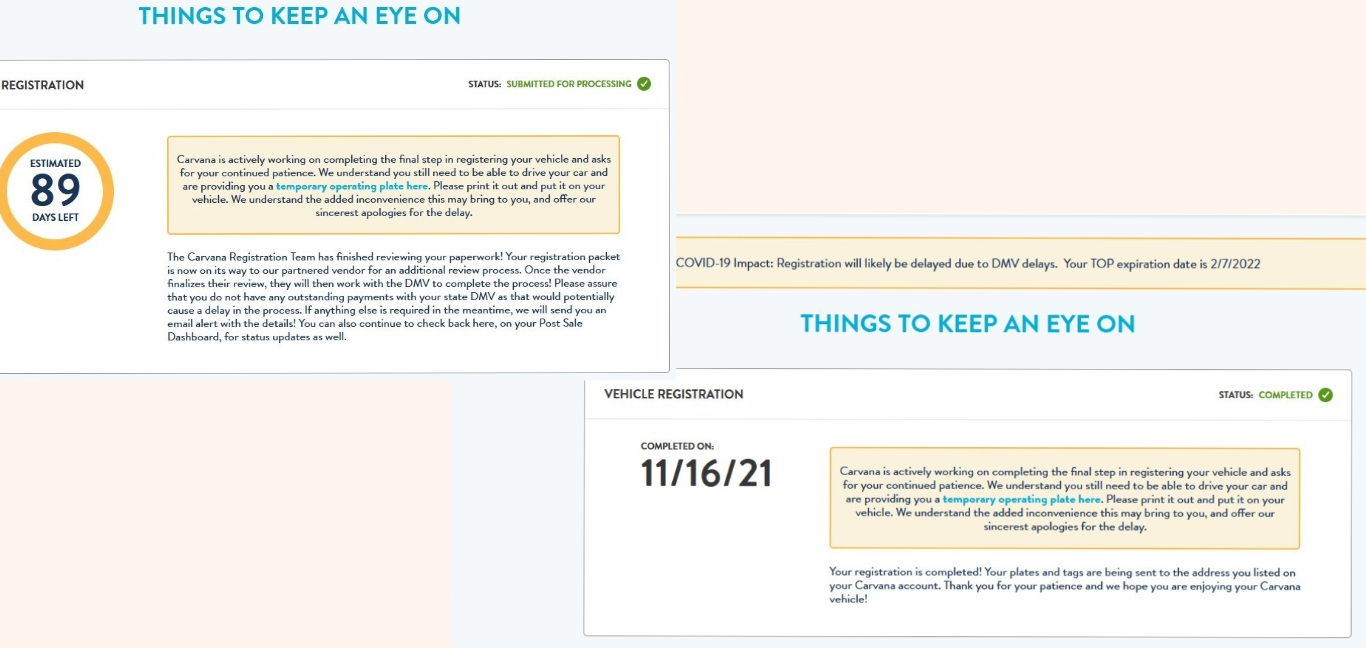
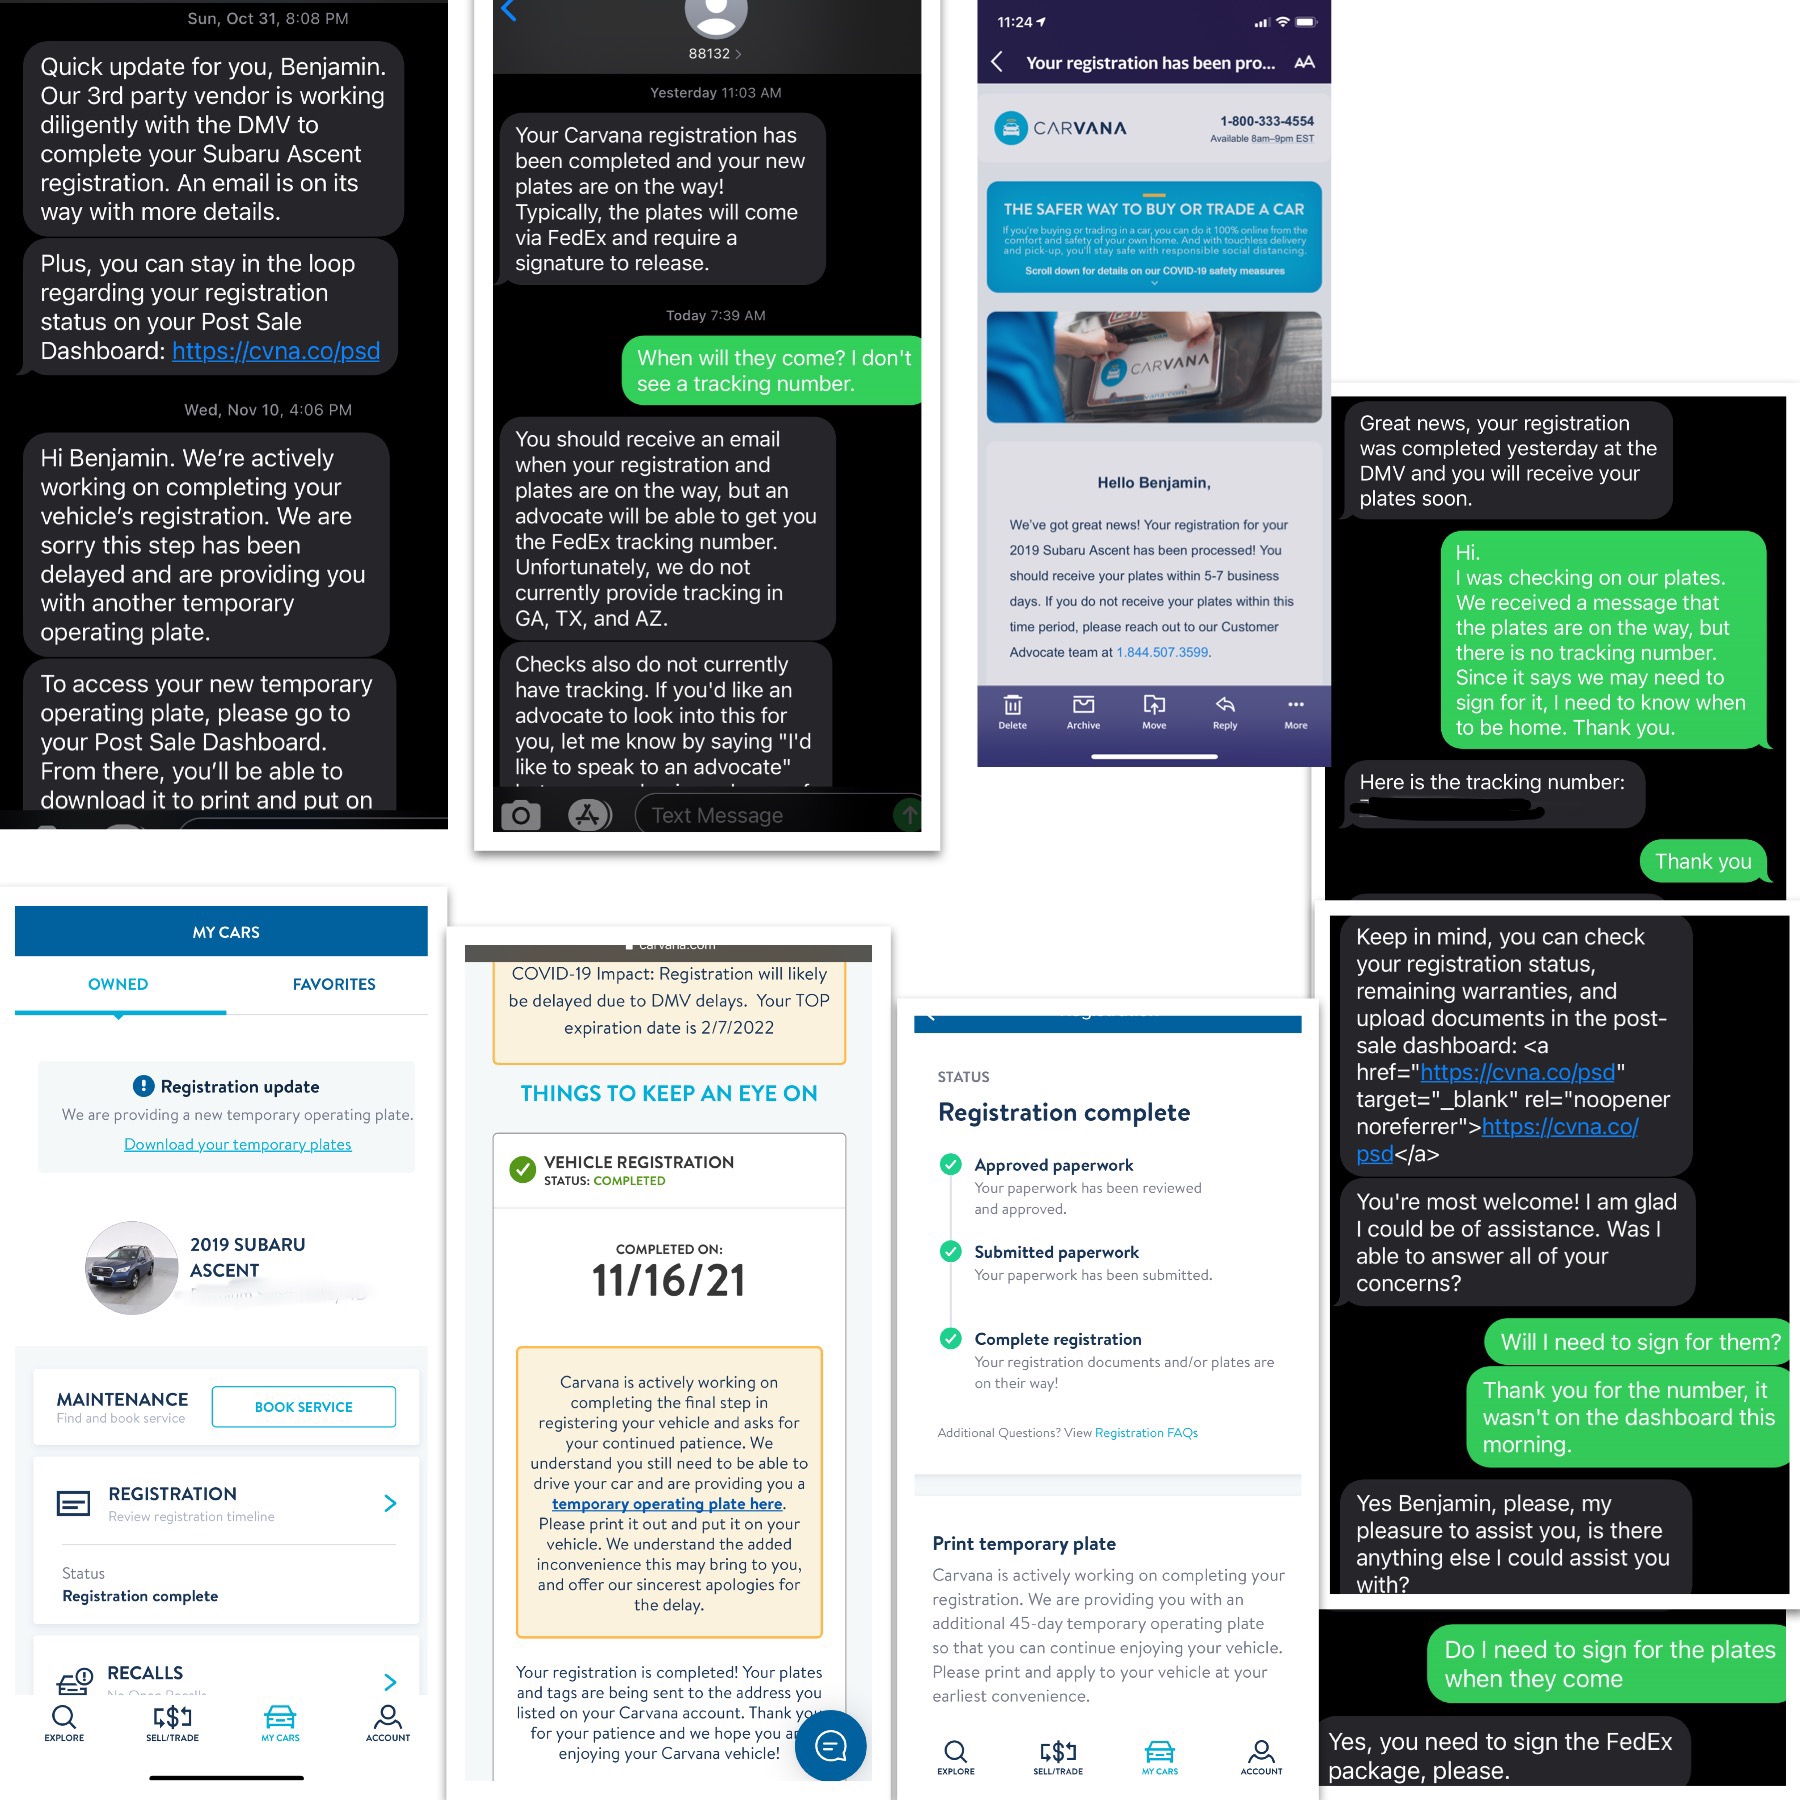
My temp tags were set to expire on 11/23/21. On 11/10, we got an email saying processing had been delayed and that new temp tags were available in my online Post Sale Dashboard. I had to print out the new tags, as they were active beginning 11/10/21 and were a different plate number. The reason given was “Covid”. It seems to be a reoccurring theme; as Ben likes to say, “Covid did it”. At this point, I could have made an appointment with our local DMV faster. On 11/16/21, I received a text saying that the registration was complete and the plates were on the way. It also stated that the plates required a signature from FedEx. I contacted Carvana on 11/17, as the app and online post-sale dashboard did not have a tracking number. I’m glad I contacted them, because they were due to arrive on 11/17. Although it stated I needed to sign for them, and I was home, FedEx just rang the doorbell and left the package on the porch.

Click To Enlarge

CARVANA, The Pluses:

  • No negotiating. The listed price is the price (plus any delivery fees/taxes, which are disclosed pretty clearly during the process). There is no sitting for hours negotiating over the price or if the floor mats are included. Not dealing with a car dealership was great.
  • Getting the car delivered on our time table. Granted, they ran late and we had to change a few things around, but it was still amazing to get it delivered right to us.
  • Not dealing with the DMV/BMV. No long lines for us! Carvana takes care of getting the permanent plates mailed to you.
  • Updates. We got several updates during the process via text messages (from online forms needing to be completed to the status of our plates).

CARVANA, The Negatives:

  • Lack of communication. Some things Carvana was great at with communication: the driver letting us know the schedule changes, online paperwork needing to be signed. However, not knowing that we would have to find and pay for a notary was a big miss in my mind. It would be simple enough to add that to the information given to you during the online buying/closing process. Not being provided a tracking number for the new plates would also be an easy fix. Although customer service told me it should be online, I could not find the tracking number in my account.
  • Accuracy. The car was in good shape, but there were more chips and scratches than advertised. The interior roof scratches are hard to miss if anyone had actually cared to look. We would have potentially looked at another Ascent, but this one was already here and we did need a car.
  • Third Party DMV/BMV delays.
Click To Enlarge
Back to Top
Click to Enlarge
Click to Enlarge
Click to Enlarge
Click to Enlarge
Click to Enlarge
Click to Enlarge
Click to Enlarge
Click to Enlarge
Click to Enlarge
Click to Enlarge
Click To Enlarge
Click To Enlarge
Click To Enlarge
Click To Enlarge

Click To Enlarge
Click To Enlarge

Click To Enlarge. WLW tower Corona Ball. It was believed to help the broadcast, but it did not. The holes are from lightening strikes.
Click To Enlarge
Click To Enlarge
Click To Enlarge
Click to Enlarge
Click to Enlarge

Click to Enlarge
Click to Enlarge
Click To Enlarge

Click To Enlarge